Общие сведения о запросах в power bi desktopquery overview in power bi desktop
Содержание:
- Работа с составными моделямиUse composite models
- Date Slicer
- Шаг 1. Получить данныеStep 1: Get data
- Скачивание Power BI Desktop напрямуюDownload Power BI Desktop directly
- Рабочие областиWorkspaces
- Agile HR Analytics
- Рекомендации и ограниченияLimitations and considerations
- Minimum requirements
- Создавать отчетыCreate reports
- Report gridlines and snap to grid (Preview)
- Тарифы
- Mixpanel
- Создание визуальных элементовCreate visuals
- Сохранение работыSaving your work
- Azure Data Lake Storage
- Line chart dot formatting options
- Advanced Trellis chart by xViz
- Очистка ресурсовClean up resources
- Дополнительная настройкаAdditional configuration
Работа с составными моделямиUse composite models
Составные модели дают возможность подключаться к различным типам источников данных при использовании Power BI Desktop или службы Power BI.With composite models, you can connect to different kinds of data sources when you use Power BI Desktop or the Power BI service. Эти подключения данных можно выполнять двумя способами:You can make those data connections in a couple of ways:
- путем импорта данных в Power BI (наиболее распространенный способ получения данных);By importing data to Power BI, which is the most common way to get data.
- путем подключения непосредственно к данным в исходном репозитории с помощью DirectQuery.By connecting directly to data in its original source repository by using DirectQuery. Дополнительные сведения о DirectQuery см. в статье Использование DirectQuery в Power BI.To learn more about DirectQuery, see Use DirectQuery in Power BI.
При использовании DirectQuery составные модели позволяют создать модель Power BI (например, одиночный PBIX-файл Power BI Desktop), предназначенную для выполнения одной или обеих следующих действий:When you use DirectQuery, composite models make it possible to create a Power BI model, such as a single .pbix Power BI Desktop file, that does either or both of the following actions:
- объединение данных из одного или нескольких источников DirectQuery;Combines data from one or more DirectQuery sources.
- объединение данных из источников DirectQuery и импортированных данных.Combines data from DirectQuery sources and import data.
Например, с помощью составных моделей можно построить модель, которая объединяет следующие типы данных:For example, by using composite models, you can build a model that combines the following types of data:
- данные о продажах из хранилища данных предприятия;Sales data from an enterprise data warehouse.
- данные о целевых продажах из базы данных SQL Server отделов предприятия;Sales-target data from a departmental SQL Server database.
- данные, импортированные из электронной таблицы.Data that’s imported from a spreadsheet.
Модель, которая объединяет данные из нескольких источников DirectQuery или объединяет DirectQuery с импортированными данными, называется составной моделью.A model that combines data from more than one DirectQuery source or that combines DirectQuery with import data is called a composite model.
Связи между таблицами можно создавать всегда, даже если эти таблицы берутся из разных источников.You can create relationships between tables as you always have, even when those tables come from different sources. Отношения между источниками создаются с кратностью «многие ко многим» независимо от фактической кратности.Any relationships that are cross-source are created with a cardinality of many-to-many, regardless of their actual cardinality. Их можно изменить на «один ко многим», «многие к одному» или «один к одному».You can change them to one-to-many, many-to-one, or one-to-one. В зависимости от того, какая кратность задается, связи между источниками имеют различное поведение.Whichever cardinality you set, cross-source relationships have different behavior. Функции выражений анализа данных (DAX) нельзя использовать для получения значений на стороне от стороны .You can’t use Data Analysis Expressions (DAX) functions to retrieve values on the side from the side. Кроме того, может быть заметно снижение производительности по сравнению со связями «многие ко многим» в одном и том же источнике.You may also see a performance impact versus many-to-many relationships within the same source.
Примечание
В контексте составных моделей все импортированные таблицы по сути представляют собой единый источник независимо от фактических базовых источников данных.Within the context of composite models, all imported tables are effectively a single source, regardless of the actual underlying data sources.
Date Slicer
Slicers are a great way for report authors to give their users a tool to quickly slice and dice the data they are seeing in a report. One of the top requests we’ve heard from customers is to more easily filter a report based on dates. In this release, we’re improving the existing slicer to do just that with a new slicer layout called date slicer.
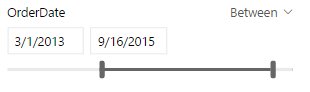
To add a date slicer is very simple. You use the standard slicer, and add a date field to it. When you do this, by default the slicer shows as a date slicer that lets you set the start and end date for your date. You can either use the sliders to set the dates or pick the date using a calendar.
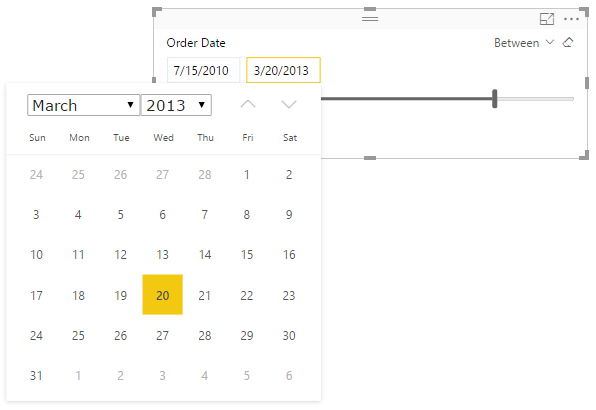
You can also change the mode to Before or After if you only need to control the last or first date used on your report page.
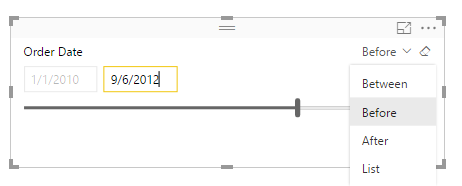
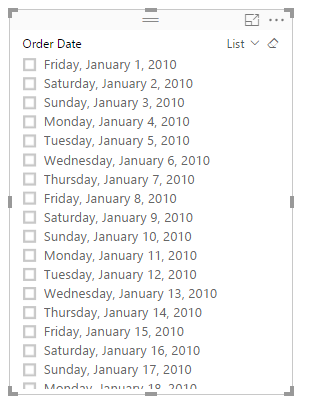
Or switch back to the standard List view.
More details about the data slicer in the following video:
Шаг 1. Получить данныеStep 1: Get data
Часто, когда требуется создать отчет Power BI, вы начинаете работу в Power BI Desktop.Often when you want to create a Power BI report, you start in Power BI Desktop. Power BI Desktop предлагает больше возможностей.Power BI Desktop offers more power. Перед разработкой отчета можно преобразовать, оформить и смоделировать данные.You can transform, shape, and model data, before you start designing report. На этот раз, однако, мы приступим к созданию отчета с нуля в службе Power BI.This time though, we’re going to start from scratch creating a report in the Power BI service.
В этом руководстве мы получаем данные из простого файла Microsoft Excel.In this tutorial, we get data from a simple Microsoft Excel file. Хотите попробовать?Want to follow along? Скачайте файл с примером финансовых данных.Download the Financial Sample file.
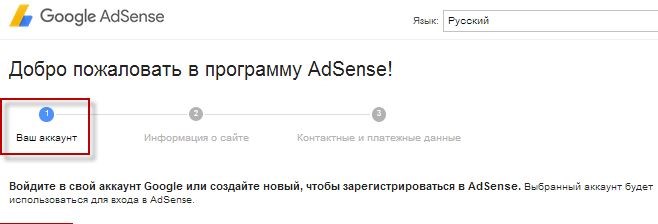
Сначала откройте службу Power BI в браузере (app.powerbi.com).To begin, open the Power BI service (app.powerbi.com) in your browser.
Нет учетной записи?Don’t have an account? Не волнуйтесь, вы можете зарегистрироваться в бесплатной пробной версии Power BI Pro.No worries, you can sign up for a free Power BI Pro trial
На панели навигации выберите Моя рабочая область.Select My workspace in the navigation pane.
В разделе Моя рабочая область выберите Создать > Отправить файл.In My workspace, select New > Upload a file.
Открывается страница Получить данные.The Get Data page opens.
В разделе Создание содержимого убедитесь в том, что выбран вариант Файлы, а затем выберите папку, в которой был сохранен файл Excel.Under the Create new content section, make sure Files is selected, then select the location where you saved the Excel file.
Перейдите к файлу на компьютере и выберите Открыть.Browse to the file on your computer, and choose Open.
В этом руководстве мы выбираем пункт меню Импорт, чтобы добавить набор данных из файла Excel. Этот набор данных затем будет использоваться для создания отчетов и панелей мониторинга.For this tutorial, we select Import to add the Excel file as a dataset, which we can then use to create reports and dashboards. Если выбрать Отправить, то в Power BI будет передана вся рабочая книга Excel, которую можно открыть и редактировать в Excel Online.If you select Upload, the entire Excel workbook is uploaded to Power BI, where you can open and edit it in Excel Online.
Когда набор данных будет готов, выберите Дополнительные параметры (…) рядом с набором данных «Пример финансовых данных», а затем щелкните Создать отчет.When your dataset is ready, select More options (…) next to your Financial Sample dataset, then select Create report.
Откроется редактор отчетов.open the report editor.
Холст отчетов пуст.The report canvas is blank. Справа находятся панели Фильтры, Визуализации и Поля.We see the Filters, Visualizations, and Fields panes on the right.
Совет
В левом верхнем углу экрана нажмите кнопку глобальной навигации, чтобы свернуть панель навигации.Select the global navigation button in the upper-left corner to collapse the navigation pane. Это позволит освободить больше места для холста.That way your canvas has more room.
В настоящее время вы находитесь в режиме правки.You’re currently in Editing view
Обратите внимание на пункт Представление чтения в строке меню.Notice the Reading view option in the menu bar.
В режиме правки вы можете создавать и изменять отчеты, так как вы являетесь владельцем и создателем отчета.While in Editing view, you can modify reports, because you’re the owner and creator of the report. При совместном использовании отчета с коллегами они зачастую могут взаимодействовать с ним только в режиме чтения.When you share your report with colleagues, often they can only interact with the report in Reading view
Они являются потребителями отчетов в разделе Моя рабочая область.They are consumers of reports in your My workspace.
Скачивание Power BI Desktop напрямуюDownload Power BI Desktop directly
Чтобы скачать исполняемый файл Power BI Desktop из Центра загрузки, на странице Центра загрузки нажмите кнопку Скачать.To download the Power BI Desktop executable from the Download Center, select Download from the Download Center page. Затем выберите 32- или 64-разрядный файл установки для скачивания.Then, specify a 32-bit or 64-bit installation file to download.
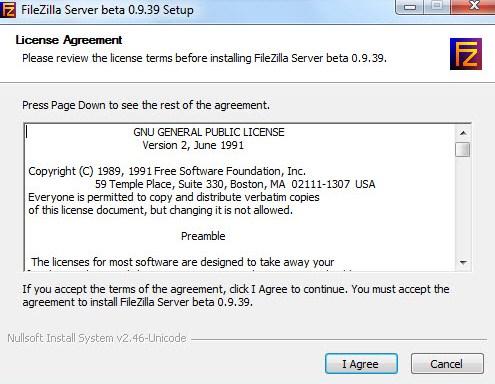
Установка Power BI Desktop после скачиванияInstall Power BI Desktop after downloading it
После скачивания файла установки появится запрос на его запуск.You’re prompted to run the installation file after you’ve finished downloading it.
Начиная с выпуска за июль 2019 г. Power BI Desktop поставляется в виде отдельного исполняемого пакета установки со всеми поддерживаемыми языками. Для 32- и 64-разрядной версии используются отдельные исполняемые файлы.Beginning with the July 2019 release, Power BI Desktop ships as a single .exe installation package that contains all supported languages, with a separate .exe file for the 32-bit and 64-bit versions. Поддержка пакетов MSI прекращена с выпуска за сентябрь 2019 г., требующего исполняемого EXE-файла для установки.The .msi packages are discontinued beginning with the September 2019 release, requiring the .exe executable for installation. Такой подход делает распространение, обновления и установку гораздо проще и удобнее (особенно для администраторов).This approach makes distribution, updates, and installation (especially for administrators) much easier and more convenient. Для настройки процесса установки можно также использовать параметры командной строки, как описано в разделе .You can also use command-line parameters to customize the installation process, as described in .
После запуска пакета установки Power BI Desktop устанавливается как приложение и запускается на компьютере.After you launch the installation package, Power BI Desktop installs as an application and runs on your desktop.
Примечание
Установка скачанной версии Power BI Desktop (пакет MSI, не рекомендуется) и версии из Microsoft Store на одном и том же компьютере (так называемая параллельная установка) не поддерживается.Installing the downloaded (MSI) version (deprecated), and the Microsoft Store version of Power BI Desktop on the same computer (sometimes referred to as a side-by-side installation) is not supported. Вручную удалите приложение Power BI Desktop, прежде чем скачивать его из Microsoft Store.Manually uninstall Power BI Desktop before you download it from the Microsoft Store.
Рабочие областиWorkspaces
Рабочие области создаются в емкостях.Workspaces are created on capacities. Рабочие области — это контейнеры для панелей мониторинга, отчетов, книг, наборов данных и потоков данных в Power BI.Essentially, they are containers for dashboards, reports, workbooks, datasets, and dataflows in Power BI.
Есть два типа рабочих областей: Моя рабочая область и рабочие области.There are two types of workspaces: My workspace and workspaces.
-
Моя рабочая область — это личная рабочая область любого пользователя Power BI, предназначенная для работы с собственным содержимым.My workspace is the personal workspace for any Power BI customer to work with your own content. Только у вас есть доступ к своему разделу «Моя рабочая область».Only you have access to your My workspace. Из этой области можно предоставлять доступ к панелям мониторинга и отчетам другим пользователям.You can share dashboards and reports from your My Workspace. Если нужно совместно работать над панелями мониторинга и отчетами или создать приложение, потребуется использовать рабочую область.If you want to collaborate on dashboards and reports, or create an app, then you want to work in a workspace.
-
Рабочие области применяются для совместной работы с коллегами и совместного использования содержимого.Workspaces are used to collaborate and share content with colleagues. В эти рабочие области можно добавить коллег для совместной работы над панелями мониторинга, отчетами, книгами и наборами данных.You can add colleagues to your workspaces and collaborate on dashboards, reports, workbooks, and datasets. За одним исключением все участники рабочей области должны иметь лицензии Power BI Pro.With one exception, all workspace members need Power BI Pro licenses. Узнайте больше о новых рабочих областях.Read more about the new workspaces.
Именно в них вы создаете, публикуете и администрируете приложения для организации.Workspaces are also the places where you create, publish, and manage apps for your organization. Рассматривайте рабочие области как промежуточные области и контейнеры для содержимого, с использованием которого будет создано приложение Power BI.Think of workspaces as staging areas and containers for the content that will make up a Power BI app. Что такое приложение?So what is an app? Это коллекция панелей мониторинга и отчетов, которые предоставляют пользователям Power BI ключевые метрики.It’s a collection of dashboards and reports built to deliver key metrics to the Power BI consumers in your organization. Приложения являются интерактивными, но пользователи не могут изменять их.Apps are interactive, but consumers can’t edit them. Пользователям приложения (коллегам, которым предоставлен доступ к приложениям) эти лицензии не требуются.App consumers, the colleagues who have access to the apps, don’t necessarily need Pro licenses.
Чтобы узнать больше об общем доступе, сначала прочитайте статью о предоставлении общего доступа к панелям мониторинга.To learn more about sharing in general, start with Ways to share dashboards your work.
Теперь перейдем к пяти основным компонентам Power BI.Now, on to the five Power BI building blocks.
Agile HR Analytics
Agile HR Analytics solution helps you discover useful HR insights for strategic decision making. Using these dashboards, you can see your organization’s HR data from different perspectives, drill through from summary level to individuals, monitor diversity metrics, analyze absenteeism, understand your staff turnover, see your training effectiveness and analyze your historical data and future trends. It also contains AI-enabled charts, such as Key Influencers, to show you the key factors that drive high performance explained by education, experience, and tenure.
You can connect it to your HR data using provided templates, contact us for API options, or you can get the PBIX file and connect it to your data.

Download the app from AppSource.
Рекомендации и ограниченияLimitations and considerations
В этом выпуске составные модели представляют несколько ограничений:This release of composite models presents a few limitations:
Сейчас добавочное обновление поддерживается только для составных моделей, подключающихся к источникам данных SQL, Oracle и Teradata.Currently, incremental refresh is supported for composite models connecting to SQL, Oracle, and Teradata data sources only.
Следующие многомерные источники Live Connect невозможно использовать с составными моделями:The following Live Connect multi-dimensional sources can’t be used with composite models:
- SAP HANASAP HANA
- SAP Business WarehouseSAP Business Warehouse
- Службы SQL Server Analysis ServicesSQL Server Analysis Services
- Наборы данных Power BIPower BI datasets
- Azure Analysis ServicesAzure Analysis Services
При подключении к этим многомерным источникам в режиме DirectQuery невозможно одновременно подключиться к другому источнику DirectQuery или сочетать его с импортированными данными.When you connect to these multi-dimensional sources by using DirectQuery, you can’t connect to another DirectQuery source or combine it with import data.
Существующие ограничения DirectQuery по-прежнему действуют при применении составных моделей.The existing limitations of DirectQuery still apply when you use composite models. Многие из этих ограничений теперь относятся к отдельным таблицам в зависимости от режима хранения для каждой таблицы.Many of these limitations are now per table, depending upon the storage mode of the table. Например, вычисляемый столбец в импортированной таблице может ссылаться на другие таблицы, но вычисляемый столбец в таблице DirectQuery по-прежнему ограничен ссылками только на столбцы той же таблицы.For example, a calculated column on an import table can refer to other tables, but a calculated column on a DirectQuery table can still refer only to columns on the same table. Другие ограничения применяются к модели в целом, если все таблицы в пределах модели являются таблицами DirectQuery.Other limitations apply to the model as a whole, if any of the tables within the model are DirectQuery. Например, функции «Краткая аналитика» и «Вопросы и ответы» недоступны в модели, если какая-либо из таблиц в ней используется в режиме хранения DirectQuery.For example, the QuickInsights and Q&A features aren’t available on a model if any of the tables within it has a storage mode of DirectQuery.
Minimum requirements
The following list provides the minimum requirements to run Power BI Desktop:
Important
Power BI Desktop will no longer be supported on Windows 7 after January 31st, 2021. After that date, Power BI Desktop will be supported on Windows 8 or newer versions of Windows, for the most recent release of Power BI Desktop only.
- Windows 7 / Windows Server 2008 R2, or later
- .NET 4.5
- Internet Explorer 10 or later
- Memory (RAM): At least 1 GB available, 1.5 GB or more recommended.
- Display: At least 1440×900 or 1600×900 (16:9) required. Lower resolutions such as 1024×768 or 1280×800 aren’t supported, as certain controls (such as closing the startup screen) display beyond those resolutions.
- Windows display settings: If you set your display settings to change the size of text, apps, and other items to more than 100%, you may not be able to see certain dialogs that you must interact with to continue using Power BI Desktop. If you encounter this issue, check your display settings in Windows by going to Settings > System > Display, and use the slider to return display settings to 100%.
- CPU: 1 gigahertz (GHz) 64-bit (x64) processor recommended.
Note
We recommend using a client version of Windows such as Windows 10, rather than Windows Server. For example, Power BI Desktop does not support using Internet Explorer Enhanced Security Configuration as it will stop Power BI Desktop from signing in to the Power BI service.
Создавать отчетыCreate reports
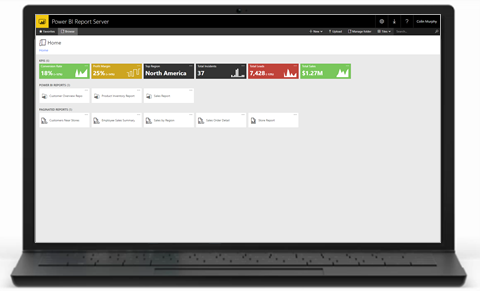
Чаще всего создаются коллекции визуальных элементов, отображающих разные аспекты данных, на основе которых создавалась модель в Power BI Desktop.More often, you’ll want to create a collection of visuals that show various aspects of the data you’ve used to create your model in Power BI Desktop. Коллекция визуальных элементов, сохраненная в одном файле Power BI Desktop, называется отчетом.A collection of visuals, in one Power BI Desktop file, is called a report. Отчет может состоять из одной или нескольких страниц, так же как файл Excel включает один или несколько листов.A report can have one or more pages, just like an Excel file can have one or more worksheets.
Power BI Desktop позволяет создавать сложные и визуально эффектные отчеты, объединяя данные из нескольких источников в один отчет, к которому можно предоставить доступ многим пользователям в организации.With Power BI Desktop you can create complex and visually rich reports, using data from multiple sources, all in one report that you can share with others in your organization.
На следующем рисунке вы видите первую страницу отчета Power BI Desktop с именем Обзор, которое отображается на вкладке в нижней части изображения.In the following image, you see the first page of a Power BI Desktop report, named Overview, as seen on the tab near the bottom of the image.

Report gridlines and snap to grid (Preview)
A critical task for authoring a beautiful Power BI report is to make sure your visuals are lined up and look organized. While you could do this in the past by manually entering in X and Y coordinates on each visual or using the arrow keys to nudge visuals into place, this is a time-consuming task. We’re excited to announce a preview of gridlines and snap to grid in Power BI Desktop, as requested by many of our users. This feature will allow you to enable gridlines on your report canvas while authoring, as well as the option to enable snapping to those gridlines.
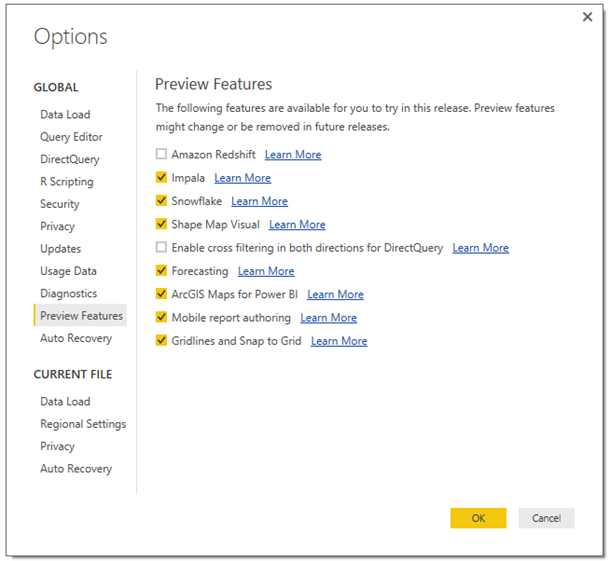
To enable the preview feature, navigate to File > Options & Settings > Options > Preview Features. Check the “Gridlines and Snap to Grid” box and restart the Desktop.
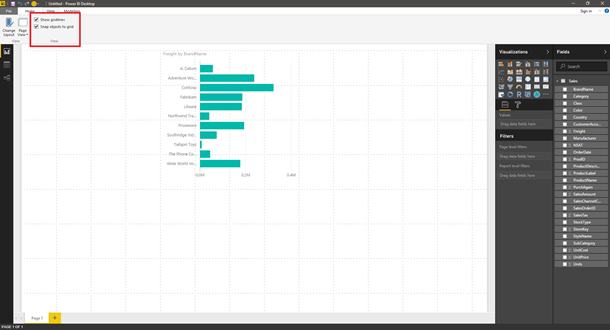
You’ll find the gridlines and snap to grid options in the View tab of the ribbon. You can choose to turn on one or both options to help you arrange your charts.
More details about gridlines and snap to grid in the following video:
Тарифы
Microsoft предлагает несколько вариантов ведения учетной записи:
- бесплатная версия Power BI с ограниченным функционалом;
- расширенная версия Pro для анализа бизнес-процессов;
- подписка Premium для крупных корпоративных клиентов.
Бесплатная версия программы доступна при регистрации новой почты. Корпоративным сотрудникам доступен базовый функционал без возможности импортировать базы Excel через браузер, пересылать отчеты, а также пользоваться приложениями.
Ежемесячная стоимость подписки Power BI Pro составляет 9,99 $. За это клиенты получают право:
- управлять таблицами Excel на веб-ресурсе;
- пересылать сведения внутри компании;
- обновлять базу трижды в сутки;
- загружать приложения;
- получать статистику по отчетам.
Разработчики предлагают бесплатно протестировать Pro-аккаунт, чтобы оценить удобство платной версии.
Power BI Premium покупается как дополнение к предыдущему статусу и его стоимость в месяц составляет 499 $. Он разработан в соответствии с требованиями крупных корпораций: большое хранилище данных, поддержка Big Data и не только. Основной функционал подписок описан в таблице ниже.
|
Функциональные возможности |
Power BI FREE |
Power BI PRO |
Power BI PREMIUM |
|
Доступ к данным |
персональный |
общий |
общий |
|
Объема облака |
10 ГБ |
10 ГБ |
100 ГБ |
|
Размер одной выборки |
1 ГБ |
1 ГБ |
10 ГБ |
|
Автообновление |
каждые 24 часа |
каждые 8 часов |
каждые 30 минут |
|
Редактирование таблиц через браузер |
нет |
да |
да |
|
Вычислительные ресурсы |
нет |
нет |
Big Data |
|
Доступ к приложениям |
нет |
есть |
есть |
|
Статистика по просмотрам отчетов |
нет |
есть |
есть |
Государственным и некоммерческим организациям компания Microsoft готова предложить скидку на подписку Pro. Размер ежемесячной абонентской платы для них составит всего 3 $.
Mixpanel
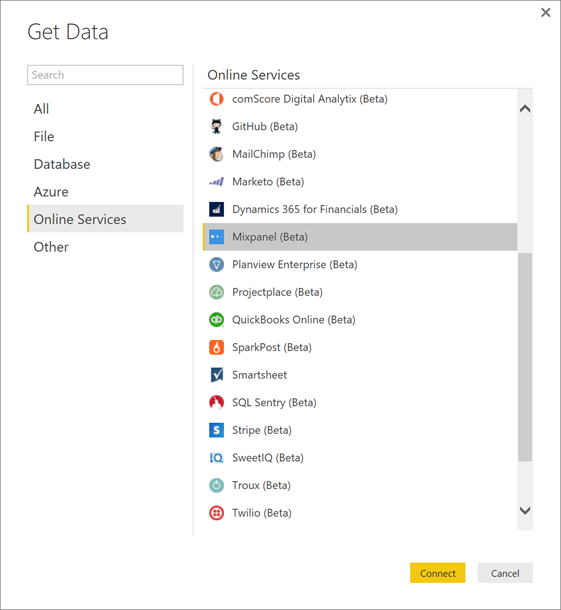
This month we are very glad to add a new connector for Mixpanel, the leading product analytics platform. This new connector allows users to pull mobile and web analytics data from their Mixpanel accounts, in order to visualize it and create reports within Power BI.
The new Mixpanel connector can be found under the “Online Services” category in the “Get Data” dialog.
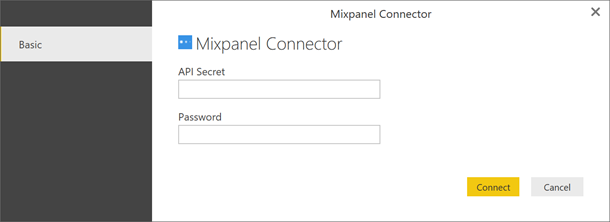
Once you select this connector, you can specify credentials (API Secret & Password) to use for authentication.
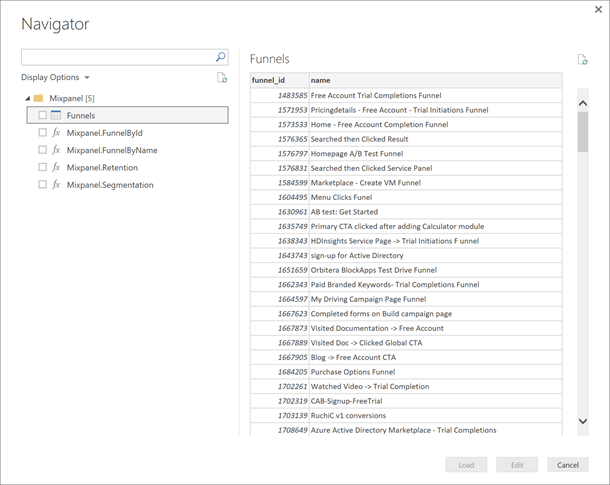
This allows you to browse available data in your accounts, in the form of tables or parameterized functions, that can be brought into Power BI.
More details about our new data connectors in the following video:
Создание визуальных элементовCreate visuals
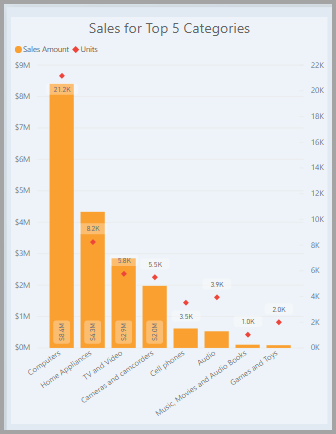
Завершив подготовку модели данных, перетащите ее поля на холст отчета для создания визуальных элементов.After you have a data model, you can drag fields onto the report canvas to create visuals. Визуальный элемент — это графическое представление данных модели.A visual is a graphic representation of the data in your model. В Power BI Desktop предоставляется широкий выбор типов визуальных элементов.There are many different types of visuals to choose from in Power BI Desktop. Ниже представлен пример визуального элемента, представляющего собой простую гистограмму.The following visual shows a simple column chart.
Порядок создания или изменения визуального элементаTo create or change a visual:
На панели Визуализации выберите значок визуального элемента.From the Visualizations pane, select the visual icon.
При этом, если на холсте отчета уже выбран визуальный элемент, его тип изменится на выбранный тип.If you already have a visual selected on the report canvas, the selected visual changes to the type you selected.
Если на холсте не выбран ни один визуальный элемент, будет создан новый визуальный элемент выбранного типа.If no visual is selected on the canvas, a new visual is created based on your selection.
Сохранение работыSaving your work
Если запрос находится в нужном месте, выберите Закрыть и применить в меню Файл в редакторе Power Query.When your query is where you want it, select Close & Apply from Power Query Editor’s File menu. Это действие применяет изменения и закрывает редактор.This action applies the changes and closes the editor.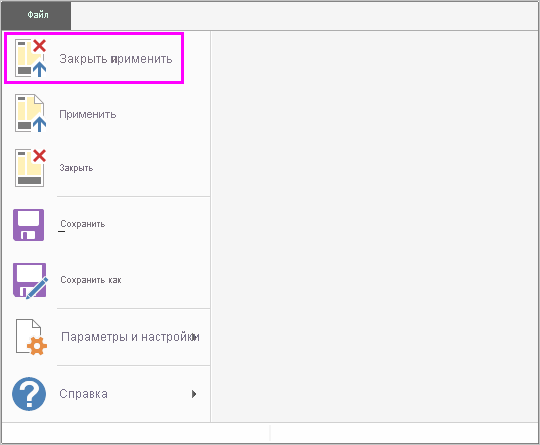
По мере хода выполнения Power BI Desktop выводит диалоговое окно для отображения состояния.As progress is made, Power BI Desktop provides a dialog to display its status.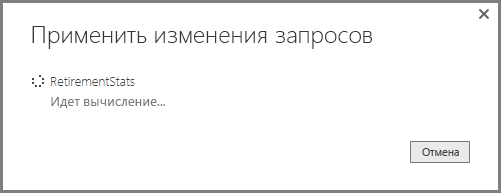
Когда будете готовы, Power BI Desktop можете сохранить вашу работу в виде файла PBIX.When you’re ready, Power BI Desktop can save your work in the form of a .pbix file.
Чтобы сохранить результаты работы, выберите Файл > Сохранить (или Файл > Сохранить как), как показано на следующем рисунке.To save your work, select File > Save (or File > Save As), as shown in the following image.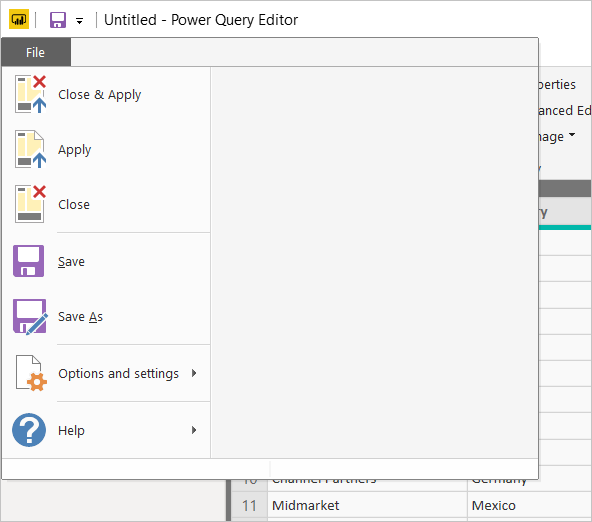
Azure Data Lake Storage
Получите в свое распоряжение широкие возможности масштабирования и гибкое хранилище для всех видов данных, которые будут анализироваться с помощью Power BI.
- Выполняйте прием, обработку и анализ структурированных и неструктурированных данных в больших масштабах с помощью Azure Data Lake Storage и Power BI.
- Используйте преимущества Common Data Service для подключения к большим наборам данных в любом расположении.
- Воспользуйтесь преимуществами форматов модели общих данных, которые позволяют разработчикам в вашей организации поддерживать семантическую согласованность между развертываниями и бизнес-приложениями.
Line chart dot formatting options
This month, we have a new formatting update to line charts. Now, you can have different colored dots show up for categories across all of your series. This update can help you call out particular points in your line charts.
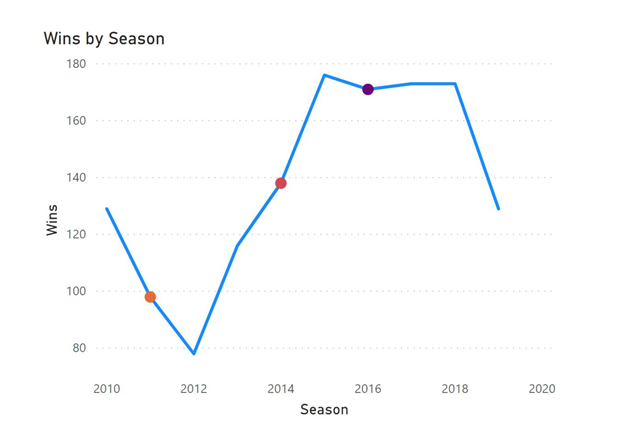
To turn this on, go to the Data colors tab in the formatting pane. In it, you should see all the categories in a series. There you can change the color that you want the dot to appear for each category.
If you want to remove the dots from your line chart, just click the Revert to default button. Note that in this release, this feature will show dots for your categories across all of your series. In the coming releases, we plan to extend this feature to allow for more control over choosing particular series.
Advanced Trellis chart by xViz
The xViz Advanced Trellis chart (also known as small multiples) is of a group of similar charts having a common axis and value fields split across a category. For example, you can compare the same Product Sales across different countries, where each country is displayed in a separate chart. They are a great choice when it comes to analyzing trends across a category in a single view.
The xViz Advanced Trellis provides different Trellis modes like Splitting the chart further by another category field, display stacked charts or display series animation options. End consumers can change the panel layout, toggle between different chart scale options (Y axis) and perform ranking on the fly during runtime. You can scroll across different pages and expand any chart to full-screen mode to focus on it individually. Some of the other notable features are as follows:
- Trellis Mode: Chose between Splitting, Stacked charts and Animation options
- Display Top N Values and group the remaining as ‘Others’
- Pagination: Display multiple small trellis across different pages
- Average Panel: Display overall average across all panels or average values in a given panel
- 10+ different chart types with extensive customization and styling options
- Data Label customization: Choose between different data label formats and column totals
- Utility Menu: Change Panel layout and scale (Y axis) on the fly
- Interaction: Enlarge Panels and interactive legends
- Axis label customization: Rotate, Word wrap, Nth label and Stepped labels to support long labels
- Advanced conditional formatting: visually highlights outliers based on different rules
- Breadcrumb – Display for drilldown levels
- Drill down support
- Number formatting: enables customization of values based on various business scenarios
- Summary table: tabular view of data

Download this new visual from AppSource.
Очистка ресурсовClean up resources
Завершив работу с учебником, вы можете удалить набор данных, отчет и панель мониторинга.Now that you’ve finished the tutorial, you can delete the dataset, report, and dashboard.
-
Выберите Моя рабочая область в черной строке заголовка Power BI.Select My workspace in the black Power BI header bar.
-
Щелкните Дополнительные параметры (…) рядом с набором данных «Образец финансовых данных» и выберите пункт Удалить.Select More options (…) next to the Financial Sample dataset > Delete.
Появится предупреждение Все плитки отчетов и панелей мониторинга, содержащие данные из этого набора данных, будут также удалены.You see a warning that All reports and dashboard tiles containing data from this dataset will also be deleted.
-
Выберите Удалить.Select Delete.
Дополнительная настройкаAdditional configuration
- Чтобы настроить интеграцию со службой Power BI и иметь возможность закреплять элементы отчета на панели мониторинга Power BI, см. статью об интеграции со службой Power BI.To configure integration with the Power BI service so you can pin report items to a Power BI dashboard, see Integrate with the Power BI service.
- Чтобы настроить электронную почту для обработки подписок, см. статьи о параметрах электронной почты и доставке электронной почты на сервере отчетов.To configure email for subscriptions processing, see E-Mail settings and E-Mail delivery in a report server.
- Чтобы настроить веб-портал и иметь возможность открывать его на компьютере отчетов для просмотра отчетов и управления ими, см. статьи о настройке брандмауэра для доступа к серверу отчетов и настройке сервера отчетов для удаленного администрирования.To configure the web portal so you can access it on a report computer to view and manage reports, see Configure a firewall for report server access and Configure a report server for remote administration.
- Дополнительные сведения о настройке системных свойств сервера отчетов в SQL Server Management Studio см. в статье Свойства сервера (страница «Дополнительно») — службы Reporting Services.For details on setting report server system properties in SQL Server Management Studio, see Server Properties Advanced Page. Если не указано иное, параметры применяются как к Серверу отчетов Power BI, так и к SQL Server Reporting Services.Unless it specifies otherwise, the options apply to both Power BI Report Server and SQL Server Reporting Services.