Как собрать простейшую java программу с помощью maven
Содержание:
- Spring Boot Specification
- Apache Maven Deploy Plugin
- Single Project Setup
- Создание приложения из архетипа
- Установка Maven.
- Специальные плагины Maven
- Зависимости и репозитории.
- Как установить?
- Known Issues
- Use the Compiler Plugin
- Примеры плагинов
- Плагины
- Apache Maven Assembly Plugin
- Использование профилей
- Что такое Maven?
- Multi Module Setup
- Файл Maven pom.xml
Spring Boot Specification
Spring Boot applications specify the JDK version inside of the properties tags in the pom.xml file.
First, we need to add spring-boot-starter-parent as a parent to our project:
This parent POM allows us to configure default plugins and multiple properties including the Java version: By default, the Java version is 1.8.
However, we can override the default version of the parent by specifying the java.version property:
By setting the java.version property we declare that the source and the target Java versions are both equal to 1.9.
Above all, we should keep in mind that this property is a Spring Boot Specification. Additionally, starting from the Spring Boot 2.0, Java 8 is the minimum version.
This means we can’t use or configure Spring Boot for the older JDK versions.
Apache Maven Deploy Plugin
The deploy plugin is primarily used during the deploy phase, to add your artifact(s) to a remote repository for sharing with other developers and projects. This is usually done in an integration or release environment. It can also be used to deploy a particular artifact (e.g. a third party jar like Sun’s non redistributable reference implementations).
As a repository contains more than the artifacts (POMs, the metadata, MD5 and SHA1 hash files…), deploying means not only copying the artifacts, but making sure all this information is correctly updated. It’s the reponsibility of the deploy plugin.
To work, the deployment will require:
- information about the repository: its location, the transport method used to access it (FTP, SCP, SFTP…) and the optional user specific required account information
- information about the artifact(s): the group, artifact, version, packaging, classifier…
- a deployer: a method to actually perform the deployment. This can be implemented as a wagon transport (making it cross-platform), or use a system specific method.
The information will be taken from the implied (or specified) pom and from the command line. The settings.xml file may also be parsed to retrieve user credentials.
Goals Overview
The deploy plugin has 2 goals:
- deploy:deploy is used to automatically install the artifact, its pom and the attached artifacts produced by a particular project. Most if not all of the information related to the deployment is stored in the project’s pom.
- deploy:deploy-file is used to install a single artifact along with its pom. In that case the artifact information can be taken from an optionally specified pomFile, but can be completed/overriden using the command line.
Major Version Upgrade to version 3.0.0
Please note that the following parameter has been completely removed from the plugin configuration:
uniqueVersion
As of Maven 3, snapshot artifacts will always be deployed using a timestamped version.
Usage
General instructions on how to use the Deploy Plugin can be found on the usage page. Some more specific use cases are described in the examples given below.
If you feel like the plugin is missing a feature or has a defect, you can fill a feature request or bug report in our issue tracker. When creating a new issue, please provide a comprehensive description of your concern. Especially for fixing bugs it is crucial that the developers can reproduce your problem. For this reason, entire debug logs, POMs or most preferably little demo projects attached to the issue are very much appreciated. Of course, patches are welcome, too. Contributors can check out the project from our source repository and will find supplementary information in the guide to helping with Maven.
Examples
To provide you with better understanding on some usages of the deploy plugin, you can take a look into the following examples:
Project Deployment:
- Deployment with FTP
- Deployment with external SSH
File Deployment:
- Disable the generation of pom
- Deploy an artifact with a customed pom
- Deploy an artifact with classifier
- Disable timestamps suffix in an artifact
- Deploy an artifact in legacy layout
Single Project Setup
This can look like this:
<project>
  <modelVersion>4.0.0</modelVersion>
  <parent>
    <groupId>org.apache</groupId>
    <artifactId>apache</artifactId>
    <version>18</version>
  </parent>
  <groupId>org.apache.maven.ci</groupId>
  <artifactId>ci-parent</artifactId>
  <name>First CI Friendly</name>
  <version>${revision}</version>
  ...
</project>
This is of course a simple situation where we use only for brevity to show the general course.
Based on the above pom you can build your project using:
mvn clean package
But wait there is a problem? Which version will the artifacts have? So you need to define the version for your artifacts. The first possibility is to use the command line like this:
mvn -Drevision=1.0.0-SNAPSHOT clean package
This will become cumbersome over the time. So the other solution for this is to simply use a property inside the pom file which looks like this:
<project>
  <modelVersion>4.0.0</modelVersion>
  <parent>
    <groupId>org.apache</groupId>
    <artifactId>apache</artifactId>
    <version>18</version>
  </parent>
  <groupId>org.apache.maven.ci</groupId>
  <artifactId>ci-parent</artifactId>
  <name>First CI Friendly</name>
  <version>${revision}</version>
  ...
  <properties>
    <revision>1.0.0-SNAPSHOT</revision>
  </properties>
</project>
So now you can simply call Maven as usual like .
You can of course change the version via the command line like this:
mvn -Drevision=2.0.0-SNAPSHOT clean package
Of course you can use the file for this.
A note about the used properties. You can only use those named , and/or and not other named properties like this:
<project>
  <modelVersion>4.0.0</modelVersion>
  <parent>
    <groupId>org.apache</groupId>
    <artifactId>apache</artifactId>
    <version>18</version>
  </parent>
  <groupId>org.apache.maven.ci</groupId>
  <artifactId>ci-parent</artifactId>
  <name>First CI Friendly</name>
  <version>${revision}</version>
  ...
  <properties>
    <revision>1.0.0-${buildNumber}-SNAPSHOT</revision>
  </properties>
</project>
The above example will not work as expected. If you like to have more flexibility you can use a combination of the different properties like this:
<project>
  <modelVersion>4.0.0</modelVersion>
  <parent>
    <groupId>org.apache</groupId>
    <artifactId>apache</artifactId>
    <version>18</version>
  </parent>
  <groupId>org.apache.maven.ci</groupId>
  <artifactId>ci-parent</artifactId>
  <name>First CI Friendly</name>
  <version>${revision}${sha1}${changelist}</version>
  ...
  <properties>
    <revision>1.3.1</revision>
    <changelist>-SNAPSHOT</changelist>
    <sha1/>
  </properties>
</project>
If you like to make a version this can simply being achieved by using this:
mvn -Drevision=2.0.0 clean package
Another usage example can be to make a release which can be done via (version 1.3.1):
mvn -Dchangelist= clean package
Or if you like to make a release with another version:
mvn -Drevision=2.7.8 -Dchangelist= clean package
Создание приложения из архетипа
На сайте http://maven.apache.org/guides/introduction/introduction-to-archetypes.html перечислены основные архетипы приложений, но несложно создать свой или найти более специфичный .
Для примера если нам нужно веб-приложение, находим подходящий архетип maven-archetype-webapp. В командной строке в нужном каталоге вводим команду Maven:
mvn archetype:create -DgroupId=com.mycompany.app -DartifactId=my-webapp -DarchetypeArtifactId=maven-archetype-webapp
Теперь можем видеть наглядную структуру каталогов с говорящими названиями:
- java — тут будут классы
- webapp — страницы веб-приложения
- resources — ресурсы
- test — unit-тесты
Установка Maven.
1. Скачиваем последнюю версию .
2. Распаковываем архив в любую директорию.
3. Создаем переменную M2_HOME со значением «C:\apache-maven-2.2.1» или другой директорией с этой папкой.
4. Создаем переменную M2 со значением %M2_HOME%\bin.
5. Убеждаемся что есть переменная JAVA_HOME с путем к JDK (значение примерно такое «C:\program files\java\jdk1.6.0_10\«.
6. Изменяем переменную Path — дописываем в нее %M2%, чтобы папка с исполняемым файлом Maven была видна из командной строки.
7. Проверяем работу установленного Maven.
В командной строке вводим mvn -version
Должна появиться информация версиях Maven, JRE и ОС.
Maven создаст локальный репозиторий в личной папке пользователя — например C:\Users\username\.m2\repository.
Maven готов, можно создавать приложения.
Специальные плагины Maven
Maven предоставляет в распоряжение программиста десятки готовых плагинов, но иногда может потребоваться какой-нибудь специальный плагин. Создать специальный плагин в Maven легко.
- Создайте новый проект, настроив упаковку POM на .
- Включите вызов , определяющий цели вашего плагина.
- Создайте класс плагина Maven (класс, расширяющий ).
- Добавьте комментарии Javadoc для этого класса, чтобы определить цели, и для переменных, которые будут служить в качестве параметров конфигурации.
- Реализуйте метод , который будет вызываться при вызове плагина.
В качестве примера в листинге 8 показаны соответствующие части специального плагина для развертывания Tomcat.
Листинг 8. TomcatDeployerMojo.java
package net.fpic.maven.plugins;

import java.io.File;
import java.util.StringTokenizer;

import net.fpic.tomcatservice64.TomcatDeploymentServerClient;

import org.apache.maven.plugin.AbstractMojo;
import org.apache.maven.plugin.MojoExecutionException;

import com.javasrc.server.embedded.CommandRequest;
import com.javasrc.server.embedded.CommandResponse;
import com.javasrc.server.embedded.credentials.Credentials;
import com.javasrc.server.embedded.credentials.UsernamePasswordCredentials;
import com.javasrc.util.FileUtils;

/**
 * Цель, развертывающая Web-приложение в Tomcat
 *
 * @goal deploy
 * @phase install
 */
public class TomcatDeployerMojo extends AbstractMojo
{
	/**
	 * Имя хоста или IP-адрес сервера развертывания
	 *
	 * @parameter alias="host" expression="${deploy.host}" @required
	 */
	private String serverHost;

	/**
	 * Порт сервера развертывания
	 *
	 * @parameter alias="port" expression="${deploy.port}" default-value="58020"
	 */
	private String serverPort;

	/**
	 * Имя пользователя для подключения к менеджеру развертывания (если этот
	 * параметр опущен, то плагин попытается развернуть приложение на сервере
	 * без учетных данных)
	 *
	 * @parameter alias="username" expression="${deploy.username}"
	 */
	private String username;

	/**
	 * Пароль для указанного имени пользователя
	 *
	 * @parameter alias="password" expression="${deploy.password}"
	 */
	private String password;

	/**
	 * Имя исходного артефакта для развертывания, например, target/pos.war
	 *
	 * @parameter alias="artifactSource" expression=${deploy.artifactSource}"
	 * @required
	 */
	private String artifactSource;

	/**
	 * Имя места назначения для развертывания артефакта, например, ROOT.war.
	 * При его отсутствии используется имя исходного артефакта (без
	 * информации о пути)
	 *
	 * @parameter alias="artifactDestination"
	 *   expression=${deploy.artifactDestination}"
	 */
	private String artifactDestination;

    public void execute() throws MojoExecutionException
    {
    	getLog().info( "Server Host: " + serverHost +
    			       ", Server Port: " + serverPort +
    			       ", Artifact Source: " + artifactSource +
    			       ", Artifact Destination: " + artifactDestination );

    	// Проверка полей
    	if( serverHost == null )
    	{
    		throw new MojoExecutionException(
    		  "No deployment host specified, deployment is not possible" );
    	}
    	if( artifactSource == null )
    	{
    		throw new MojoExecutionException(
    		  "No source artifact is specified, deployment is not possible" );
    	}

        ...
   }
}
В заголовке класса комментарий определяет цель, которую выполняет этот MOJO, а определяет этап, на котором выполняется цель. Каждое указанное свойство имеет аннотацию , которая содержит псевдоним, по которому этот параметр будет выполняться, а также выражение, которое указывает на системное свойство, содержащее фактическое значение. Если свойство имеет аннотацию , то оно обязательно. Если оно имеет аннотацию , то это значение будет использоваться по умолчанию. В методе можно вызвать , чтобы получить доступ к регистратору событий Maven, который в зависимости от уровня регистрации выводит указанное сообщение на стандартное устройство вывода. В случае ошибки плагина сообщение приведет к прерыванию процесса сборки.
Зависимости и репозитории.
Большинство популярных библиотек находятся в центральном репозитории , поэтому их можно сразу прописывать в раздел dependencies pom-файла.
Например, чтобы подключить Spring Framework нужно определить зависимость:
<dependencies>
…
<dependency>
<groupId>org.springframework</groupId>
<artifacrId>spring</artifactId>
<version>2.5.5</version>
</dependency>
</dependencies>
Можно не указывать версию, тогда Maven возьмет последний вариант, но рекомендуется это делать.
Специфические вещи не находятся в центральном репозитории и нужно в таких случаях указать репозиторий вручную. К примеру, добавим зависимость JSF-фреймворка ajax-компонентов JBoss RichFaces.
С зависимостями все просто:
<dependencies>
<dependency>
<groupId>org.richfaces.ui>/groupId>
<artifactId>richfaces-ui</artifactId>
<version>3.3.1.GA</version>
</dependency>
</dependencies>
А репозиторий JBoss нужно прописать вручную либо в файле setting.xml в корне локального репозитория, либо в pom.xml, в зависимости от того, нужен ли этот репозиторий во всех проектах или в одном конкретном:
<!— JBoss RichFaces Repository —> <repositories> <repository> <releases> <enabled>true</enabled> </releases> <snapshots> <enabled>false</enabled> <updatePolicy>never</updatePolicy> </snapshots> <id>repository.jboss.com</id> <name>Jboss Repository for Maven</name> <url> </url> <layout>default</layout> </repository> </repositories>
Обычно на сайтах крупных проектов пишут все что нужно для встраивания их библиотеки в проект на основе Maven.
Как установить?
Вам необходимо выполнить следующие простые шаги:
- В вашей системе должна быть установлена Java.
- Задайте переменную среды Java.
- Загрузите Maven.
- Теперь вам нужно распаковать zip-архив Maven в желаемое место.
- Добавьте каталог bin созданного вами каталога, то есть apache-maven-3.5.3 (независимо от установленной вами версии), в переменную среды PATH и системную переменную.
- Теперь откройте cmd и запустите команду mvn -v
- Если на вашем экране отображается снимок экрана, показанный ниже, значит, процесс установки завершен.
Apache Maven 3.5.3 (3383c37e1f9e9b3bc3df5050c29c8aff9f295297; 2018-02-25T01:19:05+05:30)
Maven home: C:apache-maven-3.5.3bin..
Java version: 1.8.0_151, vendor: Oracle Corporation
Java home: C:Program FilesJavajdk1.8.0_151jre
Default locale: en_US, platform encoding: Cp1252
OS name: "windows 10", version: "10.0", arch: "amd64", family: "windows"
Known Issues
- New attributes for URLs inheritance (see ) are not yet accepted during POM structure control on upload to the Central Repository: see MVNCENTRAL-4841 to track progress
- If you are using Maven reporting, it might happen that you will get an exception which looks like this:
 Scanning for projects...
 Internal error: java.lang.NullPointerException ->
org.apache.maven.InternalErrorException: Internal error: java.lang.NullPointerException
    at org.apache.maven.DefaultMaven.execute (DefaultMaven.java:120)
...
Caused by: java.lang.NullPointerException
    at org.apache.maven.model.plugin.DefaultReportingConverter.convert (DefaultReportingConverter.java:243)
...
This is caused by using a which does not contain a element.
Temporarily this issue can circumvented by adding an empty element inside the .
Use the Compiler Plugin
We can specify the desired Java version in the compiler plugin.
2.1. Compiler Plugin
The first option is setting the version in compiler plugin properties:
The Maven compiler accepts this command with –target and –source versions. If we want to use the Java 8 language features the –source should be set to 1.8.
Also, for the compiled classes to be compatible with JVM 1.8, the –target value should be 1.8.
The default value for both of them is 1.6 version.
Alternatively, we can configure the compiler plugin directly:
The maven-compiler-plugin also has additional configuration properties that allow us to have more control over the compilation process beyond -source and -target versions.
2.2 Java 9 and Beyond
Furthermore, starting from JDK 9 version, we can use a new -release command-line option. This new argument will automatically configure the compiler to produce class files that will link against the implementation of the given platform version.
By default, the -source and -target options don’t guarantee a cross-compilation.
This means that we cannot run our application on older versions of the platform. Additionally, to compile and run the programs for older Java versions, we also need to specify -bootclasspath option.
To cross-compile correctly, the new -release option replaces three flags: -source, -target and -bootclasspath.
After transforming our examples, for the plugin properties we can declare:
And for the maven-compiler-plugin starting from the 3.6 version we can write:
As we notice, we can add the Java version in a new <release> attribute. In this example, we compile our application for Java 7.
Even more, we don’t need a JDK 7 installed in our machine. Java 9 already contains all the information for linking the new language features with JDK 7.
Примеры плагинов
3.1. Плагин maven-archetype-plugin
Плагин maven-archetype-plugin предназначен для того чтобы по существующему шаблону создавать новые проекты. Создать проект с помощью maven-archetype-plugin достаточно просто — достаточно набрать:
Дальше выбрать шаблон из списка, ответить на дополнительные вопросы — и плагин сгенерирует проект.
3.2. Плагин maven-compiler-plugin
Компилятор — основной плагин который используется практически во всех проектах. Он доступен по умолчанию, но текущая версия Java 5.
В следующем примере в конфигурации используется версия java 1.9 (source — версия языка, на котором написана программа. А target — версия Java машины которая будет этот код запускать). И указано, что кодировка исходного кода программы UTF-8.
Пример 3. Использование плагина maven-compiler-plugin
3.3. Плагин maven-javadoc-plugin
Плагин maven-javadoc-plugin предназначен для того, чтобы генерировать документацию по исходному коду проекта стандартной утилитой javadoc.
Запускается с помощью команды:
Документация генерируется в target/site/apidocs каталог текущего проекта.
3.4. Плагин maven-checkstyle-plugin
Плагин проверяет стиль и качество исходного кода и генерирует файл checkstyle-result.xml. Из наиболее часто используемых и простых проверок:
- наличие комментариев;
- размер класса не более N строк;
- в конструкции в try-catch, блок catch не пуст.
Запуск с помощью команды:
Т.к. почти каждые проекты пишутся немного по-разному, рекомендуется создать свой набор правил. Или подавить проверку некоторых правил. Для этого используется файл suppressions.xml.
Пример 5. Файл suppressions.xml
3.5. Плагин maven-pmd-plugin
maven-pmd-plugin — плагин для автоматического анализа кода на предмет наличия «нехорошего кода». Также в этом плагине есть цель которая находит дубликаты кода Copy/Paste Detector (CPD).
Существует два режима работы плагина:
-
Генерирование отчётов PMD и CPD:
полезно для оценки качества существующих проектов которые раньше не использовали эти инструменты. Позволяет оценить масштабы «бедствия».
-
Проверка проект на наличие нарушений. В случае, если находится нарушение, сборка ломается:
3.6. Плагин findbugs-maven-plugin
findbugs-maven-plugin плагин для автоматического нахождения багов в проекте. Принцип действия плагина основан на поиске шаблонов ошибок. Код проекта проверяются на часто встречаемые ошибки, неправильное использование API и конструкций языка.
Запускаем с помощью
Плагины
Плагины-это такие же артефакт, как и зависимости, поэтому описываются практически так же.
Вместо раздела dependencies-plugins, dependency-plugin, repositories-pluginRepositories, repository-pluginRepository.
Плагинами maven делает все, даже сборку проекта.
Настройка плагина ля создания проекта для Eclipse с использованием WTP ver. 2.0.
В разделе plugins файла pom.xml прописываем плагин:
<plugin>
<groupId>org.apache.maven.plugins</groupId>
<artifactId>maven-eclipse-plugin</artifactId>
<configuration>
<wtpversion>2.0</wtpversion>
</configuration>
</plugin>
Теперь идем в командную строку и выполняем:
mvn eclipse:eclipse
Ждем пока Maven найдет все библиотеки в репозитории или скачает их и теперь Maven-проект можно открыть как проект Eclipse.
Однако плагины довольно легко найти, например по запросу «maven tomcat plugin«.
Заключение:
Maven, в отличие от Ant, описывает конечную структуру проекта, а не пути к ее достижению.
Apache Maven Assembly Plugin
Introduction
The Assembly Plugin for Maven enables developers to combine project output into a single distributable archive that also contains dependencies, modules, site documentation, and other files.
Your project can easily build distribution «assemblies» using one of the prefabricated assembly descriptors. These descriptors handle many common operations, such as packaging a project’s artifact along with generated documentation into a . Alternatively, your project can provide its own descriptor and assume a much higher level of control over how dependencies, modules, file-sets, and individual files are packaged in the assembly.
Currently it can create distributions in the following formats:
- zip
- tar
- tar.gz (or tgz)
- tar.bz2 (or tbz2)
- tar.snappy
- tar.xz (or txz)
- jar
- dir
- war
- and any other format that the ArchiveManager has been configured for
If your project wants to package your artifact in an uber-jar, the assembly plugin provides only basic support. For more control, use the Maven Shade Plugin.
To use the Assembly Plugin in Maven, you simply need to:
- choose or write the assembly descriptor to use,
- configure the Assembly Plugin in your project’s pom.xml, and
- run «mvn assembly:single» on your project.
To write your own custom assembly, you will need to refer to the Assembly Descriptor Format reference.
What is an Assembly?
An «assembly» is a group of files, directories, and dependencies that are assembled into an archive format and distributed. For example, assume that a Maven project defines a single JAR artifact that contains both a console application and a Swing application. Such a project could define two «assemblies» that bundle the application with a different set of supporting scripts and dependency sets. One assembly would be the assembly for the console application, and the other assembly could be a Swing application bundled with a slightly different set of dependencies.
The Assembly Plugin provides a descriptor format which allows you to define an arbitrary assembly of files and directories from a project. For example, if your Maven project contains the directory «src/main/bin», you can instruct the Assembly Plugin to copy the contents of this directory to the «bin» directory of an assembly and to change the permissions of the files in the «bin» directory to UNIX mode 755. The parameters for configuring this behavior are supplied to the Assembly Plugin by way of the assembly descriptor.
Goals
The main goal in the assembly plugin is the single goal. It is used to create all assemblies.
For more information about the goals that are available in the Assembly Plugin, see the plugin documentation page.
Assembly and Component Descriptor Schemas (XSD)
- http://maven.apache.org/xsd/assembly-2.0.0.xsd, http://maven.apache.org/xsd/assembly-component-2.0.0.xsd (for version 3.0 and higher)
- http://maven.apache.org/xsd/assembly-1.1.3.xsd, http://maven.apache.org/xsd/component-1.1.3.xsd (for version 2.5.4 and higher)
- http://maven.apache.org/xsd/assembly-1.1.2.xsd, http://maven.apache.org/xsd/component-1.1.2.xsd (for version 2.2 and higher)
- http://maven.apache.org/xsd/assembly-1.1.1.xsd, http://maven.apache.org/xsd/component-1.1.1.xsd (for version 2.2-beta-4 — 2.2-beta-5)
- http://maven.apache.org/xsd/assembly-1.1.0.xsd, http://maven.apache.org/xsd/component-1.1.0.xsd (for version 2.2-beta-1 — 2.2-beta-3)
- http://maven.apache.org/xsd/assembly-1.0.0.xsd, http://maven.apache.org/xsd/component-1.0.0.xsd (for version 2.1 and lower)
Usage
General instructions on how to use the Assembly Plugin can be found on the usage page. Some more specific use cases are described in the examples given below.
If you feel like the plugin is missing a feature or has a defect, you can fill a feature request or bug report in our issue tracker. When creating a new issue, please provide a comprehensive description of your concern. Especially for fixing bugs it is crucial that the developers can reproduce your problem. For this reason, entire debug logs, POMs or most preferably little demo projects attached to the issue are very much appreciated. Of course, patches are welcome, too. Contributors can check out the project from our source repository and will find supplementary information in the guide to helping with Maven.
Examples
To provide you with better understanding on some usages of the Assembly Plugin, you can take a look into the examples which can be found here.
Использование профилей
Наиболее значительные проекты содержат, по крайней мере, базовую группу инструментальных сред, решающих задачи, связанные с разработкой, контролем качества (QA), интеграцией и производством. Задача управления всеми этими средами заключается в настройке сборки, которая должна подключаться к нужной базе данных, выполнять нужный набор сценариев и развертывать в каждой среде все необходимые артефакты. С помощью профилей Maven можно делать все это без необходимости составлять четкие инструкции для каждой среды индивидуально.
Ключом служит объединение профилей всех систем с проблемно-ориентированными профилями. Каждый профиль системы определяет конкретные места, сценарии и серверы. Так, в своем файле pom.xml я определяю проблемно-ориентированный профиль , как показано в листинге 6.
Листинг 6. Профиль развертывания
    <profiles>
        <profile>
            <id>deploywar</id>
            <build>
                <plugins>
                    <plugin>
                        <groupId>net.fpic</groupId>
                        <artifactId>tomcat-deployer-plugin</artifactId>
                        <version>1.0-SNAPSHOT</version>
                        <executions>
                            <execution>
                                <id>pos</id>
                                <phase>install</phase>
                                <goals>
                                    <goal>deploy</goal>
                                </goals>
                                <configuration>
                                    <host>${deploymentManagerRestHost}</host>
                                    <port>${deploymentManagerRestPort}</port>
                                    <username>${deploymentManagerRestUsername}</username>
                                    <password>${deploymentManagerRestPassword}</password>
                                    <artifactSource>
                                      address/target/addressservice.war
                                    </artifactSource>
                                </configuration>
                            </execution>
                        </executions>
                    </plugin>
                </plugins>
            </build>
        </profile>
    </profiles>
Этот профиль, определяемый идентификатором , выполняет плагин , настроенный на подключение к определенному узлу, порту и к определенным учетным данным (имя пользователя/пароль). Вся эта информация задается с помощью переменных, таких как . Эти переменные определены в моем файле profiles.xml для каждой инструментальной среды, как показано в листинге 7.
Листинг 7. profiles.XML
        <!-- Defines the development deployment information -->
        <profile>
            <id>dev</id>
            <activation>
                <property>
                    <name>env</name>
                    <value>dev</value>
                </property>
            </activation>
            <properties>
                <deploymentManagerRestHost>10.50.50.52</deploymentManagerRestHost>
                <deploymentManagerRestPort>58090</deploymentManagerRestPort>
                <deploymentManagerRestUsername>myusername</deploymentManagerRestUsername>
                <deploymentManagerRestPassword>mypassword</deploymentManagerRestPassword>
            </properties>
        </profile>

        <!-- Defines the QA deployment information -->
        <profile>
            <id>qa</id>
            <activation>
                <property>
                    <name>env</name>
                    <value>qa</value>
                </property>
            </activation>
            <properties>
                <deploymentManagerRestHost>10.50.50.50</deploymentManagerRestHost>
                <deploymentManagerRestPort>58090</deploymentManagerRestPort>
                <deploymentManagerRestUsername>
                  myotherusername
                </deploymentManagerRestUsername>
                <deploymentManagerRestPassword>
                  myotherpassword
                </deploymentManagerRestPassword>
            </properties>
        </profile>
Развертывание профилей Maven
В файле profiles.xml в я определил два профиля и активизировал их на основе значения свойства (среды) . Если свойству присвоить значение , то будет использоваться информация для развертывания среды разработки. Если свойству присвоить значение , то будет использоваться информация для развертывания среды QA, и т.д.
Вот команда для развертывания файла:
mvn -Pdeploywar -Denv=dev clean install
Флаг предписывает Maven явно включить профиль . Оператор создает системное свойство с именем и присваивает ему значение , которое активирует конфигурацию среды разработки. Передача активировала бы конфигурацию среды QA.
Что такое Maven?
Maven — действительно мощный инструмент управления проектами, который используется для создания и управления любым проектом, связанным с Java. Maven помогает облегчить работу Java-разработчика. Он способен обрабатывать сборку проекта, отчеты и документацию.
Принцип работы:
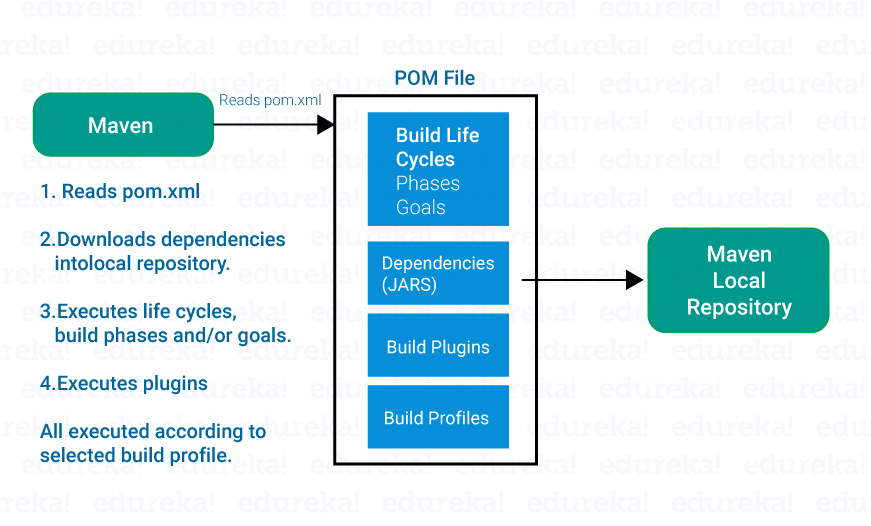
Здесь есть определенные термины, которые могут быть для вас новыми.
- Файлы POM: для настройки Maven вам необходимо использовать объектную модель проекта (POM), которая хранится в файле pom.xml. POM включает параметр конфигурации, связанный с Maven. У него также есть цели и плагины. В процессе выполнения Maven считывает цель, ищет POM в каталоге и получает необходимую информацию.
-
Жизненные циклы, фазы и цели сборки.
- Жизненный цикл сборки — это четко определенная последовательность фаз. Он определяет порядок, в котором цели должны быть выполнены.
- Каждая фаза построения состоит из последовательности целей. Если выполняется один жизненный цикл, выполняются все фазы сборки в этом жизненном цикле.
- Если выполняется этап сборки, выполняются все этапы сборки до него в заранее определенной последовательности этапов сборки.
- Плагины сборки: Maven — это в основном среда выполнения плагинов, и каждая задача выполняется с помощью плагинов. Если для вашего проекта необходимо выполнить определенный набор действий, которые не охватываются стандартными этапами и целями сборки Maven, вы можете добавить плагин в файл POM. У Maven есть несколько стандартных плагинов, которые можно использовать в java-проекте. Плагин фактически ставит перед собой набор целей. Плагины упоминаются в pom.xml с помощью элементов плагина.
- Профили сборки: профили сборки используются, если вам нужно построить проект несколькими способами. Вы также можете настроить сборку для нескольких сред, таких как среды разработки и разработки. Существует три типа профилей сборки: на профиль, на пользователя, глобальные.
-
Репозиторий: это просто каталог на вашем компьютере. Здесь хранятся jar-файлы проекта, плагины или любые другие материалы, относящиеся к проекту. Есть три разных типа репозиториев:
- локальные;
- центральные;
- удаленные.
Multi Module Setup
So now let us take a look into a situation where we have a multi module build. We have a parent pom and one or more children. The parent pom will look like this:
<project>
  <modelVersion>4.0.0</modelVersion>
  <parent>
    <groupId>org.apache</groupId>
    <artifactId>apache</artifactId>
    <version>18</version>
  </parent>
  <groupId>org.apache.maven.ci</groupId>
  <artifactId>ci-parent</artifactId>
  <name>First CI Friendly</name>
  <version>${revision}</version>
  ...
  <properties>
    <revision>1.0.0-SNAPSHOT</revision>
  </properties>
  <modules>
    <module>child1</module>
    ..
  </modules>
</project>
The child will look like this:
<project>
  <modelVersion>4.0.0</modelVersion>
  <parent>
    <groupId>org.apache.maven.ci</groupId>
    <artifactId>ci-parent</artifactId>
    <version>${revision}</version>
  </parent>
  <groupId>org.apache.maven.ci</groupId>
  <artifactId>ci-child</artifactId>
   ...
</project>
Файл Maven pom.xml
POM означает объектную модель проекта. Файл pom.xml содержит информацию о проекте и информацию о конфигурации для сборки проекта. Он содержит зависимости, каталог сборки, каталог с исходным кодом, каталог с исходным кодом теста, плагин и т. д. Maven просматривает файл pom.xml, а затем выполняет цель. Для создания простого файла pom.xml вам потребуются следующие элементы:
- project: Корневой элемент файла pom.xml.
- groupId: вложенный элемент проекта. Он описывает идентификатор проекта.
- modelVersion: вложенный элемент проекта. Он сообщает вам версию модели.
- artifactId: вложенный элемент проекта. В нем указывается идентификатор проекта. Артефакт либо создается, либо используется проектом. Примеры артефактов: JAR, исходные и двоичные дистрибутивы, а также WAR.
- Version: Подэлемент проекта. Он сообщает вам версию артефакта в данной группе.
Ниже показан образец файла pom.xml:
<project xmlns="http://maven.apache.org/POM/4.0.0" xmlns:xsi="http://www.w3.org/2001/XMLSchema-instance" xsi:schemaLocation="http://maven.apache.org/POM/4.0.0 http://maven.apache.org/xsd/maven-4.0.0.xsd"gt;
<modelVersion>4.0.0</modelVersion>
<groupId>com.edureka.application1</groupId>
<artifactId>my-app</artifactId>
<version>1</version>
</project>
В файле pom.xml есть некоторые дополнительные элементы:
- Packaging: определяет тип упаковки, такой как war, jar и т. д.
- Scope: определяет область для проекта maven.
- Url: указывает URL-адрес проекта.
- Name: определяет имя проекта maven.
- Dependency: определяет зависимость. Он используется внутри зависимостей.
Пример кода файла pom.xml, показывающий дополнительные элементы:
<project xmlns="http://maven.apache.org/POM/4.0.0" xmlns:xsi="http://www.w3.org/2001/XMLSchema-instance" xsi:schemaLocation="http://maven.apache.org/POM/4.0.0 http://maven.apache.org/xsd/maven-4.0.0.xsd"gt;
<modelVersion>4.0.0</modelVersion>
<groupId>com.edureka.application1</groupId>
<artifactId>my-application1</artifactId>
<version>1.0</version>
<packaging>jar</packaging>
<name>Maven Quick Start Archetype</name>
<ur>http://maven.apache.org</url>
<dependencies>
<dependency>
<groupId>junit</groupId>
<artifactId>junit</artifactId>
<version>4.8.2</version>
<scope>test</scope>
</dependency>
</dependencies>
</project>