Kali linux
Содержание:
- Настройка системы
- Download Kali Linux 2020.1
- Поддерживаемые платформы
- Литература
- Kali Linux Release History
- AWS EC2 Cloud Image Refresh
- Setup Process
- OnePlus 7 (T / Pro) image for Android 10
- Настройки BIOS
- Как установить Kali Linux рядом с Windows?
- 3. Установка
- ARM Images
- 1.0 NetHunter Editions
- Особенности
- Going Forward
- HiDPI (High Dots Per Inch) Display
- Desktop Environments — Xfce
- Login Screen — LightDM
- Win-KeX
- Overview
- Installation
- Run Win-KeX
- Optional Steps:
- Kali Linux NetHunter
Настройка системы
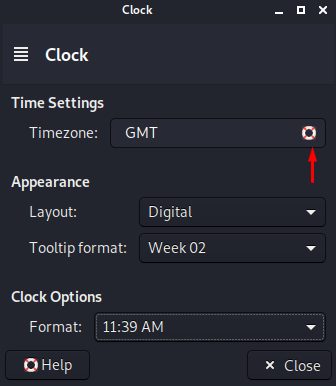
Установите часовой пояс
После того, как вы войдете в систему с правами root, первое, что вы заметите, это то, что время может быть неправильно установлено, и это вызовет проблемы при доступе к веб-сайтам. Вы можете легко изменить его, используя графический интерфейс:
Щелкните правой кнопкой мыши на часах сверху

Выберите Свойства

Установите местное время. Вы также можете найти множество атрибутов для изменения по умолчанию
Включить звук загрузки
Одной из проблем, с которыми сталкиваются пользователи Kali, является отсутствие звука при установке. Чтобы включить его, введите команду в терминале

Update и Upgrade
Рекомендуется Update и Upgrade все устаревшие репозитории, чтобы повысить производительность

Apt-update обновит доступные пакеты и версии
Apt upgrade установит новую версию имеющихся у вас пакетов
Установить новый пароль для root
При установке ОС вы указали пароль, но что если вы захотите изменить пароль через некоторое время? Вот команда для легкого изменения пароля root:

Таким образом, вы можете легко изменить свой пароль, набрав только одну команду.
Добавить учетную запись с низким уровнем привилегий
Вы получили приглашение к учетной записи root, но при запуске от имени учетной записи root существует вероятность того, что небольшая ошибка в приложении может стереть некоторые системные файлы, поэтому в любой операционной системе рекомендуется запускать как пользователь без полномочий root с низким уровнем доступа. Чтобы создать нового пользователя с низкими привилегиями:

Добавьте этого пользователя в группу Sudoers для запуска корневых команд:

После этого напишите команду для настройки нового пользователя для BASH:

Установка оболочки входа пользователя ehacking в /bin/bash
Установить Git
Git – обязательный инструмент для этических хакеров, стремящихся увеличить свой набор инструментов по сравнению с тем, что уже установлено в стандартных репозиториях Kali. Чтобы установить Git, просто наберите:

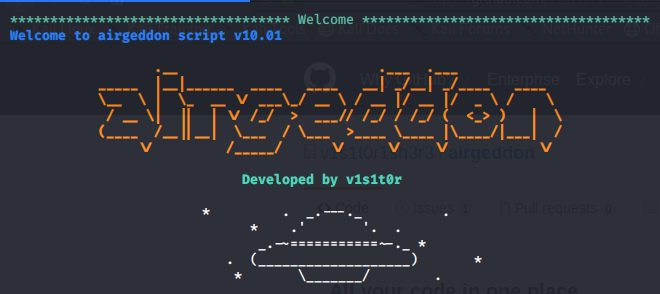
Установите ваши любимые инструменты взлома
В Kali Linux уже есть много инструментов для взлома и тестирования, например (Wireshark , Aircrack-ng , BeEF , Burp Suite , Hydra , Nikto , Maltego , Nmap), но что если вы захотите установить свой любимый инструмент, который вам нужен? Я собираюсь использовать для конкретной задачи, например, мне нужно атаковать сеть Wi-Fi с помощью Airgeddon, потому что он автоматизирует с помощью различных инструментов, поэтому вам не нужно вводить команды. Я могу установить Airgeddon в Kali Linux, набрав команду на терминале:

Дайте разрешения, чтобы сделать его исполняемым, набрав:
Запустите файл:
Установите браузер TOR
Onion Router (TOR) – это бесплатное программное обеспечение с открытым исходным кодом для анонимного общения. Он предназначен для того, чтобы люди не могли отслеживать ваши привычки, в том числе правительственные учреждения и корпорации. Вы можете установить браузер TOR, добавив репозиторий TOR в свой репозиторий APT:
затем загрузите ключ пакета и импортируйте его в ваш набор ключей APT:
Введите apt-get update:
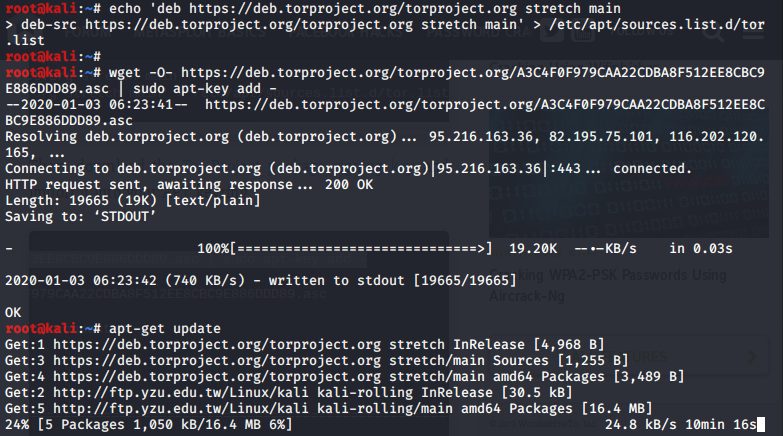
После обновления установите TOR:

Установить Tilix
Tilix – это эмулятор терминала с открытым исходным кодом, который использует виджет VTE GTK + 3, обладающий некоторыми удивительными функциями, такими как макеты терминалов любым способом, разделяя их по горизонтали или вертикали, и ввод можно синхронизировать между терминалами, чтобы команды, набранные в одном терминале, реплицировались в другие
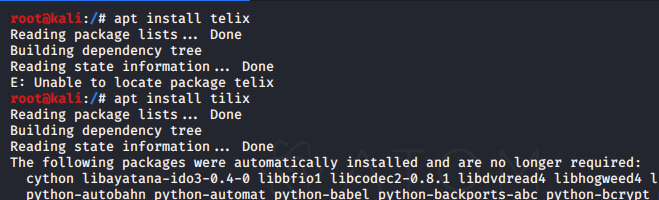
Введите tilix

Download Kali Linux 2020.1
Fresh images Why are you waiting? Start downloading now!
Existing Upgrades If you already have an existing Kali installation, remember you can always do a quick update:
kali@kali:~$ cat <<EOF | sudo tee /etc/apt/sources.list
deb http://http.kali.org/kali kali-rolling main non-free contrib
EOF
kali@kali:~$
kali@kali:~$ sudo apt update && sudo apt -y full-upgrade
kali@kali:~$
kali@kali:~$ [ -f /var/run/reboot-required ] && sudo reboot -f
kali@kali:~$
You should now be on Kali Linux 2020.1. We can do a quick check by doing:
kali@kali:~$ grep VERSION /etc/os-release
VERSION=»2020.1″
VERSION_ID=»2020.1″
VERSION_CODENAME=»kali-rolling»
kali@kali:~$
kali@kali:~$ uname -v
#1 SMP Debian 5.4.13-1kali1 (2020-01-20)
kali@kali:~$
kali@kali:~$ uname -r
5.4.0-kali3-amd64
kali@kali:~$
NOTE: The output of may be different depending on architecture.
As always, should you come across any bugs in Kali, please submit a report on our bug tracker. We’ll never be able to fix what we don’t know is broken.
Поддерживаемые платформы
Kali Linux распространяется в 32-битных и 64-битных образах для использования на хостах на основе набора команд x86 и в качестве образа для архитектуры ARM для использования на Beagle board и на Chromebook от AMD.
Разработчики Kali Linux стремятся сделать Kali Linux доступным для ещё большего количества устройств с архитектурой ARM.
Kali Linux уже доступен для BeagleBone Black, HP Chromebook, CubieBoard 2, CuBox, CuBox-i, Raspberry Pi, EfikaMX, Odroid U2, Odroid XU, Odroid XU3, , Utilite Pro, Galaxy Note 10.1 и SS808.
С появлением Kali NetHunter, Kali Linux также официально доступен на смартфонах, таких как Nexus 5, Nexus 6, Nexus 7, Nexus 9, Nexus 10, OnePlus One и ещё на некоторых моделях Samsung Galaxy.
Kali Linux доступен в Windows 10, поверх Windows Subsystem for Linux (WSL). Официальный дистрибутив Kali для Windows можно загрузить из Microsoft Store.
Литература
- Рафаэль Херцог, Джим О`Горман, Мати Ахарони. Kali Linux от разработчиков. — Питер, 2019. — 323 p. — ISBN 978-0997615609 англ.
- Шива Парасрам, Теди Хериянто, Алекс Замм. Kali Linux. Тестирование на проникновение и безопасность. — Питер, 2019. — 448 p. — ISBN 978-5-4461-1252-4.
- Shakeel Ali, Tedi Heriyanto. BackTrack 4: Assuring Security by Penetration Testing. — Packt Publishing, 2011. — 392 p. — ISBN 978-1-84951-394-4.
- Joseph Muniz, Aamir Lakhani. Web Penetration Testing with Kali Linux. — Packt Publishing, 2013. — 342 p. — ISBN 978-1-78216-316-9.
- Justin Hutchens. Kali Linux Network Scanning Cookbook. — Packt Publishing, 2014. — 452 p. — ISBN 978-1-78398-214-1.
- Lorenzo Simionato. (недоступная ссылка). linux.com (24 апреля 2007). Дата обращения: 18 марта 2015.
Kali Linux Release History
We release fresh images of Kali Linux every few months as a result of accumulative fixes, major security updates, installer updates, etc.
Please see https://bugs.kali.org/changelog_page.php for the most up-to-date log of changes.
Kali 2020.4 – 18th November, 2020 – The fourth 2020 Kali Rolling release. Kernel 5.9.0, Xfce 4.14.4
- Kali 2020.3 – 18th August, 2020 – The third 2020 Kali Rolling release. Kernel 5.7.0, Xfce 4.14.4
- Kali 2020.2 – 12th May, 2020 – The second 2020 Kali Rolling release. Kernel 5.5.0, Xfce 4.14.4
- Kali 2020.1b – 18th March, 2020 – Minor BugFix release (Offline setup issue).
- Kali 2020.1a – 13th February, 2020 – Minor BugFix release (xserver-xorg issue).
- Kali 2020.1 – 28th January, 2020 – The first 2020 Kali Rolling release. Kernel 5.4.0, Xfce 4.14.2
- Kali 2019.4 – 26th November, 2019 – The fourth 2019 Kali Rolling release. Kernel 5.3.9, Xfce 4.14.1
- Kali 2019.3 – 2nd September, 2019 – The third 2019 Kali Rolling release. Kernel 5.2.9, GNOME 3.30.2
- Kali 2019.2 – 21st May, 2019 – The second 2019 Kali Rolling release. Kernel 4.19.28, GNOME 3.30.2
- Kali 2019.1a – 4th March, 2019 – Minor BugFix release (VMware Installer).
- Kali 2019.1 – 18th February, 2019 – The first 2019 Kali Rolling release. Kernel 4.19.13, GNOME 3.30.2
- Kali 2018.4 – 29th October, 2018 – The fourth 2018 Kali Rolling release. Kernel 4.18.0, GNOME 3.30.1
- Kali 2018.3 – 27th August, 2018 – The third 2018 Kali Rolling release. Kernel 4.17.0, GNOME 3.28.2
- Kali 2018.2 – 30th April, 2018 – The second 2018 Kali Rolling release. Kernel 4.15.0, GNOME 3.28.0
- Kali 2018.1 – 6th February, 2018 – The first 2018 Kali Rolling release. Kernel 4.14.12, GNOME 3.26.2
- Kali 2017.3 – 21st November, 2017 – The third 2017 Kali Rolling release. Kernel 4.13, GNOME 3.26
- Kali 2017.2 – 20th September, 2017 – The second 2017 Kali Rolling release. Kernel 4.12, GNOME 3.25.
- Kali 2017.1 – 25th April, 2017 – The first 2017 Kali Rolling release. Kernel 4.9, GNOME 3.22.
- Kali 2016.2 – 31st August, 2016 – The second Kali Rolling release. Kernel 4.6, GNOME 3.20.2.
- Kali 2016.1 – 21st January, 2016 – The first Kali Rolling release. Kernel 4.3, GNOME 3.18.
- Kali 2.0 – 11th August, 2015 – Major release, “safi”, now a rolling distribution, major UI changes.
- Kali 1.1.0a – 13th March, 2015 – No fanfare release fixing kernel ABI inconsistencies in the installers.
- Kali 1.1.0 – 9th Febuary, 2015 – First dot release in 2 years. New kernel, new tools and updates.
- Kali 1.0.9a – 6th October, 2014 – Security BugFix release covering shellshock and Debian apt vulnerabilities.
- Kali 1.0.9 – 25th August, 2014 – BugFix release including installer and a set of tool updates and package fixes.
- Kali 1.0.8 – 22nd July, 2014 – EFI Support for our “full” ISOs and a set of tool updates and package fixes.
- Kali 1.0.7 – 27th May, 2014 – Kernel 3.14, tool updates, package fixes, Kali Live Encrypted USB Persistence.
- Kali 1.0.6 – 9th January, 2014 – Kernel 3.12, cryptsetup nuke option, Amazon AMI, ARM build scripts.
- Kali 1.0.5 – 5th September, 2013 – BugFix rollup. LVM Encrypted installs, Software Defined Radio (SDR) tools.
- Kali 1.0.4 – 25th July, 2013 – BugFix rollup. Penetration testing tool additions and updates.
- Kali 1.0.3 – 26th April, 2013 – BugFix rollup. New accessibility features. Added live Desktop installer.
- Kali 1.0.2 – 27th March, 2013 – Minor BugFix release and update roll-up.
- Kali 1.0.1 – 14th March, 2013 – Minor BugFix release (USB Keyboard).
- Kali 1.0.0 – 13th March, 2013 – Initial release, “moto”.
AWS EC2 Cloud Image Refresh
Upon doing the refresh, we have worked with AWS to get Kali Linux added to “GovCloud“. Which may be useful to a certain audience. With how the accounts were setup, we have had to start from fresh. As a result, we have a new marketplace entry.
What does this mean for people who are using the old entry? As Kali Linux is a rolling distribution, not a lot! You can still keep updating Kali Linux as usual. However, you will no longer be able to spin up the latest version using the latest instance. For that, you will need to switch to the new entry.
Note: We have tried to say it as many different places as possible, but putting it here is not going to hurt. The default login for AWS EC2 username is “kali” (not the standard “ec2-user”).
Setup Process
The full installer image always had all the packages required for an offline installation but if you installed a Kali Linux system with this image and without disabling the network, the installer would automatically run during the install. This is done to make sure that you have the latest packages on first boot. And that step can take a very long time, especially after a few months after a release when lots of updates have accumulated. Starting with 2020.3, we disabled the network mirror in the full installer so that you always get the same installation speed, and the same packages and versions for that release – just make sure to update after installing!
Whilst we were at it, we fixed another related issue. If you didn’t have network access (either voluntarily or otherwise) during installation, you would get an empty network repository (). This means, you would not be able to use to install additional packages. While there might be some users who will never have network, we believe that it’s best to actually configure that file in all cases. So that’s what we did. By default, any fresh installs going forward after 2020.3 will have network repositories pre-defined.
OnePlus 7 (T / Pro) image for Android 10
Our flagship device has received a new kernel for Android 10 based on the amazing work of the talented #tytydraco. The image supports the following models in the series:
- OnePlus 7
- OnePlus 7 Pro
- OnePlus 7T
- OnePlus 7T Pro
Please note that we do not currently recommend the OnePlus 7T and OnePlus 7T Pro until full TWRP recovery support is available. Our pick is the OnePlus 7 for its incredible price performance ratio.
The new image offers all the usual bells and whistles you can expect from NetHunter but also has some improvements over the Android 9 version, such as:
- Full support for USB multi-port adaptors (USB,HDMI, ethernet, pass-through charging, etc.)
- Full HID support
- The latest rtl88XXXu drivers from Kimocoder, adding injection support for:
- RTL8812AU
- RTL8814AU
- RTL8821AU
The image is available for download on our Kali NetHunter download page. Please note that Android 10 adds certain restrictions to the way storage access is handled. Please update the NetHunter app from the NetHunter store after flashing the image to enable the required access.
Настройки BIOS
Подключите загрузочный USB-накопитель к компьютеру.

Включите ПК и зайдите в BIOS или UEFI, нажав клавишу или клавиатурной сочетания, предусмотренное для выполнения данной задачи в вашей модели. При загрузке компьютера на экране появится подсказка. Чаще всего используются клавиши:
- «Delete» («Del»)
- «F2»
- «F10»

В разных моделях компьютеров предусмотрены различные интерфейсы UEFI или BIOS. Необходимо найти раздел «Boot» (или подобный).

Поменять порядок загрузки таким образом, чтобы созданный вами установочный USB-накопитель стал первым. Нажать клавишу «F10» для подтверждения изменений.

Нажать экранную кнопку «ОК» и «Enter».

Как установить Kali Linux рядом с Windows?
Обычная ситуация: вы – опытный пользователь ОС Windows и решили позаниматься с Linux-системой, выбрали дистрибутив, но хочется работать не на бездушной виртуалке, а на живом железе. Только вот весь жёсткий диск ваш размечен под NTFS и нет возможности установить рядом ещё и Linux. Из ситуации есть 2 выхода:
- Воспользоваться каким-нибудь дисковым менеджером и изменить размер NTFS-тома, чтобы на свободное место вкорячить Linux. Как видим, этот способ я описывал уже давно.
- Воспользоваться установочным диском с тем же Kali Linux и всё сделать прямо из-под него, ощутив себя мега-хацкером! Вот этим и займёмся сейчас, ведь Linux позволяет проделать все эти операции в менее дружественной среде (хе-хе), да ещё и так, что поневоле борода начинает расти.
Порядок действий
Первым делом, посмотрим, что мы имеем:
Типичная Windows 7, на единственном пользовательском разделе свободно аж 23 гигабайта дискового пространства. Вот это место мы и будем использовать для своих целей.
Запустим LiveCD с Kali Linux, (который мы и поставим в дальнейшем на освободившееся место), выберем первый пункт – просто запуск, без установки.
После того,как Live-система будет загружена, посмотрим конфигурацию диска:
# fdisk -l
Зачем?… Как зачем? Не знаю! (С)
На самом деле нам важно здесь посмотреть начало второго раздела – sda2. Видим, что начальный сектор – 206848
Запомним это число, а лучше как я, сделаем скриншот
Теперь посмотрим, на сколько можно будет уменьшить размер тома:
# ntfsresize -i -b /dev/sda2
Эта команда оценивает (-i), сколько пространства занято на разделе от общего размера раздела (с учётом бэд-кластеров (-b)). Мы видим, что предварительная оценка составила 8588 Мб (25%) от размера тома. Я решил не подрезать том “под ноль”, а оставить немного места для работу в Windows, поэтому откусывать будем где-то 14 Гб.
Здесь у меня будет косяк – я сначала делаю везде под 14 Гб, а потом, почему-то при разметке диска забыл и стал считать, что отрезал 13 Гб. В общем-то ничего такого страшного нет, просто будьте внимательнее меня!
Выполним команду:
# ntfsresize -n -b -s 14G /dev/sda2
Данная команда проведёт рассчёты без фактического изменения размера тома (-n) под размер (-s 14G) с учётом бэд-кластеров (-b). Если никаких ошибок не возникло, можно выполнить её же без ключа -n:
В ходе работы утилита переместит все файлы в начало тома, оставив “хвост” раздела пустым так, что его можно безболезненно отрезать fdisk-ом. Данные не пропадут, т.к. они перенесены к началу тома.
Общий порядок такой:
# fdisk /dev/sda – открываем редактор разметки для диска /dev/sdad удаляем2 второй разделn создаёмp основной том2 второй раздел206848 это начальный сектор второго тома, мы его запоминали в начале статьи+13G размер тома (вот тут я пропёрся, надо было писать +14G)Nне удалять старую сигнатуру NTFS (хотя это ни на что не влияет)t изменить тип раздела2 второго раздела7тип NTFS (т.к. по умолчанию создаётся раздел Linux)wзаписать изменения на диск
Перезапустим систему и проверим, загружается ли урезанная Windows:
Система загрузилась успешно, видим изменившийся размер тома. И вот тут всплыл мой косяк, что том стал 13 Гб, вместо 14… Можно, конечно, нарастить.
Чтож, продолжим наш процесс. Перезагрузим компьютер, вставив загрузочный Linux снова, на сей раз выберем установку. Шаги стандартные, пока не дойдём до разметки диска:
Вот тут возможны 2 варианта: либо доверимся мастеру и выберем пункт “Авто – использовать наибольшее свободное место“, либо разметка вручную.
Главное не выбирать “Использовать весь диск”, а то все наши виндовые разделы могут быть затёрты.
При разметке вручную – выбираем свободное место:Разметим его автоматически – все файлы в одном разделе (+ один раздел для подкачки)
Перед тем, как окончательно записать изменения на диск, убедимся, что не тронуты наши виндовые разделы:
А вот так выгляди меню загрузки:
Можно отредактировать меню, сделать запуск по умолчанию именно Windows и т.д. Но это уже выходит за рамки данной статьи.
Я убедился в том, что обе системы (Windows и Kali Linux) загружаются успешно.
Результаты
- Мы научились оценивать возможность редукции (уменьшения) раздела NTFS.
- Без проблем подрезаем раздел, используя только установочный диск Kali Linux.
- Уяснили, что удаление и создание раздела в fdisk с того же начального сектора не влияет на сохранность данных на разделе.
- Поняли, как можно установить себе дополнительную операционную систему по соседству с Windows, так что обе системы остались работоспособны.
3. Установка
Скачать установочный образ вы можете на официальном сайте, вам только нужно выбрать архитектуру. После загрузки обязательно проверьте диск на повреждения, сравнив контрольную сумму SHA256. Поскольку этот дистрибутив предназначен для тестирования безопасности совсем не хотелось, бы, чтобы он был каким-либо образом нарушен. Как выполнять проверку контрольной суммы Linux описано в отдельной статье.
В остальном же установка Kali Linux не сильно отличается от Debian. В зависимости от способа и мощности компьютера она может занять от нескольких минут до получаса. Мы детально рассматривали все в статье установка Kali Linux.
ARM Images
You will probably notice a bit of a change in the ARM images starting with our 2020.1 release. There are fewer images available for download, due to both manpower and hardware constraints, some images won’t be posted without community assistance.
The scripts are still updated, so if an image doesn’t exist for a machine you use, you will have to create it by running the build script on a Kali machine.
ARM images for 2020.1 will still run as root by default.
The sad news that a lot of people didn’t want to hear… an image for the Pinebook Pro isn’t included in the 2020.1 release. We are still working on getting it added, and as soon as it is ready we will post it.
1.0 NetHunter Editions
NetHunter can be installed on almost every Android device under the sun using one of the following editions:
| Edition | Usage |
|---|---|
| NetHunter Rootless | The core of NetHunter for unrooted, unmodified devices |
| NetHunter Lite | The full NetHunter package for rooted phones without a custom kernel. |
| NetHunter | The full NetHunter package with custom kernel for supported devices |
The following table illustrates the differences in functionality:
| Feature | NetHunter Rootless | NetHunter Lite | NetHunter |
|---|---|---|---|
| App Store | Yes | Yes | Yes |
| Kali cli | Yes | Yes | Yes |
| All Kali packages | Yes | Yes | Yes |
| KeX | Yes | Yes | Yes |
| Metasploit w/o DB | Yes | Yes | Yes |
| Metasploit with DB | No | Yes | Yes |
| NetHunter App | No | Yes | Yes |
| Requires TWRP | No | Yes | Yes |
| Requires Root | No | No | Yes |
| WiFi Injection | No | No | Yes |
| HID attacks | No | No | Yes |
The installation of NetHunter Rootless is documented here:
NetHunter-Rootless
The NetHunter-App specific chapters are only applicable to the NetHunter & NetHunter Lite editions.
The Kernel specific chapters are only applicable to the NetHunter edition.
Особенности
С версии 2019.4 (ноябрь 2019 года) рабочий стол по умолчанию переведён с GNOME на Xfce, при этом версия GNOME по-прежнему доступна.
Kali Linux имеет выделенный проект, предназначенный для совместимости и портирования на определенные Android-устройства под названием Kali Linux NetHunter.
Это первая платформа тестирования проникновения на платформе открытого исходного кода для устройств Nexus, созданная в качестве совместного усилия между членом сообщества Kali «BinkyBear» и «Offensive Security». Он поддерживает установку беспроводной кадр 802.11, однонаправленную настройку точки доступа MANA Evil, клавиатуру HID (такие как атаки типа Teensy), а также атаки Bad USB MITM.
BackTrack (предшественник Kali) включал в себя режим, известный как «криминалистический режим», который был перенесен на Kali через LiveBoot. Этот режим очень популярен по многим причинам, отчасти потому, что у многих пользователей Kali уже есть загрузочный USB-накопитель Kali или CD, и этот вариант упрощает применение Kali к судебной работе. При загрузке в «криминалистическом режиме» система не касается внутреннего жёсткого диска или места подкачки, и автоматическая установка отключена. Тем не менее, разработчики рекомендуют, чтобы пользователи тщательно тестировали эти функции, прежде чем использовать Kali в «криминалистическом режиме».
Going Forward
All that said, we are still not encouraging people to use Kali as their day to day operating system. More than anything else, this is because we don’t test for that usage pattern and we don’t want the influx of bug reports that would come with it. However, for those of you that are familiar with Kali and want to run it as your day to day platform, this change should help you out a lot. For the rest of you, this should give you a better security model to operate under while you are doing assessments.
As we mentioned at the start, this change is currently available in the daily builds and will be in the next weekly build. Feel free to download and test early, as we would like to have as many potential issues shaken lose before release as possible. The more active users on this the better.
HiDPI (High Dots Per Inch) Display
Upon starting Kali Linux up, certain things (Windows/buttons or text/font) may appear smaller than expected. This could be because of HiDPI (aka High DPI). It all depends on the software in question, with how it was made, (e.g. GTK2, GTK3, Qt5 etc). This could be happening for various reasons, such as the graphic card drivers and/or the monitor profile.
If things are looking larger than what you would believe to be «normal», please see our Fixing DPI guide.
This guide will cover single screen setups. We do not have the hardware in order to test multiple display outputs to write up the guide. So we are looking for community contribution to help out. If you have the hardware, and expertise, please edit this guide!
Desktop Environments — Xfce
Xfce does support HiDPI monitors. Though you may need to alter a few places, depending on your hardware, versions and issues to get it working.
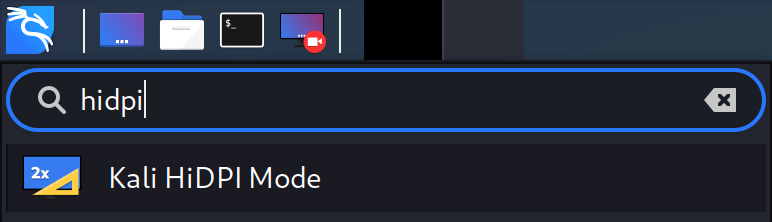
In order to make this process easier, Kali now provides a HiDPI mode. This mode adjusts the scaling-factor for GTK, QT and even Java based interfaces, so that the user doesn’t need to modify each one of them manually. You can toggle it by opening ‘Kali HiDPI mode’ from the applications menu or by running from the terminal.

Even though kali-hidpi-mode is able to alter the scaling-factor without the need of restarting, it is recommended to close the session and login again to ensure all changes are properly applied.
Below is more of an explanation for a manual setting.
Scaling Factor
GTK
After logging into Kali, the wallpaper may look «normal», but everything else might be «a little small to read».

Increasing the «Scaling Factor» from «x1» to «x2» should address this problem. You have two ways todo this, either through the command line or graphical:
In a terminal window, run the following commands:
- Graphical:
- Kali -> Settings -> Appearance -> Settings -> Windows Scaling
- Kali -> Settings -> Appearance -> Window Manager -> Theme:

The quickest way to clean up any left over artifacts is to log out and in again.
Qt
Some apps, such as qTerminal, don’t use the scale factor explained before, so they need to be configure separately.
To do so, you need to set the following environmental variables in the file:
Cursor size
Enabling HiDPI settings can cause some issues with the mouse size, and you might see how its size varies depending on the application you place it over.
To solve this, you can force the cursor size with the following command:
You may need to try increasing the value from .
Login Screen — LightDM
Are you experiencing an issue with the login screen (), with the login box being smaller than «normal»?
A possible solution would be to set «» to » (or higher):
You may need to try increasing the value from .
Updated on: 2020-Jul-21Author:
g0tmi1k
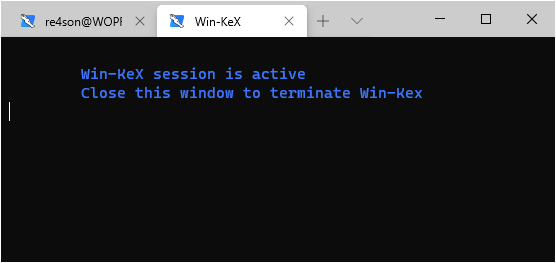
Win-KeX
Overview
- Window mode: start a Kali Linux desktop in a dedicated window
- Seamless mode: share the Windows desktop between Windows and Kali apps and menus
- Sound support
- Unprivileged and Root session support
- Shared clipboard for cut and paste support between Kali Linux and Windows apps
- Multi-session support: root window & non-priv window & seamless sessions concurrently

This page details the steps to install Win-Kex in under 2 minutes.
Installation
All installation steps, up to the point where we install Win-Kex, are also explained in the 5 minute video guide by the amazing NetworkChuck:
Kali Linux on Windows in 5min (WSL2 GUI)
Note: You can skip the installation of xrdp and follow to install Win-Kex instead.
Install Kali Linux in WSL2
-
Open PowerShell as administrator and run:
-
Restart
-
Open PowerShell as administrator and run:
-
Restart
-
Download and install the WSL2 Linux Kernel from here: https://aka.ms/wsl2kernel
-
Open PowerShell as administrator and run:
-
Install Kali Linux from the Microsoft Store
Note: to upgrade an existing WSL1 kali-linux installation, type:
-
Run Kali and finish the initial setup
Install Win-KeX
Install win-kex via:
sudo apt update && sudo apt install kali-win-kex
Run Win-KeX
Win-KeX supports two modes:
-
Window Mode:
To start Win-KeX in Window mode with sound support, run
Refer to the Win-KeX Win usage documentation for further information.
-
Seamless mode:
To start Win-KeX in Seamless mode with sound support, run
Refer to the Win-KeX SL usage documentation for further information.
Optional Steps:
-
If you have the space, why not install «Kali with the lot»?:
-
Create a Windows Terminal Shortcut:
Choose amongst these options:
Basic Win-KeX in window mode with sound:
Advanced Win-KeX in window mode with sound — Kali icon and start in kali home directory:
Copy the kali-menu.png icon across to your windows picture directory and add the icon and start directory to your WT config:
Basic Win-KeX in seamless mode with sound:
Advanced Win-KeX in seamless mode with sound — Kali icon and start in kali home directory:
Copy the kali-menu.png icon across to your windows picture directory and add the icon and start directory to your WT config:


For more information, ask for help via:
or consult the manpage via:

or join us in the Kali Forums
Kali Linux NetHunter
We were so excited about some of the work that has been happening with NetHunter recently, we already did a mid-term release to showcase them and get it to you as quick as possible.
On top of all the previous NetHunter news there is even more to announce this time around!
- Nexmon support has been revived, bringing WiFi monitor support and frame injection to on the Nexus 6P, Nexus 5, Sony Xperia Z5 Compact, and more!
- OpenPlus 3T images have been added to the download page.
- Our documentation page has received a well deserved refresh, especially the kernel development section.
When you think about the amount of power NetHunter provides in such a compact package, it really is mind blowing. Its been amazing to watch this progress, and the entire Kali team is excited to show you what is coming in the future.