Zbrush
Содержание:
- Types of Materials
- Materials for 2D illustration
- Working with several Tools and SubTools
- Типы лицензий
- So What’s it All About?
- Features
- GoZ for the mesh edition and the projection of details
- Loading Materials
- О продукте Zbrush
- Watch that Syntax!
- Системные требования:
- Understanding the Lingo
- About ZBrush® 2021
- Курс «3D-моделирование в ZBrush с нуля» от Skillbox
- Скачайте ZBrush на русском языке бесплатно для Windows
- Materials for 3D models
- GoZ for the rendering
Types of Materials
The Material palette shows many different materials. However, there are only five basic types of materials; the others are variations of these basic types.
Flat Color Material The Flat Color material is not a true material in that it has no shading or other material attributes. It is pure white and appears incandescent alongside other materials.
Important!
Note: embedding the Flat Color material in a 3D model will remove any other materials and return the model to the default behaviour of displaying the selected material.
FastShader Material The FastShader Material contains only diffuse and ambient attributes. It is primarily used for modeling when simple shading of the model is required.
BasicMaterial The BasicMaterial forms the basis for most of the standard materials, including:
- Toy Plastic
- Double Shader material
- TriShader materials
- QuadShader materials
These materials contain all the same attributes as a Basic material except that they have either 1, 2, 3 or 4 shader channels.
Fiber Material The fiber material adds 3D hair-like strands to the image. By default the hairs are drawn along the surface normals (so on a sphere the fibers will appear sticking straight out), though you can adjust this and other fiber properties in the material settings.
MatCap Materials MatCap materials use image maps to simulate the effects of lighting on different types of surface. As the lighting is fixed by the image map, they do not respond to changes made in the Light palette. MatCap stands for material capture and using the MatCap tool you can quickly create your own MatCap materials that effectively simulate real world surfaces.
To learn more about MatCap see the MatCap page.
Materials for 2D illustration
To work with materials in ZBrush, first make sure that the MRGB button (for color and material) or the M button (for material only) in the Draw Palette are pressed. Note that for many operations, the MRGB button is on by default.
Now select a material, choose a tool from the Tool palette that creates pixols, such as the SimpleBrush or a 3D tool such as Sphere3D, and start drawing. Whatever you draw will use the selected, or Active, material.
If you choose a different material, under normal circumstances nothing will change in the document, except anything you draw from then on will use the new material.
Working with several Tools and SubTools
GoZ is able to work with several Tool or SubTool at the same time, eventually shared between different target application. The only important thing to consider is to working with objects which have a unique name. As the models are send between several applications, this is the only way to keep track of all your edits and change.
GoZ can work with:
- Different Tools which contain no SubTools.
- SubTools which are in different Tools.
- All the SubTools of a Tool, visible or not.
- A new 3D model imported from another application as a new Tool or as a new SubTool
When doing all your GoZ operations, ZBrush will be able to automatically select the corresponding Tool or SubTool or the corresponding mesh in the target applications.
Типы лицензий
- Локальная лицензия (Single License)
Индивидуальная лицензия для конкретного пользователя. Эта лицензия позволяет одному пользователю установить и активировать ZBrush, предоставляя возможность использовать ZBrush там, где необходимо пользователю.
Объемная лицензия (Volume License)
Лицензия для корпораций и больших групп. Стоимость за рабочее место не отличается от стоимости локальной лицензии. Этот тип лицензии использует единый серийный номер для активации того количества лицензий, которое было приобретено. Используя онлайн-активацию, эти лицензии можно переносить с одной рабочей станции на другую путем деактивации и повторной активации лицензии при необходимости. Выбор опции объемной лицензии возможен при заказе 5 и более лицензий.
Плавающая лицензия (Floating License)
Этот вариант идеален для организаций, которым необходима возможность запускать ZBrush в любое время с любой рабочей станции их корпоративной сети. Этот тип лицензий использует лицензионный сервер, установленный на одной из рабочих станций внутри сети. Сами лицензии ZBrush могут быть установлены на любую или на все рабочие станции сети. Когда любой пользователь загружает ZBrush, программа связывается с лицензионным сервером и проверяет доступность свободных лицензий для работы. Лицензионный сервер позволяет количество одновременных активаций равное количеству приобретенных лицензий продукта. Если количество текущих активаций равно количеству приобретенных лицензий, при запуске ZBrush на очередной рабочей станции будет выдано сообщение о достижении максимального количества активаций, и программа не сможет быть запущена до тех пор, пока один из пользователей, использующих ее не закроет ZBrush. Использование плавающих лицензий возможно при наличии 10 и более лицензий. Дополнительное количество рабочих мест может быть приобретено в любое время и в любом количестве. Могут использоваться разные клиентские платформы (т.е. часть лицензий на Windows и часть лицензий на Mac OS). Для серверной платформы должен использоваться сервер на платформе Windows или Linux. При первичной активации сетевой учетной записи производится оплата за перевод локальной лицензии ZBrush в плавающую.
So What’s it All About?
The ZScript language is made up of a series of commands – nearly 200 of them. These commands can be put together in a huge variety of ways so as to get ZBrush to do stuff.
Let’s suppose you’ve written a zscript, or got one from somewhere such as ZBC – what happens next? Well, first the zscript has to be loaded into ZBrush by pressing the Load button in the ZScript menu. At that point ZBrush tries to convert the human-readable zscript text file into computer-readable code (or ‘machine code’ as it is known). This process is called compiling and, if all goes well, the ‘Play’ button or other interface components will appear and the next part of the process can happen – running the thing!
But we’re getting a little ahead of things; first let’s consider the zscript language in a little more detail.
Features
Sculptris Pro
 When sculpting digitally everything is created from polygons and the number of polygons is what determines how much detail your model can have. If your mesh only has a few polygons you won’t be able to add much detail. Sculptris Pro takes the guess work out of this. It automatically adds or removes polygons as you sculpt so you can concentrate on your model!
Brushes
 ZBrushCoreMini contains 8 of the most popular brushes from ZBrush and ZBrushCore. These brushes allow you to experience the digital sculpting revolution that defines the ZBrush family of products! In combination with Sculptris Pro these brushes will unleash your creativity. For example, if you want to add legs to your creature just pull them out with the SnakeHook brush.
-
- The Standard brush is the default sculpting brush. It creates a smooth finish.
- The Clay Buildup brush is more like modeling with actual clay. Use it to quickly block out a form.
- The Inflate brush will inflate the mesh, a bit like blowing up a balloon.
- The Pinch brush pinches the mesh together. This is good for creating folds.
- Use the Move brush to change the shape your model in dramatic ways.Note that Sculptris Pro does not operate for the Move brush.
- The SnakeHook brush is ideal for pulling out arms and legs or even for creating hair.
- The Slash3 brush carves into the mesh. This is good for creating cracks and wrinkles.
- The hPolish brush polishes the surface so that it resembles metal. It is good for adding hard surface details.
Symmetry
Need to sculpt both the left and right sides of a model? No worries! Symmetry has you covered. Simply enable the symmetry button and you will be able to sculpt on both sides of the model at the same time. You can turn it off again later when you are ready to break symmetry for that extra bit of realism.
Base Meshes
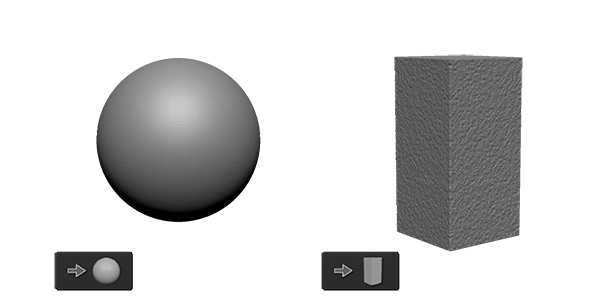
ZBrushCoreMini contains two starting models for you to choose from: a Sphere or a digital Block of stone. Either way, it is merely a starting point for you to unleash your creativity upon!
Materials/Color

ZBrushCoreMini contains eight different Materials to give additional life to your model. Some of these materials also add RGB color. All of them allow you to display your models in different ways when exporting images for sharing with the world.
To select a material, simply click its icon and the model will immediately be updated. Use the color selector to change the look of the material further.
iMage3D GIF and iMage3D PNG
Introducing a revolutionary new way to save your models! The iMage3D GIF and iMage3D PNG formats allow you share your files as special versions of the universal *.GIF and *.PNG image formats. On websites and social media, these files appear as normal 2D images as seen with the dinosaur to the left. But when someone saves that image and opens it in their copy of ZBrushCoreMini the band of “noise” at the bottom contains all the data necessary to reconstruct the image into a full 3D model!
(ZBrushCoreMini also allows saving and loading *.ZPR files for use with ZBrushCore and ZBrush. These files created by ZBrushCoreMini are fully usable in both applications. *.ZPR files created by ZBrushCore can be opened in ZBrushCoreMini in Viewer mode (see below). *.ZPR files created by ZBrush cannot currently be opened by ZBrushCoreMini.)
Image Exporting

Want to share a preview image of your model inside ZBrushCoreMini? Simply click the Export Image button to export an image of your model on the canvas.Unlike the iMage3D function, this image will not contain any mesh data.
3D Printing

ZBrushCoreMini is built for STEM learning. (Science, Technology, Engineering, Mathematics) Whether at home, school or the library if you have access to a 3D printer you can export your creations from ZBrushCoreMini with one click of the 3D Print button. This will automatically reduce the polygon count of the model (while intelligently keeping details) and export a *.OBJ file that you can then load into any 3D printer’s slicing software.
Viewer Mode

Viewer Mode allows ZBrushCoreMini to preview any *.ZPR project files created by ZBrushCore. When these are loaded into ZBrushCoreMini you will be able to rotate and view these models in 3D. While in this mode you will not be able to make any changes to the model but you can export images of the mesh at different angles or as viewed with different materials!
GoZ for the mesh edition and the projection of details
One of the most powerful features of GoZ is to allow you to send forth and back your model in another 3D software to edit your topology, or even adding props and then, streaming up your pipeline.
To edit your topology, just press the GoZ button: ZBrush will go to the lowest level of subdivision of your model and it will open it in the application you choose.
It is advised to mainly to refine the topology by adding loops, minor extrusions, to refine your shape, but avoid as much as possible major additions like converted a sphere made in ZBrush to a teapot in your package of choice: when sending back your model in ZBrush, a warning message will ask you if you want to transfer the existing sculpting information to your updated model or simply replace it and deleting the existing sculpting. Then if you chose to transfer the details and you create major changes, you may have unexpected results.
Notes:
- The projection of details can be time consuming and requiring a large amount of memory.
- The Projection may alter a little bit the quality of the sculpting. For a better result, try to minimize the projections by reducing the transfer between the different applications
Loading Materials
ZBrush starts with a set number of materials. The exact number depends on how many custom materials there are in the ZStartup/Materials folder but once ZBrush has started, the number of materials available in the Material palette does not change.
Materials can be thought of as occupying slots. When you load a new material through the Material > Load button it will replace the currently selected material in its slot. So, for example, if you select the Red Wax material and load a new material called Blue Mist, the Red Wax material will no longer be available. Furthermore, wherever you have used the Red Wax material on the canvas, or a model, it will now be replaced by Blue Mist.
This can take a bit of getting used to but it is a very powerful way of working with materials. It means that you don’t need to regard any material in ZBrush as ‘fixed’ – it can always be changed.
The one material that can’t be replaced is the Flat Color material. If you load a new material with Flat Color selected then the displayed name will be changed but the attributes will not.
О продукте Zbrush
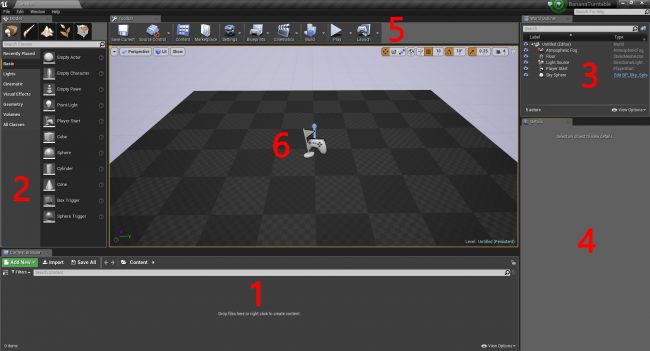
ZBrush устанавливает отраслевой стандарт для цифровой скульптуры. Его характеристики позволяют использовать настраиваемые кисти, формы, текстуры и краски виртуальной глины в режиме реального времени. Когда вы используете ZBrush, вы будете работать с теми же инструментами, которые используются киностудиями, разработчиками игр, производителями игрушек и коллекционных товаров, ювелирными дизайнерами, автомобильными/авиационными дизайнерами, иллюстраторами и художниками по всему миру.
ZBrush 2020 продолжает идти по пути творчества и производительности с основными новыми функциями, позволяющими художникам работать еще быстрее, особенно фокусируясь на создании твердых поверхностей и механических форм с большей легкостью. Во время работы или для подведения результата своей работы вы сможете воспользоваться потрясающим реалистичным рендерингом с мгновенной обратной связью. ZBrush 2020 также помогает вам быть более эффективными с новой системой организации папок, переписанным инструментом автоматической ретопологии и новой системой камеры. Ваше искусство изменится навсегда.
Для увеличения нажмите на картинку
Watch that Syntax!
A big difference between any computer programming language and human speech is that the computer is very unforgiving of errors. If we say ‘the cat white is’ then most people will understand that we mean ‘the cat is white’. But if we were to make a similar mistake in a computer language then the computer would not understand and our code would not be useable. Putting everything in the right place and right order is what’s meant by correct ‘syntax’.
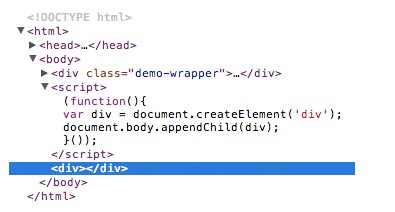
ZBrush first checks the syntax when the zscript text file is loaded. If the syntax is wrong then we can’t get any further – ZBrush can’t make its ‘machine code’ and a message is displayed in the zscript window at the bottom of the ZBrush interface. (You may need to click on the handle or press ‘H’ on the keyboard to get the zscript window to open.) ZBrush will display your code and then a message where it thinks the error is – though sometimes the precise error can be difficult to track down! Here’s an example:
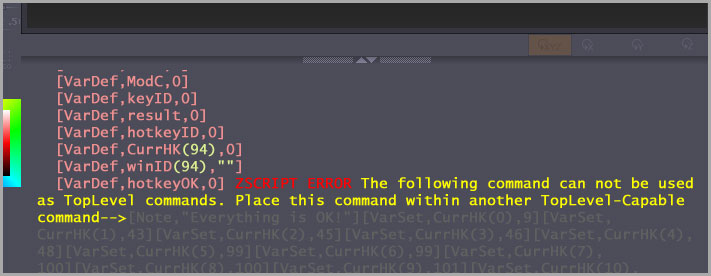
What this all boils down to is this: make sure you check that each opening square bracket has a closing square bracket, and that your commas are in the right places. It can be fiddly getting this right but errors of this sort can be difficult to spot later.
Системные требования:
Windows
Минимальные:
- ОС: 64-х битные версии Windows Vista и выше
- Процессор: Core2duo или AMD эквивалентные
- Оперативная память: 4Гб (рекомендуется 8 Гб и выше)
- HDD: 8 Гб свободного пространства.
- Разрешение экрана: 1280×1024 и выше (32 bits)
- Видео-карта: большинство карт, произведенных в 2008 году и позже. Должна поддерживать OpenGL 3.3 или выше.
Рекомендованные:
- ОС: 64-х битные версии Windows Vista и выше
- Процессор: Intel i5/i7/Xeon или AMD эквивалентные
- Оперативная память: 8Гб (рекомендуется 16+ Гб и выше)
- HDD: 100 Гб свободного пространства. (SSD-диск рекомендован)
- Разрешение экрана: 1920×1080 и выше (32 bits)
- Видео-карта: большинство карт, произведенных в 2008 году и позже. Должна поддерживать OpenGL 3.3 или выше.
Mac
Минимальные:
- ОС: Mac OS 10.10 и выше
- Процессор: Core2duo с поддержкой технологии SSE2
- Оперативная память: 4Гб (рекомендуется 6Гб и выше)
- HDD: 8 Гб свободного пространства.
- Разрешение экрана: 1280×1024 и выше
- Видео-карта: большинство карт, произведенных в 2008 году и позже. Должна поддерживать OpenGL 3.3 или выше.
Рекомендованные:
- ОС: Mac OS 10.10 и выше
- Процессор: Intel i5/7/Xeon
- Оперативная память: 8Гб (рекомендуется 16+ Гб и выше)
- HDD: 100 Гб свободного пространства. (SSD-диск рекомендован)
- Разрешение экрана: 1920×1080 и выше (32 bits)
- Видео-карта: большинство карт, произведенных в 2008 году и позже. Должна поддерживать OpenGL 3.3 или выше.
Understanding the Lingo
Brackets and Commas
All the ZScript commands are contained within square brackets: . Inside those brackets the different parts of the command are separated by commas: . Those are the two essential punctuation marks in zscripting; the rest is made up of the special command words and various options.
The commands all follow the same basic form. There is a starting square bracket followed by the command name. After that come the various options (if there are any) separated by commas and finally there is an ending square bracket. Here is the command for setting the canvas zoom; the 1 is the value which sets the zoom to actual size:
Inside and Outside
One thing to watch when arranging your zscript is how the commands relate to each other. Some zscript commands have to always be on their own in a zscript – these are called Top Level commands. Other commands must always go inside other commands – these are known as Sub-Level. However, the majority can go anywhere; inside or outside.
So how do you tell where to put things? There are no obvious ways to distinguish Top Level or Sub-Level commands. But don’t worry about this now; when you get to look over the ZScript Command Reference you’ll see that the different types of command are clearly indicated.
Descriptive Commands
As has been said, the ZScript language is basically English which has been adapted so that it can be interpreted by a computer. As you may have realised from the example given above, it’s not that difficult to understand what a command does. CanvasZoomSet is simply a compressed way of saying ‘set the canvas zoom to…’. Likewise, the command that creates an interface button is IButton, the I being an abbreviation for Interface. As you’ll see, this particular form, with an I at the start of the command, is used a lot.
Upper or Lower Case?
ZScripting is not case sensitive, in other words it doesn’t matter whether you type your code all in lower case, ALL IN CAPITALS, or a combination of the two. The form we will follow here is a mixture of upper and lower case, with a capital letter indicating a new word, as in CanvasZoomSet. This method is generally easiest to read and therefore easiest to understand.
About ZBrush® 2021
ZBrush sets the industry standard for digital sculpting. Its features enable you to use customizable brushes to shape, texture and paint virtual clay in a real-time environment. When you use ZBrush, you’ll be working with the same tools used by film studios, game developers, toy/collectible makers, jewelry designers, automotive/aviation designers, illustrators and artists worldwide.
ZBrush 2021 continues on the path of creativity and productivity with major new features allowing artists to work even faster and with more freedom. This version carries the ability to experiment and work in a natural way to a whole new level, offering artists greater freedom to express their ideas and discover ways of working that previously have been beyond imagination. Get ready to unleash your creativity!
Cloth Simulation
Cloth is one of the most difficult things to create in 3D. The folds and the way the cloth lies on a surface can challenge all of an artist’s ingenuity and talent. But with cloth simulation and dynamic collision detection the process is made a whole lot easier. The ability to control the effect by running a simulation that can be stopped and restarted at any time, or alternatively by using the new cloth brushes to affect the result directly, makes the whole process easy and fun.
Read more about Cloth Simulation here.
Dynamic Thickness
A new feature for Dynamic Subdivision, you can now add thickness to single-sided meshes. This means you can add thickness as and when you need it, and adjust at any time, instead of having to plan in advance.
Read more about Dynamic Thickness here.
MicroPoly
MicroPoly is a new feature for Dynamic Subdivision that allows the tiling of meshes to produce cloth weave and other materials. Easily switch between different MicroPoly meshes to get exactly the effect you are after. Combine with Cloth Simulation to produce amazingly realistic results.
Read more about MicroPoly here.
ZModeler Additions
Two major additions have been made to ZModeler: Edge Extrude for creating single-sided meshes and re-topology. And Inset Equidistant for creating insets that don’t change you existing topology profile.
Read more about ZModeler Additions here.
NanoMesh Additions
When you have several versions of the same object in your scene it can be tedious and time-consuming when you need to update them.
With the revised NanoMesh Edit Object functionality this is now easy – work on the original and see the copies update in real time.
Read more about NanoMesh Additions here.
iMage3D Gif and iMage3D PNG
Introducing a new way to save your models! The iMage3D GIF and iMage3D PNG formats allow you to share your files in *.GIF and *.PNG images. Want to share your work on Social Medias? Simply save your model as an iMage3D GIF or iMage3D PNG and create the post! When saved the file will be stored in a standard *.GIF or *.PNG format showing you a thumbnail of the mesh along with the 3D information built in..
Read more about iMage3D Gif and iMage3D PNG here.
Other Additions
Find in this section all the various other additions and changes made in ZBrush 2021.
Read more about Other Additions here.
Курс «3D-моделирование в ZBrush с нуля» от Skillbox

| Длительность | 2 месяца |
| Уровень | С нуля |
| Для кого подходит | Начинающим 3D-моделерам |
| Формат | Видеолекции + домашние задания + общение с наставником |
| Итоги | Диплом |
| Цена | ● полная – 20 000 рублей; ● УСПЕЙ НА СКИДКУ! –1 167 рублей в месяц! ● гарантия возврата денег в течение 14 дней, если не понравится формат обучения или манера преподавания. |
| Ссылка на курс |
Программа курса включает в себя следующие блоки:

Преподаватели:
Роберт Кубус – 3D-моделер студии «Паровоз».
После окончания курса вы сможете:
- создавать живые, красочные, индивидуальные персонажи;
- уверенно пользоваться программой;
- создавать 3D-модели;
- детализировать модель и делать её более фактурной;
- создавать одежду, аксессуары и части тела персонажа.
Мои впечатления: За 2 месяца вы полностью изучите основные инструменты и принципы работы с ZBrush. Научитесь создавать «живые» персонажи с мимикой, одеждой и аксессуарами. Обучение пройдёт под руководством опытных преподавателей, а также вы сможете общаться со студентами в общем чате. Доступ к материалам курса не ограничен по сроку, поэтому любой урок можно пройти повторно. Благодаря курсу освоите новую профессию и станете востребованным специалистом.
Получить скидку →
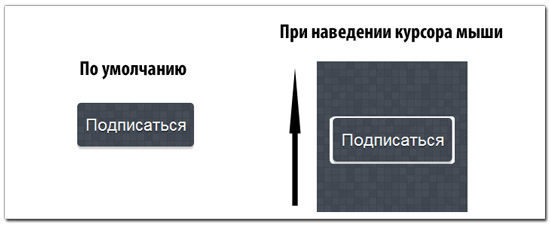
Подписывайтесь на наши новости
Одно письмо в неделю с самыми актуальными статьями + обзор digital-профессий!
*Нажимая «Подписаться» вы даете согласие на обработку персональных данных.
Скачайте ZBrush на русском языке бесплатно для Windows
| Версия | Платформа | Язык | Размер | Формат | Загрузка |
|---|---|---|---|---|---|
 ZBrush 2018 Installer |
Windows |
English | 1134.3MB | .exe |
Скачать |
|
ZBrush взлом |
Windows | English | 111.3MB | .exe |
Скачать |
|
Pixologic ZBrush 2018 |
MAC | English | 1250,3MB | .zip |
Скачать |
Обзор ZBrush
ZBrush (Збраш) – условно-бесплатная программа для трехмерного цифрового моделирования. Подходит для создания объектов любой сложности: от геометрических фигур до сложных, реалистичных моделей с глубокой детализацией.
Функционал ZBrush
Программа создает модели на основе технологии Pixol, которая позволяет буквально лепить 3D-скульптуры из виртуальной глины. Можно растягивать объекты, менять консистенцию материала и геометрию структур, создавать эффект мерцания глаз.
Все изменения у пользователя на виду: он может оценить их и сразу исправить недочеты. Это ускоряет и упрощает процесс.
Программа создает эффект имитации трехмерности: пользователь рисует 3D-модели на двумерной поверхности.
Главная особенность ZBrush – автоматическое создание и проработка теней и бликов. Физика объектов сохраняется: при поворачивании или перемещении модели затенение тоже меняется. Вкупе с отменной детализацией, эта функция помогает создать реалистичные модели.
В программе тысячи инструментов: разные виды кистей для рисования и раскрашивания, модификаторы геометрии и готовые шаблоны объектов.
Чтобы пользователю было легче ориентироваться, разработчики распределили их по палитрам. Внутри последних инструменты тоже сгруппированы по своему предназначению.
Другие возможности и функции ZBrush:
- – Детализация до сотен миллионов полигонов позволяет достичь максимальной реалистичности объекта.
- – Программа работает по воксельной системе. Воксель – трехмерный аналог пикселя, у которого 3 координаты – X, Y, Z. Это позволяет прорисовывать глубокие штрихи.
- – Пользователь может разделять готовый объект на части или создавать разрезы и отверстия, а также соединять несколько моделей в одну.
- – В ZBrush огромная библиотека разных элементов, включая геометрические фигуры, разные формы носов, глаз, рук и других частей тела.
- – Программа дает возможность воссоздать форму геометрических объектов и полировать поверхность моделей.
- – Кисть FiberMesh создает волосы и шерсть с высокой детализацией.
ZBrush нетребователен к ресурсам системы и работает даже на относительно слабых компьютерах. Интерфейс не доступен на русском языке. Программа поддерживается на ОС Windows и OS X. Последняя версия – ZBrush 2018 – вышла в марте 2018 года.
Скриншоты
Похожие программы
Аудио | Видео программы
Графические программы
Microsoft Office
Игры
Интернет программы
Диски и Файлы
Materials for 3D models
If you are working with a 3D object such as the Sphere3D or a polymesh, the new material will only be applied if the object is in Edit mode or the Move, Scale or Rotate Gyro is active. The default behaviour for a 3D model in Edit mode is for it to take on the selected material.
To paint particular materials on a 3D object, the materials must be embedded. Embedding the material stops the default behaviour and the model will display the embedded material whichever material is selected in the Material palette. To embed a material you need to:
- Make sure the M or MRGB button is on in the Draw palette
- Select a suitable base material to work with
- Press Color > Fill Object
After doing this, you will be able to paint on the model using other materials. Simply select the material you want to use, make sure that the M or MRGB button is on, and paint.
Important!
Note: If you wish to paint with material and color then turn on the MRGB button. Remember to turn off the ZAdd or ZSub buttons to avoid sculpting your model at the same time as painting.
GoZ for the rendering
When you create a sculpting and create the Displacement maps, Normal maps and/or Diffuse map, assigned to a Tool or SubTool and sending your model to another application through GoZ, a new shader will be created on the first time, which will include all the information needed to do a render with the according settings, like the displacement intensity value, or the normal map directions. Only add few lights, tweak the shader and your model is ready to be rendered.
A shader will be created with at least one map loaded in the Displacement Map, Texture map or Normal map menu located in the Tool palette. GoZ won’t create automatically the maps for you, then if you want to export your model including the maps, you must:
- Create UVs or import UVs (through GoZ or not) at the lowest level of Subdivision
- Choosing the size of your texture in the UV Map menu located in the Tool palette
- Creating your Diffuse, Normal map or Displacement map in the menu of the same name, located in the Tool palette.
- GoZ will only send the Displacement, Normal and/or Diffuse Map(s) if the map(s) are in the small preview window of either map sub-palette.
- Then, you can send your model through GoZ to the application of your choice and creating your renders.
If you recreate new maps after the creation of the shader, GoZ will try to automatically update them in the previously created shader, without, if possible, not affecting the changes you did.
Note about 3DSMax :3DSMax create a Shell shader, which will let you choose for a real time shader and a rendering shader. The realtime shader is based on a DirectX Shader, to have the normal map displayed in real time.