Bootstrap text color
Содержание:
- Examples
- Direction
- Настройка грид
- Варианты оформления изображений
- Bootstrap 4 CDN
- Usage
- Contextual classes
- Internet Explorer 10 на Windows 8 и Windows Phone 8
- Горизонтальная форма
- Examples
- Использование сетки
- Подсказки для полей формы
- Z-index
- Custom File Upload
- Internet Explorer 8 и Respond.js
- Валидация на стороне клиента
Examples
Due to the widespread use of tables across third-party widgets like calendars and date pickers, we’ve designed our tables to be opt-in. Just add the base class to any , then extend with custom styles or our various included modifier classes.
Using the most basic table markup, here’s how -based tables look in Bootstrap. All table styles are inherited in Bootstrap 4, meaning any nested tables will be styled in the same manner as the parent.
| # | First | Last | Handle |
|---|---|---|---|
| 1 | Mark | Otto | @mdo |
| 2 | Jacob | Thornton | @fat |
| 3 | Larry | the Bird |
You can also invert the colors—with light text on dark backgrounds—with .
| # | First | Last | Handle |
|---|---|---|---|
| 1 | Mark | Otto | @mdo |
| 2 | Jacob | Thornton | @fat |
| 3 | Larry | the Bird |
Direction
Set the direction of flex items in a flex container with direction utilities. In most cases you can omit the horizontal class here as the browser default is . However, you may encounter situations where you needed to explicitly set this value (like responsive layouts).
Use to set a horizontal direction (the browser default), or to start the horizontal direction from the opposite side.
Flex item 1
Flex item 2
Flex item 3
Flex item 1
Flex item 2
Flex item 3
Use to set a vertical direction, or to start the vertical direction from the opposite side.
Flex item 1
Flex item 2
Flex item 3
Flex item 1
Flex item 2
Flex item 3
Responsive variations also exist for .
Настройка грид
Используя наш встроенного грид Sass переменные и карты, можно полностью настроить предопределенные грид классов. Изменение количества уровней, в медиа Размеры запроса и ширину контейнера—то перекомпилировать.
Столбцы и промежутки
Число грид столбцами и горизонтальными внутренний отступ (ака, промежутки) может быть изменен через Sass переменные. используется для создания ширины (в процентах) каждого отдельного столбца в то время как делятся поровну между и для водостоков колонки.
Грид уровней
Перемещение за пределы самих колонок, Вы также можете настроить количество грид уровнях. Если вы хотели всего лишь три грид уровней, вы бы обновление и Что-то вроде этого:
При внесении любых изменений в файл Sass переменные или карты, Вам необходимо сохранить изменения и перекомпилировать. Это будет совершенно новый набор предопределенных грид классы для ширины столбцов, смещение, толкает и тянет. Адаптивный ЖКХ видимости также будут обновлены, чтобы использовать пользовательские точки останова.
Варианты оформления изображений
В этом разделе рассмотрим примеры оформления изображений с помощью CSS.
1. Пример, в котором показано как можно разместить текст поверх изображения.
<style>
/* CSS */
.img__container {
  position: relative;
  margin: 20px auto 30px auto;
}

.img__container>img {
  display: inline-block;
  max-width: 100%;
  height: auto;
  border-radius: 4px;
  box-shadow: 0 0 6px #9E9E9E;
  border: 4px solid #fff;
}

.img__description {
  position: absolute;
  left: 0;
  right: 0;
  bottom: 0;
  padding: 15px;
  background-color: rgba(255, 255, 255, 0.8);
  border-bottom-left-radius: 4px;
  border-bottom-right-radius: 4px;
}

.img__header {
  font-weight: bold;
  font-size: 1.25em;
}
</style>

<!-- HTML -->
<div class="img__container">
  <img src="image.png" class="image" alt="Описание изображения...">
  <div class="img__description">
    <div class="img__header">Заголовок для текста</div>
    Текст поверх изображения...
  </div>
</div>
2. Рамка для изображения с использованием CSS-свойств , и .
<style>
/* CSS */
.image {
  display: block;
  margin: 20px auto 30px auto;
  max-width: 100%;
  height: auto;
  margin-bottom: 30px;
  outline: 6px dotted #fff;
  outline-offset: -3px;
  border: 8px solid #eee;
}
</style>

<!-- HTML -->
<img src="image.png" class="image" alt="Описание изображения...">
3. Изображение, стилизованное с использованием CSS-свойств и .
<style>
/* CSS */
.image {
  display: block;
  margin: 20px auto 30px auto;
  max-width: 100%;
  height: auto;
  box-shadow: -6px 6px 0 #E0E0E0, -12px 12px 0 #BDBDBD;
  margin-bottom: 30px;
  border: 6px solid #F5F5F5;
}
</style>

<!-- HTML -->
<img src="image.png" class="image" alt="Описание изображения...">
4. Изображение, оформленное с помощью CSS-свойств и .
<style>
/* CSS */
.image {
  display: block;
  max-width: 100%;
  height: auto;
  margin: 20px auto 30px auto;
  border: 5px solid #fff;
  box-shadow: 0 0 10px #9e9e9e;
  border-radius: 4px;
}
</style>

<!-- HTML -->
<img src="image.png" class="image" alt="Описание изображения...">
5. Пример, в котором показана CSS3 техника для установки фонового изображения на весь экран.
/* CSS */
html {
  background: url(bg.jpg) no-repeat center center fixed;
  -webkit-background-size: cover;
  -moz-background-size: cover;
  -o-background-size: cover;
  background-size: cover;
}
6. Пример, в котором элементу установим фоновое изображение.
Установка изображения в качестве фона в Bootstrap выполняется средствами CSS. Для этого используется свойство или .
<style>
/* CSS */
.page-title {
  background-image: url(bg.png);
}
</style>

<!-- HTML -->
<div class="page-title">...</div>
Изображение применять в качестве фона рекомендуется только в том случае, если оно не является частью контента, а используется только для оформления.
Bootstrap 4 CDN
If you don’t want to download and host Bootstrap 4 yourself, you can include it from a CDN (Content Delivery Network).
MaxCDN provides CDN support for Bootstrap’s CSS and JavaScript. You must also include jQuery:
MaxCDN:
<!— Latest compiled and minified CSS —><link rel=»stylesheet» href=»https://maxcdn.bootstrapcdn.com/bootstrap/4.5.2/css/bootstrap.min.css»><!— jQuery library —><script src=»https://ajax.googleapis.com/ajax/libs/jquery/3.5.1/jquery.min.js»></script>
<!— Popper JS —><script src=»https://cdnjs.cloudflare.com/ajax/libs/popper.js/1.16.0/umd/popper.min.js»></script><!— Latest compiled JavaScript —><script src=»https://maxcdn.bootstrapcdn.com/bootstrap/4.5.2/js/bootstrap.min.js»></script>
One advantage of using the Bootstrap 4 CDN:
Many users already have downloaded
Bootstrap 4 from MaxCDN when visiting
another site. As a result, it will be loaded from cache when they visit your site, which leads to faster loading time.
Also, most CDN’s will make sure that once a user requests a file from it, it will be served
from the server closest to them, which also leads to faster loading time.jQuery and Popper?Bootstrap 4 use jQuery and Popper.js for
JavaScript components (like modals, tooltips, popovers etc). However, if you just use the
CSS part of Bootstrap, you don’t need them.
Show components that require jQuery »
- Closable alerts
- Buttons and checkboxes/radio buttons for toggling states
- Carousel for slides, controls, and indicators
- Collapse for toggling content
- Dropdowns (also requires Popper.js for perfect positioning)
- Modals (open and close)
- Navbar (for collapsible menus)
- Tooltips and popovers (also requires Popper.js for perfect positioning)
- Scrollspy for scroll behavior and navigation updates
Usage
bootstrap_form_for
To get started, use the helper in place of the Rails helper. Here’s an example:
<%= bootstrap_form_for(@user) do |f| %>
  <%= f.email_field :email %>
  <%= f.password_field :password %>
  <%= f.check_box :remember_me %>
  <%= f.submit "Log In" %>
<% end %>
This generates the following HTML:
<form accept-charset="UTF-8" action="/users" class="new_user" id="new_user" method="post">
  <div class="form-group">
    <label for="user_email">Email</label>
    <input class="form-control" id="user_email" name="user" type="email">
  </div>
  <div class="form-group">
    <label for="user_password">Password</label>
    <input class="form-control" id="user_password" name="user" type="password">
  </div>
  <div class="form-check">
    <input name="user" type="hidden" value="">
    <input class="form-check-input" id="user_remember_me" name="user" type="checkbox" value="1">
    <label class="form-check-label" for="user_remember_me">Remember me</label>
  </div>
  <input class="btn btn-secondary" name="commit" type="submit" value="Log In">
</form>
bootstrap_form_tag
If your form is not backed by a model, use the . Usage of this helper is the same as , except no model object is passed in as the first argument. Here’s an example:
<%= bootstrap_form_tag url: '/subscribe' do |f| %>
  <%= f.email_field :email, value: 'name@example.com' %>
  <%= f.submit %>
<% end %>
bootstrap_form_with
Note that in Rails 5.1 does not add IDs to form elements and labels by default, which are both important to Bootstrap markup. This behaviour is corrected in Rails 5.2.
To get started, just use the helper in place of . Here’s an example:
<%= bootstrap_form_with(model: @user, local: true) do |f| %>
  <%= f.email_field :email %>
  <%= f.password_field :password %>
  <%= f.check_box :remember_me %>
  <%= f.submit "Log In" %>
<% end %>
This generates:
<form role="form" action="/users" accept-charset="UTF-8" method="post">
<input name="utf8" type="hidden" value="✓" />
<div class="form-group">
<label class="required" for="user_email">Email</label>
<input class="form-control" type="email" value="steve@example.com" name="user" />
</div>
<div class="form-group">
<label for="user_password">Password</label>
<input class="form-control" type="password" name="user" />
<small class="form-text text-muted">A good password should be at least six characters long</small>
</div>
<div class="form-check">
<input name="user" type="hidden" value="">
<input class="form-check-input" id="user_remember_me" name="user" type="checkbox" value="1">
<label class="form-check-label" for="user_remember_me">Remember me</label>
</div>
<input type="submit" name="commit" value="Log In" class="btn btn-secondary" data-disable-with="Log In" />
</form>
supports both the and use cases
in .
Contextual classes
Use contextual classes to color table rows or individual cells.
| Class | Heading | Heading |
|---|---|---|
| Active | Cell | Cell |
| Default | Cell | Cell |
| Primary | Cell | Cell |
| Secondary | Cell | Cell |
| Success | Cell | Cell |
| Danger | Cell | Cell |
| Warning | Cell | Cell |
| Info | Cell | Cell |
| Light | Cell | Cell |
| Dark | Cell | Cell |
Regular table background variants are not available with the dark table, however, you may use text or background utilities to achieve similar styles.
| # | Heading | Heading |
|---|---|---|
| 1 | Cell | Cell |
| 2 | Cell | Cell |
| 3 | Cell | Cell |
| 4 | Cell | Cell |
| 5 | Cell | Cell |
| 6 | Cell | Cell |
| 7 | Cell | Cell |
| 8 | Cell | Cell |
| 9 | Cell | Cell |
Conveying meaning to assistive technologies
Using color to add meaning only provides a visual indication, which will not be conveyed to users of assistive technologies – such as screen readers. Ensure that information denoted by the color is either obvious from the content itself (e.g. the visible text), or is included through alternative means, such as additional text hidden with the class.
Create responsive tables by wrapping any with , making the table scroll horizontally at each breakpoint of up to (but not including) 576px, 768px, 992px, and 1120px, respectively.
Note that since browsers do not currently support , we work around the limitations of and viewports with fractional widths (which can occur under certain conditions on high-dpi devices, for instance) by using values with higher precision for these comparisons.
Internet Explorer 10 на Windows 8 и Windows Phone 8
Интернет Эксплорер 10 не отличает ширину устройства с шириной окна просмотра, и, следовательно, неправильно применяет медиа запросы в CSS Bootstrap. Как правило, вы могли бы просто добавить быстрый фрагмент CSS чтобы исправить это:
Однако, это не работает для устройств, работающих под управлением Windows Phone 8 версий старше, чем Обновления 3 (а.к.а. GDR3), поскольку это вызывает такие устройства, чтобы главным образом показать основной рабочий стол вместо узкого «phone» view. Для решения этой проблемы вам необходимо включать следующие CSS и JavaScript, чтобы обойти ошибку.
Для получения дополнительной информации и руководства по использованию, просмотрите Windows Phone 8 и Device-Width.
Один за одним, мы включаем это в документацию и примеры Bootstrap в качестве демонстрации.
Горизонтальная форма
Вы можете использовать классы сетки Bootstrap для создания горизонтальных форм. Просто укажите, сколько колонок должен занимать каждый элемент. В частности, добавьте класс .row к .form-group и класс .col-*-* или .col-* для каждой колонки.
Вы также должны добавить класс .col-form-label к элементу <label>, чтобы метка относительно текстовых полей расположилась по центру вертикали.
<link rel=»stylesheet» href=»https://maxcdn.bootstrapcdn.com/bootstrap/4.0.0/css/bootstrap.min.css»>
<div class=»container»>
<form>
<div class=»form-group row»>
<label for=»first_name» class=»col-xs-3 col-form-label mr-2″>Имя</label>
<div class=»col-xs-9″>
<input type=»text» class=»form-control» id=»first_name» name=»first_name»>
</div>
</div>
<div class=»form-group row»>
<label for=»last_name» class=»col-xs-3 col-form-label mr-2″>Фамилия</label>
<div class=»col-xs-9″>
<input type=»text» class=»form-control» id=»last_name» name=»last_name»>
</div>
</div>
<div class=»form-group row»>
<div class=»offset-xs-3 col-xs-9″>
<button type=»submit» class=»btn btn-primary»>Отправить</button>
</div>
</div>
</form>
</div>
Bootstrap 4 против Bootstrap 3
Когда речь идёт о горизонтальных формах, имеются некоторые незначительные различия между Bootstrap 4 и Bootstrap 3.
Сетки
При использовании сеток для макета формы, Bootstrap 4 требует класс .row. Этот класс не является обязательным для форм Bootstrap 3 (хотя по прежнему обязателен для сеток Bootstrap 3).
Метки
Bootstrap 4 использует .col-form-label в сетке макета формы, тогда как Bootstrap 3 использует .control-label
Обратите внимание, что Bootstrap 4 изначально использовал .form-control-label, но впоследствии заменил его на .col-form-label.
Класс .form-horizontal
Bootstrap 3 требует класс .form-horizontal, тогда как Bootstrap 4 нет.
Examples
Alerts are available for any length of text, as well as an optional dismiss button. For proper styling, use one of the eight required contextual classes (e.g., ). For inline dismissal, use the .
A simple primary alert—check it out!
A simple secondary alert—check it out!
A simple success alert—check it out!
A simple danger alert—check it out!
A simple warning alert—check it out!
A simple info alert—check it out!
A simple light alert—check it out!
A simple dark alert—check it out!
Conveying meaning to assistive technologies
Using color to add meaning only provides a visual indication, which will not be conveyed to users of assistive technologies – such as screen readers. Ensure that information denoted by the color is either obvious from the content itself (e.g. the visible text), or is included through alternative means, such as additional text hidden with the class.
Link color
Use the utility class to quickly provide matching colored links within any alert.
A simple primary alert with . Give it a click if you like.
A simple secondary alert with . Give it a click if you like.
A simple success alert with . Give it a click if you like.
A simple danger alert with . Give it a click if you like.
A simple warning alert with . Give it a click if you like.
A simple info alert with . Give it a click if you like.
A simple light alert with . Give it a click if you like.
A simple dark alert with . Give it a click if you like.
Additional content
Alerts can also contain additional HTML elements like headings, paragraphs and dividers.
Well done!
Aww yeah, you successfully read this important alert message. This example text is going to run a bit longer so that you can see how spacing within an alert works with this kind of content.
Whenever you need to, be sure to use margin utilities to keep things nice and tidy.
Dismissing
Using the alert JavaScript plugin, it’s possible to dismiss any alert inline. Here’s how:
- Be sure you’ve loaded the alert plugin, or the compiled Bootstrap JavaScript.
- If you’re building our JavaScript from source, it . The compiled version includes this.
- Add a dismiss button and the class, which adds extra padding to the right of the alert and positions the button.
- On the dismiss button, add the attribute, which triggers the JavaScript functionality. Be sure to use the element with it for proper behavior across all devices.
- To animate alerts when dismissing them, be sure to add the and classes.
You can see this in action with a live demo:
Holy guacamole! You should check in on some of those fields below.
×
Использование сетки
<form>
    <div class="row">
        <div class="col">
            <input type="text" class="form-control" placeholder="Имя">
        </div>
        <div class="col">
            <input type="text" class="form-control" placeholder="Фамилия">
        </div>
        <div class="col">
            <input type="email" class="form-control" placeholder="Почта">
        </div>
        <div class="col">
            <input type="password" class="form-control" placeholder="Пароль">
        </div>
    </div>
</form>
<form>
    <div class="form-row">
        <div class="col">
            <input type="text" class="form-control" placeholder="Имя">
        </div>
        <div class="col">
            <input type="text" class="form-control" placeholder="Фамилия">
        </div>
        <div class="col">
            <input type="email" class="form-control" placeholder="Почта">
        </div>
        <div class="col">
            <input type="password" class="form-control" placeholder="Пароль">
        </div>
    </div>
</form>
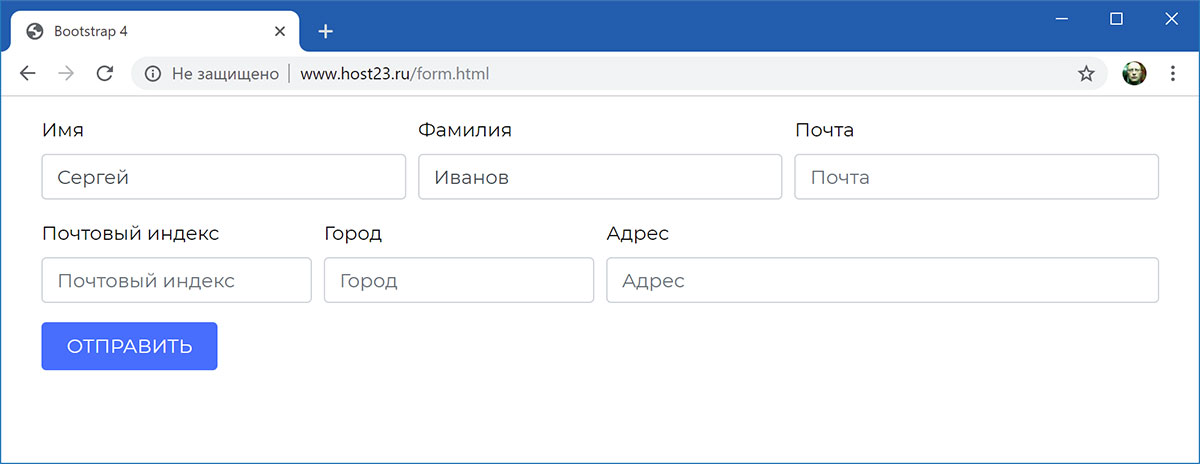
<form>
    <div class="form-row">
        <div class="form-group col-md-6">
            <label for="input-email">Почта</label>
            <input type="email" class="form-control" id="input-email" placeholder="Введите email">
        </div>
        <div class="form-group col-md-6">
            <label for="input-password">Пароль</label>
            <input type="password" class="form-control" id="input-password" placeholder="Введите пароль">
        </div>
    </div>
    <div class="form-row">
        <div class="form-group col-md-3">
            <label for="input-zip">Индекс</label>
            <input type="text" class="form-control" id="input-zip" placeholder="Почтовый индекс">
        </div>
        <div class="form-group col-md-3">
            <label for="input-city">Город</label>
            <input type="text" class="form-control" id="input-city" placeholder="Город доставки">
        </div>
        <div class="form-group col-md-6">
            <label for="input-address">Адрес</label>
            <input type="text" class="form-control" id="input-address" placeholder="Адрес доставки">
        </div>
    </div>
    <button type="submit" class="btn btn-primary">Отправить</button>
</form>
Пример вертикального выравнивания элементов формы. Ширина каждого элемента определяется содержимым:
<form>
    <div class="row align-items-center">
        <div class="col-auto">
            <label for="input-email" class="sr-only">Почта</label>
            <input type="email" class="form-control mb-2" id="input-email" placeholder="Введите email">
        </div>
        <div class="col-auto">
            <label for="input-password" class="sr-only">Пароль</label>
            <input type="password" class="form-control mb-2" id="input-password" placeholder="Введите пароль">
        </div>
        <div class="form-check mb-2">
            <input class="form-check-input" type="checkbox" id="remember">
            <label class="form-check-label" for="remember">
                Запомнить
            </label>
        </div>
        <div class="col-auto">
            <button type="submit" class="btn btn-primary mb-2">Войти</button>
        </div>
        <div class="col-auto">
            Поля со звездочкой обязательны
        </div>
    </div>
</form>
Если не использовать класс , то эта форма выглядела бы так:
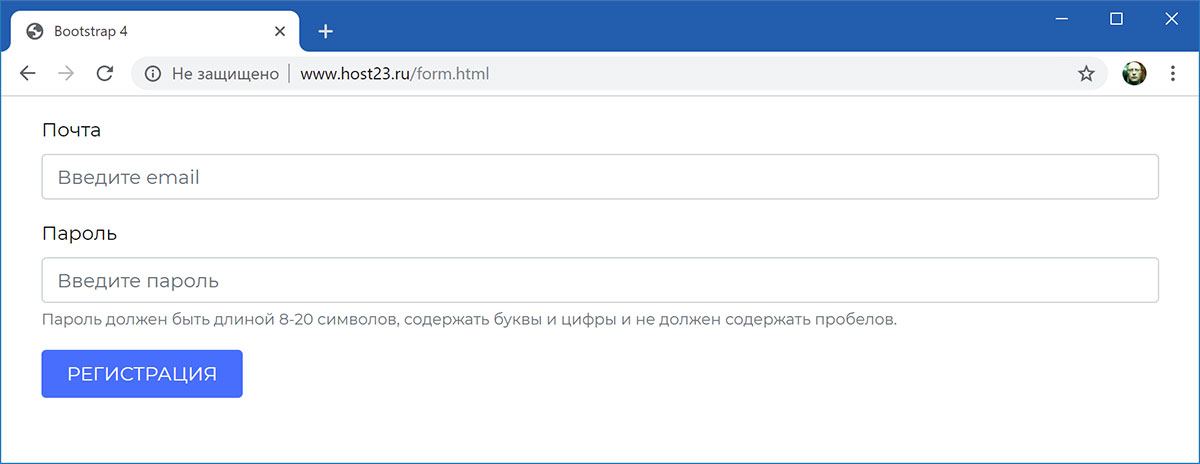
Подсказки для полей формы
<form>
    <div class="form-group">
        <label for="input-email">Почта</label>
        <input type="email" class="form-control" id="input-email" placeholder="Введите email">
    </div>
    <div class="form-group">
        <label for="input-password">Пароль</label>
        <input type="password" class="form-control" id="input-password" placeholder="Введите пароль">
        <small id="password-help" class="form-text text-muted">
            Пароль должен быть длиной 8-20 символов, содержать буквы и цифры
            и не должен содержать пробелов.
        </small>
    </div>
    <div class="form-group">
        <button type="submit" class="btn btn-primary">Регистрация</button>
    </div>
</form>
<form class="form-inline">
    <label for="input-email" class="sr-only">Почта</label>
    <input type="email" class="form-control" id="input-email" placeholder="Введите email">

    <div class="form-group mx-sm-2">
        <label for="input-password" class="sr-only">Пароль:</label>
        <input type="password" class="form-control" id="input-password" placeholder="Введите пароль">
        <small id="password-help" class="text-muted ml-sm-2">
            Должен быть не менее 8 символов.
        </small>
    </div>

    <button type="submit" class="btn btn-primary">Регистрация</button>
</form>

Z-index
Several Bootstrap components utilize , the CSS property that helps control layout by providing a third axis to arrange content. We utilize a default z-index scale in Bootstrap that’s been designed to properly layer navigation, tooltips and popovers, modals, and more.
These higher values start at an arbitrary number, high and specific enough to ideally avoid conflicts. We need a standard set of these across our layered components—tooltips, popovers, navbars, dropdowns, modals—so we can be reasonably consistent in the behaviors. There’s no reason we couldn’t have used + or +.
We don’t encourage customization of these individual values; should you change one, you likely need to change them all.
To handle overlapping borders within components (e.g., buttons and inputs in input groups), we use low single digit values of , , and for default, hover, and active states. On hover/focus/active, we bring a particular element to the forefront with a higher value to show their border over the sibling elements.
Custom File Upload
To create a custom file upload, wrap a container element with a
class of around the input with type=»file». Then add the to it.
Tip: If you use labels for accompanying text, add the class to it.
Note that the value of the for attribute should match the id of the checkbox:
Choose file
Note that you also have to include some jQuery code if you want the name of the file to appear when you select a specific file:
Example
<form> <div class=»custom-file»> <input
type=»file» class=»custom-file-input» id=»customFile»>
<label class=»custom-file-label» for=»customFile»>Choose file</label>
</div></form><script>// Add the following code if
you want the name of the file appear on select
$(«.custom-file-input»).on(«change», function() { var fileName =
$(this).val().split(«\\»).pop();
$(this).siblings(«.custom-file-label»).addClass(«selected»).html(fileName);
});</script>
❮ Previous
Next ❯
Internet Explorer 8 и Respond.js
Примите во внимание следующие оговорки, при использовании Respond.js в вашей среде разработки, в рабочей среде Internet Explorer 8
Respond.js и кросс-доменный CSS
Если вы храните Respond.js и CSS на разных (суб)доменах (например, на CDN) — это требует некоторых дополнительных установок. для уточнений.
Respond.js и
Через правила безопасности браузера, Respond.js не работает при просмотре через протокол (например, когда вы открываете HTML файл локально). Чтобы протестировать настройки чувствительности в IE8, просматривайте ваши страницы через HTTP(S). для уточнений.
Respond.js и
Respond.js не работает с CSS, на которые ссылаются как . В частности, некоторые конфигурации Drupal, как известно, используют . для уточнений.
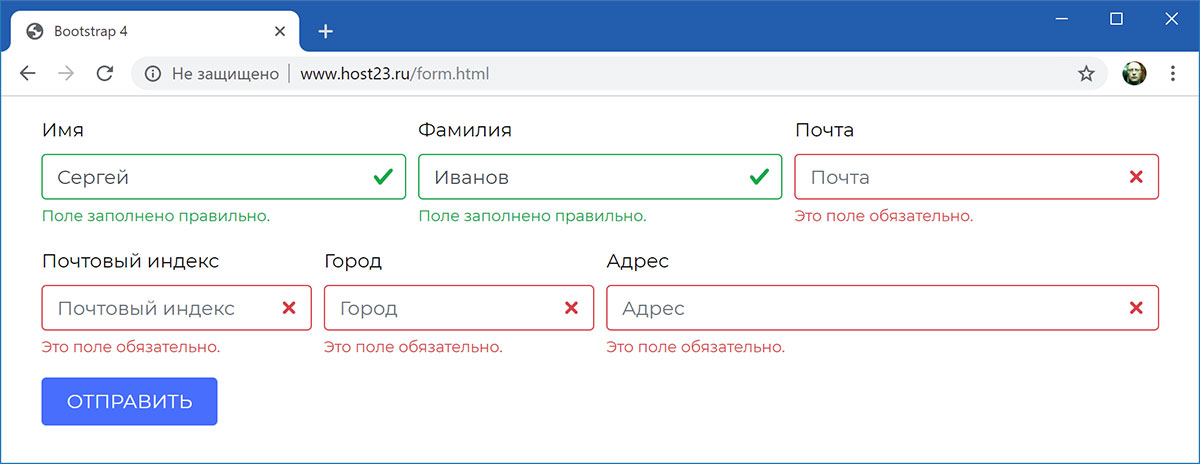
Валидация на стороне клиента
Чтобы отменить проверку формы браузером, достаточно добавить атрибут для элемента . В этом случае проверка данных формы будет уже заботой разработчика.
<form class="needs-validation" novalidate>
    <div class="form-row">
        <div class="col-md-4 mb-3">
            <label for="input-name">Имя</label>
            <input type="text" class="form-control" id="input-name"
                   placeholder="Имя" value="Сергей" required>
            <div class="valid-feedback">Поле заполнено правильно.</div>
        </div>
        <div class="col-md-4 mb-3">
            <label for="input-surname">Фамилия</label>
            <input type="text" class="form-control" id="input-surname"
                   placeholder="Фамилия" value="Иванов" required>
            <div class="valid-feedback">Поле заполнено правильно.</div>
        </div>
        <div class="col-md-4 mb-3">
            <label for="input-email">Почта</label>
                <input type="text" class="form-control" id="input-email"
                       placeholder="Почта" required>
                <div class="invalid-feedback">Это поле обязательно.</div>
        </div>
    </div>

    <div class="form-row">
        <div class="col-md-3 mb-3">
            <label for="input-zip">Почтовый индекс</label>
            <input type="text" class="form-control" id="input-zip"
                   placeholder="Почтовый индекс" required>
            <div class="invalid-feedback">Это поле обязательно.</div>
        </div>
        <div class="col-md-3 mb-3">
            <label for="input-city">Город</label>
            <input type="text" class="form-control" id="input-city"
                   placeholder="Город" required>
            <div class="invalid-feedback">Это поле обязательно.</div>
        </div>
        <div class="col-md-6 mb-3">
            <label for="input-address">Адрес</label>
            <input type="text" class="form-control" id="input-address"
                   placeholder="Адрес" required>
            <div class="invalid-feedback">Это поле обязательно.</div>
        </div>
    </div>

    <button class="btn btn-primary" type="submit">Отправить</button>
</form>
(function() {
    'use strict';
    window.addEventListener('load', function() {
        var forms = document.getElementsByClassName('needs-validation');
        var validation = Array.prototype.filter.call(forms, function(form) {
            form.addEventListener('submit', function(event) {
                if (form.checkValidity() === false) {
                    event.preventDefault();
                    event.stopPropagation();
                }
                form.classList.add('was-validated');
            }, false);
        });
    }, false);
})();
Поиск:
Bootstrap • CSS • HTML • Web-разработка • Верстка • Форма • Фреймворк • Form • Валидация