Peewee orm манипуляция базами данных
Содержание:
- Table Of Contents
- Создание моделей в Peewee
- PyMySQL заголовки столбцов
- Prevent SQL Injection
- Prevent SQL Injection
- Python Tutorial
- Select limited rows from MySQL table using fetchmany and fetchone
- Python NumPy
- Первые шаги с SQLite в Python
- Pip Command to install MySQL Connector python
- Use Python variables as parameters in MySQL Select Query
- Вставка записи (INSERT)
- Prerequisite
- Python NumPy
- Python NumPy
- Check if Database Exists
- Выбор нескольких записей
- Steps to connect MySQL database in Python using MySQL Connector Python
- Пакеты драйверов для баз данных на языке Python
- redis-py — клиент базы данных Redis на Python
- PyMySQL — драйвер Pure Python MySQL, совместимый с mysql-python
- asyncpg — быстрая клиентская библиотека Python / asyncio для базы данных PostgreSQL
- psycopg2 — самый популярный адаптер PostgreSQL для Python
- mysqlclient — поддерживающий Python 3 форк библиотеки mysql-python
- cassandra-python-driver — драйвер Python для Cassandra
- motor — аснхронный драйвер Python для MongoDB
- pymssql — простой интерфейс для Microsoft SQL Server
- SuperSQLite — улучшенная библиотека SQLite
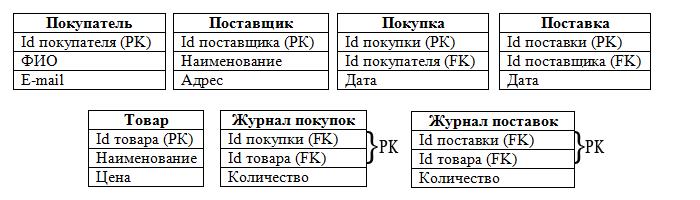
- 2.3. Primary Key
Table Of Contents
-
2.1.
2.2. 2.3.
Note:
This tutorial is not meant to teach you complete SQL syntax or language.
This tutorial will teach you how you can work with MySQL in Python.
Procedure To Follow In Python To Work With MySQL
- Connect to the database.
- Create an object for your database.
- Execute the SQL query.
- Fetch records from the result.
- Informing the Database if you make any changes in the table.
1. Installing MySQL
MySQL is one of the most popular databases.
Download and install MySQL from the MySQL’s official website. You need to install the MySQL server to follow this tutorial.
Next, you have to install mysql.connector for Python. We need mysql.connector to connect Python Script to the MySQL database. Download the mysql.connector from here and install it on your computer.
Now, check whether you have installed the mysql.connector correctly or not using the following code.
If the above code runs without any errors, then you have successfully installed mysql.connector, and it is ready to use.
Создание моделей в Peewee
Сейчас я перейду к созданию моделей. В этой статье я использую две таблицы или модели: «Категория» и «Продукт«. Категория может содержать несколько продуктов. Сохраняем как файл models.py
models.py
Python
from peewee import *
class BaseModel(Model):
class Meta:
database = dbhandle
class Category(BaseModel):
id = PrimaryKeyField(null=False)
name = CharField(max_length=100)
created_at = DateTimeField(default=datetime.datetime.now())
updated_at = DateTimeField(default=datetime.datetime.now())
class Meta:
db_table = «categories»
order_by = (‘created_at’,)
|
1 |
frompeewee import* classBaseModel(Model) classMeta database=dbhandle classCategory(BaseModel) id=PrimaryKeyField(null=False) name=CharField(max_length=100) created_at=DateTimeField(default=datetime.datetime.now()) updated_at=DateTimeField(default=datetime.datetime.now()) classMeta db_table=»categories» order_by=(‘created_at’,) |
Сначала я создал BaseModel. Это связанно с тем, что Peewee просит вас передать dbhandle в каждый класс Model. Чтобы избежать лишних движений, я просто создал базовый класс и расширил его. Ознакомиться со всеми типами столбцов в таблице можно тут:
Хорошо, наша BaseModel и Category созданы. Модель Category состоит из четырех полей:
- id, который является полем автоматического прироста;
- name содержит имя категории;
- updated_at и created_at – поля timestamp, которые определяют настоящее время по умолчанию.
В классе Meta я передаю название таблицы в собственность db_table. Это не обязательно, если название таблицы и модели одинаковые. Собственность order_by указывает, какой столбец должен использоваться для сортировки данных во время извлечения. Вы можете переписать его, передав вид по полю на ваше усмотрение.
Перед тем как мы двинемся дальше, я хочу создать еще один файл под названием operations.py, в котором я буду использовать эти модели.
Python
import peewee
from models import *
if __name__ == ‘__main__’:
try:
dbhandle.connect()
Category.create_table()
except peewee.InternalError as px:
print(str(px))
|
1 |
importpeewee frommodels import* if__name__==’__main__’ try dbhandle.connect() Category.create_table() exceptpeewee.InternalError aspx print(str(px)) |
После импорта, я подключаюсь к базе данных. Ошибка peewee.OperationalError ссылается на все ошибки, связанные с Peewee. К примеру, если вы введете неправильные учетные данные, вы получите следующее:
Python
(1045, «Access denied for user ‘root1’@’localhost’ (using password: YES)»)
| 1 | (1045,»Access denied for user ‘root1’@’localhost’ (using password: YES)») |
Затем мы вызываем Category.create_table(), которые создает таблицу с указанной ранее собственностью. Если вы передаете safe=True в качестве параметра, то существующая таблица просто перепишется. Это может привести к проблемам в реальной ситуации.
Далее, модель Product:
Python
class Product(BaseModel):
id = PrimaryKeyField(null=False)
name = CharField(max_length=100)
price = FloatField(default=None)
category = ForeignKeyField(Category, related_name=’fk_cat_prod’, to_field=’id’, on_delete=’cascade’,
on_update=’cascade’)
created_at = DateTimeField(default=datetime.datetime.now())
updated_at = DateTimeField(default=datetime.datetime.now())
class Meta:
db_table = «products»
order_by = (‘created_at’,)
|
1 |
classProduct(BaseModel) id=PrimaryKeyField(null=False) name=CharField(max_length=100) price=FloatField(default=None) category=ForeignKeyField(Category,related_name=’fk_cat_prod’,to_field=’id’,on_delete=’cascade’, on_update=’cascade’) created_at=DateTimeField(default=datetime.datetime.now()) updated_at=DateTimeField(default=datetime.datetime.now()) classMeta db_table=»products» order_by=(‘created_at’,) |
Она аналогична модели Cateogory. Разница только в ForeignKeyField, который указывает, как именно Product должен быть связан с Category. Обновление основы должно выглядеть следующим образом:
Python
if __name__ == ‘__main__’:
try:
dbhandle.connect()
Category.create_table()
except peewee.InternalError as px:
print(str(px))
try:
Product.create_table()
except peewee.InternalError as px:
print(str(px))
|
1 |
if__name__==’__main__’ try dbhandle.connect() Category.create_table() exceptpeewee.InternalError aspx print(str(px)) try Product.create_table() exceptpeewee.InternalError aspx print(str(px)) |
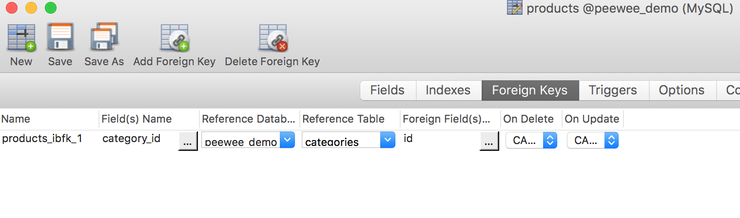
После запуска указанного выше кода, создается таблица модели product, а также отношение с таблицей categories. Вот скриншот моего клиента sql:
PyMySQL заголовки столбцов
Далее будет показано, как вывести названия столбцов с информацией из таблицы базы данных.
Python
#!/usr/bin/python3
# -*- coding: utf-8 -*-
import pymysql
con = pymysql.connect(‘localhost’, ‘user17’,
‘s$cret’, ‘testdb’)
with con:
cur = con.cursor()
cur.execute(«SELECT * FROM cities»)
rows = cur.fetchall()
desc = cur.description
print(«{0:>3} {1:>10}».format(desc, desc))
for row in rows:
print(«{0:3} {1:>10}».format(row, row))
|
1 |
#!/usr/bin/python3 importpymysql con=pymysql.connect(‘localhost’,’user17′, ‘s$cret’,’testdb’) withcon cur=con.cursor() cur.execute(«SELECT * FROM cities») rows=cur.fetchall() desc=cur.description print(«{0:>3} {1:>10}».format(desc,desc1)) forrow inrows print(«{0:3} {1:>10}».format(row,row2)) |
Названия столбцов представляют собой метаданные. Они извлекаются из объекта курсора.
Python
desc = cur.description
| 1 | desc=cur.description |
Атрибут курсора возвращает информацию о каждом результативном столбце запроса.
Python
print(«{0:>3} {1:>10}».format(desc, desc))
| 1 | print(«{0:>3} {1:>10}».format(desc,desc1)) |
Таким образом, выводятся и форматируются названия столбцов таблицы.
Python
for row in rows:
print(«{0:3} {1:>10}».format(row, row))
|
1 |
forrow inrows print(«{0:3} {1:>10}».format(row,row2)) |
Данные перебираются и выводятся на экран при помощи цикла for.
Shell
$ ./column_headers.py
id name
1 432000
2 1759000
3 1280000
4 1748000
5 3971000
6 8550000
7 464000
8 3671000
|
1 |
$.column_headers.py idname 1432000 21759000 31280000 41748000 53971000 68550000 7464000 83671000 |
Это результат вывода.
Prevent SQL Injection
When query values are provided by the user, you should escape the values.
This is to prevent SQL injections, which is a common web hacking technique to
destroy or misuse your database.
The mysql.connector module has methods to escape query values:
Example
Escape query values by using the placholder
method:
import mysql.connectormydb = mysql.connector.connect( host=»localhost»,
user=»yourusername», password=»yourpassword», database=»mydatabase»)mycursor = mydb.cursor()sql = «SELECT * FROM customers WHERE
address = %s»adr = («Yellow Garden 2», )
mycursor.execute(sql, adr)myresult = mycursor.fetchall()for x in myresult:
print(x)
❮ Previous
Next ❯
Prevent SQL Injection
It is considered a good practice to escape the values of any query, also in
update statements.
This is to prevent SQL injections, which is a common web hacking technique to
destroy or misuse your database.
The mysql.connector module uses the placeholder to escape values in the delete statement:
Example
Escape values by using the placholder
method:
import mysql.connectormydb = mysql.connector.connect( host=»localhost»,
user=»yourusername», password=»yourpassword», database=»mydatabase»)mycursor = mydb.cursor()sql = «UPDATE customers SET address = %s
WHERE address = %s»val = («Valley 345», «Canyon 123»)mycursor.execute(sql,
val)mydb.commit()print(mycursor.rowcount, «record(s)
affected»)
❮ Previous
Next ❯
Python Tutorial
Python HOMEPython IntroPython Get StartedPython SyntaxPython CommentsPython Variables
Python Variables
Variable Names
Assign Multiple Values
Output Variables
Global Variables
Variable Exercises
Python Data TypesPython NumbersPython CastingPython Strings
Python Strings
Slicing Strings
Modify Strings
Concatenate Strings
Format Strings
Escape Characters
String Methods
String Exercises
Python BooleansPython OperatorsPython Lists
Python Lists
Access List Items
Change List Items
Add List Items
Remove List Items
Loop Lists
List Comprehension
Sort Lists
Copy Lists
Join Lists
List Methods
List Exercises
Python Tuples
Python Tuples
Access Tuples
Update Tuples
Unpack Tuples
Loop Tuples
Join Tuples
Tuple Methods
Tuple Exercises
Python Sets
Python Sets
Access Set Items
Add Set Items
Remove Set Items
Loop Sets
Join Sets
Set Methods
Set Exercises
Python Dictionaries
Python Dictionaries
Access Items
Change Items
Add Items
Remove Items
Loop Dictionaries
Copy Dictionaries
Nested Dictionaries
Dictionary Methods
Dictionary Exercise
Python If…ElsePython While LoopsPython For LoopsPython FunctionsPython LambdaPython ArraysPython Classes/ObjectsPython InheritancePython IteratorsPython ScopePython ModulesPython DatesPython MathPython JSONPython RegExPython PIPPython Try…ExceptPython User InputPython String Formatting
Select limited rows from MySQL table using fetchmany and fetchone
In some situations to fetch all the rows from a table is a time-consuming task if a table contains thousand to rows.
If we fetch all rows we need more space and processing time to its advisable to use the method of cursor class to fetch fewer rows.
The syntax of the cursor’s fetchmany()
- This method fetches the next set of rows of a query result and returns a list of tuples. If no more rows are available, it returns an empty list.
- Cursor’s fetchmany() methods return the number of rows specified by size argument, defaults value of size argument is one. If the specified size is 5, then it returns Five rows.
Note: If a table contains row lesser than specified size then fewer rows are returned.
Python example to fetch fewer rows from MySQL table using cursor’s fetchmany
Output:
Total number of rows is:  2
Printing  2  Laptop record using cursor.fetchmany
(1, 'Lenovo ThinkPad P71', 6459.0, datetime.date(2019, 8, 14))
(2, 'Area 51M', 6999.0, datetime.date(2019, 4, 14))
Note:- Also in the above program, the specified the size is 2 to fetch two records. Also, we set buffered=True in connection. Cursor () method to avoid MySQL Unread result error.
Fetch single row from MySQL table using cursor’s fetchone
- Use the method to retrieve the next row of a query result set.
- This method returns a single record or None if no more rows are available.
The Syntax of fetchone()
Note: The fetchone() method is internally used by fetchall() and fetchmany() to fetch rows.
Python Example to fetch a single row from MySQL table using cursor.fetchone
Output: –
Printing first record (1, 'Lenovo ThinkPad P71', 6459.0, datetime.date(2019, 8, 14))
MySQL connection is closed
Python NumPy
NumPy IntroNumPy Getting StartedNumPy Creating ArraysNumPy Array IndexingNumPy Array SlicingNumPy Data TypesNumPy Copy vs ViewNumPy Array ShapeNumPy Array ReshapeNumPy Array IteratingNumPy Array JoinNumPy Array SplitNumPy Array SearchNumPy Array SortNumPy Array FilterNumPy Random
Random Intro
Data Distribution
Random Permutation
Seaborn Module
Normal Distribution
Binomial Distribution
Poisson Distribution
Uniform Distribution
Logistic Distribution
Multinomial Distribution
Exponential Distribution
Chi Square Distribution
Rayleigh Distribution
Pareto Distribution
Zipf Distribution
NumPy ufunc
ufunc Intro
ufunc Create Function
ufunc Simple Arithmetic
ufunc Rounding Decimals
ufunc Logs
ufunc Summations
ufunc Products
ufunc Differences
ufunc Finding LCM
ufunc Finding GCD
ufunc Trigonometric
ufunc Hyperbolic
ufunc Set Operations
Первые шаги с SQLite в Python
Начнем руководство с загрузки библиотеки. Для этого нужно использовать следующую команду:
Следующий шаг — создание базы данных.
Создание базы данных SQLite в Python
Есть несколько способов создания базы данных в Python с помощью SQLite. Для этого используется объект , который и представляет собой базу. Он создается с помощью функции .
Создадим файл , поскольку это стандартный способ управления базой SQLite. Файл будет называться . За соединение будет отвечать переменная .
Эта строка создает объект , а также новый файл в рабочей директории. Если нужно использовать другую, ее нужно обозначить явно:
Если файл уже существует, то функция осуществит подключение к нему.
Функция создает соединение с базой данных SQLite и возвращает объект, представляющий ее.
Резидентная база данных
Еще один способ создания баз данных с помощью SQLite в Python — создание их в памяти. Это отличный вариант для тестирования, ведь такие базы существуют только в оперативной памяти.
Однако в большинстве случаев (и в этом руководстве) будет использоваться описанный до этого способ.
Создание объекта cursor
После создания объекта соединения с базой данных нужно создать объект . Он позволяет делать SQL-запросы к базе. Используем переменную для хранения объекта:
Теперь выполнять запросы можно следующим образом:
Обратите внимание на то, что сами запросы должны быть помещены в кавычки — это важно. Это могут быть одинарные, двойные или тройные кавычки. Последние используются в случае особенно длинных запросов, которые часто пишутся на нескольких строках
Последние используются в случае особенно длинных запросов, которые часто пишутся на нескольких строках.
Создание таблиц в SQLite в Python
Пришло время создать первую таблицу в базе данных. С объектами соединения () и () это можно сделать. Будем следовать этой схеме.

Начнем с таблицы .
В коде выше выполняются следующие операции:
- Функция отвечает за SQL-запрос
- SQL генерирует таблицу
- поможет при попытке повторного подключения к базе данных. Запрос проверит, существует ли таблица. Если да — проверит, ничего ли не поменялось.
- Создаем первые четыре колонки: , , и . — это основной ключ.
- Сохраняем изменения с помощью функции для объекта соединения.
Для создания второй таблицы просто повторим последовательность действий, используя следующие команды:
После исполнения этих двух скриптов база данных будет включать две таблицы. Теперь можно добавлять данные.
Добавление данных с SQLite в Python
По аналогии с запросом для создания таблиц для добавления данных также нужно использовать объект .
В Python часто приходится иметь дело с переменными, в которых хранятся значения. Например, это может быть кортеж с информацией о пользователе.
Если его нужно загрузить в базу данных, тогда подойдет следующий формат:
В данном случае все значения заменены на знаки вопроса и добавлен параметр, содержащий значения, которые нужно добавить.
Важно заметить, что SQLite ожидает получить значения в формате кортежа. Однако в переменной может быть и список с набором кортежей
Таким образом можно добавить несколько пользователей:
Но нужно использовать функцию вместо обычной :
Если применить , то функция подумает, то пользователь хочет передать в таблицу два объекта (два кортежа), а не два кортежа, каждый из которых содержит по 4 значения для каждого пользователя. Хотя в первую очередь вообще должна была возникнуть ошибка.
Pip Command to install MySQL Connector python
It is always accessible and straightforward to install any module using pip in python. MySQL Connector Python is available on pypi.org so you can install using pip command.
Using pip command, you can install MySQL Connector python on any operating system platform including Windows, macOS, Linux, and Unix and Ubuntu.
Use the following pip command to install MySQL Connector python.
pip install mysql-connector-python
If you are facing any problem while installing, please mention the version of the module and then try to install it again. Refer to the above table to install the correct version.
pip install mysql-connector-python==8.0.11
If you are facing pip install fails error with “connection error: certificate verify failed (_ssl.c:598)”. You can solve this error.
You can ignore SSL errors by setting pypi.org and files.pythonhosted.org as trusted hosts. Please try following pip command to install MySQL Connector Python.
python -m pip install --trusted-host pypi.org --trusted-host files.pythonhosted.org --trusted-host pypi.python.org mysql-connector-python
Verifying MySQL Connector Python installation
You should get the following messages after running pip command: –
- Collecting mysql-connector-python
- Downloading packages.
- Requirement already satisfied: setup tools in D:python\python37-32\lib\site-packages.
- Installing collected packages: mysql-connector-python
- Successfully installed mysql-connector-python-8.0.13
Verify MySQL Connector Python installation by Connecting to MySQL Using MySQL Connector Python.
Check out our Python Database Programming Exercise to master the database programming techniques in Python.
If you are unable to install using pip you can install using the following approaches.
Use Python variables as parameters in MySQL Select Query
Many times we need to pass a variable to SQL select query in where clause to check some condition.
Let’s say application wants to fetch laptop price by giving any laptop id at runtime. To handle such a requirement we need to use a parameterized query. Let see how to do it.
A parameterized query is a query in which placeholders used for parameters and the parameter values supplied at execution time. You can read the Parameterized Query and its performance benefits. Let see the example now.
Output:
Id =  1
Name =  Lenovo ThinkPad P71
Join Date =  6459.0
Salary  =  2019-08-14

connection is closed
Id =  2
Name =  Area 51M
Join Date =  6999.0
Salary  =  2019-04-14

MySQL connection is closed
Вставка записи (INSERT)
Теперь мы можем перейти к добавлению данных сперва в category, а затем в таблицу products. Так как у нас есть рабочие модели, не так просто добавлять или обновлять записи.
Python
import peewee
from models import *
def add_category(name):
row = Category(
name=name.lower().strip(),
)
row.save()
add_category(‘Books’)
|
1 |
importpeewee frommodels import* defadd_category(name) row=Category( name=name.lower().strip(), ) row.save() add_category(‘Books’) |
Я добавил функцию под названием add_category() с параметром и именем внутри. Объект Category создан, как и поля таблицы, которые являются переданной собственностью данного объекта класса. В нашем случае, это поле name.
The row.save() сохраняет данные из объекта в базу данных.
Круто, не так ли? Больше не нужно прописывать уродливые INSERT-ы.
Теперь добавим product.
Python
import peewee
from models import *
def add_product(name, price, category_name):
cat_exist = True
try:
category = Category.select().where(Category.name == category_name.strip()).get()
except DoesNotExist as de:
cat_exist = False
if cat_exist:
row = Product(
name=name.lower().strip(),
price=price,
category=category
)
row.save()
|
1 |
importpeewee frommodels import* defadd_product(name,price,category_name) cat_exist=True try category=Category.select().where(Category.name==category_name.strip()).get() exceptDoesNotExist asde cat_exist=False ifcat_exist row=Product( name=name.lower().strip(), price=price, category=category ) row.save() |
add_product берет name, price и category_id в качестве вводных данных. Сначала, я проверю, существует ли категория, если да – значит её объекты хранятся в базе. В ORM вы имеете дело с объектом, по этому вы передаете информацию о категории в качестве объекта, так как мы уже определили эту взаимосвязь ранее.
Далее, я буду создавать разделы в main.py:
Python
add_category(‘Books’)
add_category(‘Electronic Appliances’)
|
1 |
add_category(‘Books’) add_category(‘Electronic Appliances’) |
Теперь добавим продукты:
Python
# Добавление продуктов.
add_product(‘C++ Premier’, 24.5, ‘books’)
add_product(‘Juicer’, 224.25, ‘Electronic Appliances’)
|
1 |
# Добавление продуктов. add_product(‘C++ Premier’,24.5,’books’) add_product(‘Juicer’,224.25,’Electronic Appliances’) |
Полный main.py можете видеть ниже:
main.py
Python
import peewee
from models import *
def add_category(name):
row = Category(
name=name.lower().strip(),
)
row.save()
def add_product(name, price, category_name):
cat_exist = True
try:
category = Category.select().where(Category.name == category_name.strip()).get()
except DoesNotExist as de:
cat_exist = False
if cat_exist:
row = Product(
name=name.lower().strip(),
price=price,
category=category
)
row.save()
if __name__ == ‘__main__’:
# Создаем разделы.
add_category(‘Books’)
add_category(‘Electronic Appliances’)
# Добавляем продукты в разделы.
add_product(‘C++ Premier’, 24.5, ‘books’)
add_product(‘Juicer’, 224.25, ‘Electronic Appliances’)
|
1 |
importpeewee frommodels import* defadd_category(name) row=Category( name=name.lower().strip(), ) row.save() defadd_product(name,price,category_name) cat_exist=True try category=Category.select().where(Category.name==category_name.strip()).get() exceptDoesNotExist asde cat_exist=False ifcat_exist row=Product( name=name.lower().strip(), price=price, category=category ) row.save() if__name__==’__main__’ # Создаем разделы. add_category(‘Books’) add_category(‘Electronic Appliances’) # Добавляем продукты в разделы. add_product(‘C++ Premier’,24.5,’books’) add_product(‘Juicer’,224.25,’Electronic Appliances’) |
Я передаю имя категории, как только её объект будет найден и передан объекту класса Product. Если вы хотите пойти по пути SQL, для начала вам нужно выполнить SELECT, чтобы получить существующий category_id, и затем назначить id добавляемому продукту.
Так как работать с ORM – значит иметь дело с объектами, мы храним объекты вместо скалярных значений. Кто-то может посчитать это слишком «инженерным» методом в нашем случае, но подумайте о случаях, когда вы понятия не имеете о том, какая база данных должна быть использована в будущем. Ваш код – это универсальный инструмент для работы с базами данных, так что если он работает с MySQL, или MSSQL, то он будет работать даже с MongoDb (гипотетически).
Prerequisite
Before executing the following program, please make sure you have the following in place: –
- Username and password that you need to connect MySQL
- MySQL database table name from which you want to fetch data.
For this article, I am using a “Laptop” table present in my MySQL server.
If no table is present in your MySQL server you can refer to our article to create a MySQL table from Python.
Also, you can download Laptop table creation with data in MySQL file which contains SQL queries for table creation along with data so you can use this table for your SELECT operations.
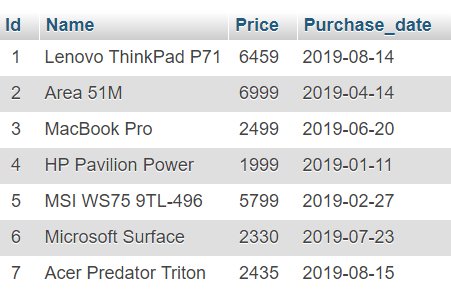
MySQL Laptop table with data
Note: We are using MySQL Connector Python to select data from MySQL table.
Python NumPy
NumPy IntroNumPy Getting StartedNumPy Creating ArraysNumPy Array IndexingNumPy Array SlicingNumPy Data TypesNumPy Copy vs ViewNumPy Array ShapeNumPy Array ReshapeNumPy Array IteratingNumPy Array JoinNumPy Array SplitNumPy Array SearchNumPy Array SortNumPy Array FilterNumPy Random
Random Intro
Data Distribution
Random Permutation
Seaborn Module
Normal Distribution
Binomial Distribution
Poisson Distribution
Uniform Distribution
Logistic Distribution
Multinomial Distribution
Exponential Distribution
Chi Square Distribution
Rayleigh Distribution
Pareto Distribution
Zipf Distribution
NumPy ufunc
ufunc Intro
ufunc Create Function
ufunc Simple Arithmetic
ufunc Rounding Decimals
ufunc Logs
ufunc Summations
ufunc Products
ufunc Differences
ufunc Finding LCM
ufunc Finding GCD
ufunc Trigonometric
ufunc Hyperbolic
ufunc Set Operations
Check if Database Exists
You can check if a database exist by listing all databases in your system by
using the «SHOW DATABASES» statement:
Example
Return a list of your system’s databases:
import mysql.connectormydb = mysql.connector.connect( host=»localhost»,
user=»yourusername», password=»yourpassword»)mycursor = mydb.cursor()
mycursor.execute(«SHOW DATABASES»)for x in mycursor:
print(x)
Or you can try to access the database when making the connection:
Example
Try connecting to the database «mydatabase»:
import mysql.connectormydb = mysql.connector.connect( host=»localhost»,
user=»yourusername», password=»yourpassword»,
database=»mydatabase»)
If the database does not exist, you will get an error.
❮ Previous
Next ❯
Выбор нескольких записей
Сначала выделяем категории:
Python
import peewee
from models import *
def find_all_categories():
return Category.select()
def find_all_products():
return Product.select()
|
1 |
importpeewee frommodels import* deffind_all_categories() returnCategory.select() deffind_all_products() returnProduct.select() |
Category.select() возвращает ВСЮ запись, которая будет отсортирована по столбцу created_at, что мы и указали в классе Meta.
Теперь выбираем все продукты:
Python
products = find_all_products()
product_data = []
for product in products:
product_data.append({
‘title’: product.name,
‘price’: product.price,
‘category’: product.category.name
})
print(product_data)
|
1 |
products=find_all_products() product_data= forproduct inproducts product_data.append({ ‘title’product.name, ‘price’product.price, ‘category’product.category.name }) print(product_data) |
Здесь я перебираю продукты и добавляю запись в список product_data
Обратите внимание на доступ к категории продукта. Больше нет SELECT для получения ID, с последующим поиском названия
Простой цикл делает все за нас. При запуске, информация о продукте будет отображаться следующим образом:
Python
|
1 |
{‘price’24.5,’title»c++ premier’,’category»books’}, {‘price’224.25,’title»juicer’,’category»electronic appliances’} |
Steps to connect MySQL database in Python using MySQL Connector Python
- Install MySQL Connector Python using pip.
- Use the method of MySQL Connector Python with required parameters to connect MySQL.
- Use the connection object returned by a method to create a object to perform Database Operations.
- The to execute SQL queries from Python.
- Close the Cursor object using a and MySQL database connection using after your work completes.
- Catch Exception if any that may occur during this process.
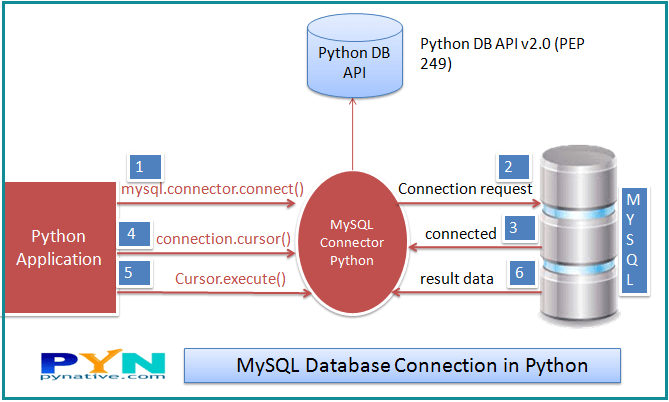
MySQL database connection in Python
Python Example to connect MySQL Database
To connect the MySQL database, you must know the database name you want to connect. Run below query on MySQL console if you have not created any database in MySQL. Otherwise, you can skip the below query.
Create Database in MySQL
Below is the last step, i.e. using methods of MySQL Connector Python to connect MySQL database. Let see the example now.
After connecting to MySQL Server, you should get below output.
Connected to MySQL Server version  5.7.19
You're connected to database:  ('electronics',)
MySQL connection is closed
Understand the Python MySQL Database connection program
This line imports the MySQL Connector Python module in your program so you can use this module’s API to connect MySQL.
mysql connector Error object is used to show us an error when we failed to connect Databases or if any other database error occurred while working with the database. Example ACCESS DENIED ERROR when username or password is wrong.
- Using this method we can connect the MySQL Database, this method accepts four required parameters: Host, Database, User and Password that we already discussed.
- connect() method established a connection to the MySQL database from Python application and returned a MySQLConnection object. Then we can use MySQLConnection object to perform various operations on the MySQL Database.
- The method can throw an exception, i.e. Database error if one of the required parameters is wrong. For example, if you provide a database name that is not present in MySQL, then Python application throws an exception. So check the arguments that you are passing to this method.
is_connected() is the method of the MySQLConnection class through which we can verify is our python application connected to MySQL.
- This method returns a cursor object. Using a cursor object, we can execute SQL queries.
- The MySQLCursor class instantiates objects that can execute operations such as SQL statements.
Cursor objects interact with the MySQL server using a MySQLConnection object.
Using the cursor’s close method we can close the cursor object. Once we close the cursor object, we can not execute any SQL statement.
At last, we are closing the MySQL database connection using a close() method of MySQLConnection class.
Now you know how to connect to MySQL server from python let’s proceed with creating a table from Python.
Пакеты драйверов для баз данных на языке Python
Ниже приведен список Python-библиотек драйверов для различных баз данных, полезный любому программисту, который интересуется этим языком.
redis-py — клиент базы данных Redis на Python
redis-py 3.5.x — это последняя версия, которая поддерживала Python 2. Обновления безопасности, совместимые с Python 2, выходили вплоть до 20 августа 2020 года. Для redis-py 4.0, следующей основной версии, уже требуется Python не ниже версии 3.5.
PyMySQL — драйвер Pure Python MySQL, совместимый с mysql-python
Этот пакет содержит клиентскую библиотеку Python MySQL, основанную на стандарте PEP 249.
Большинство открытых API-интерфейсов совместимы с mysqlclient и MySQLdb.
ЗАМЕЧАНИЕ: PyMySQL не поддерживает низкоуровневые API-запросы, которые есть в _mysql, а именно и . Вы должны использовать высокоуровневые API-запросы, определенные в стандарте PEP 249. Но некоторые API-запросы, такие как и , все же поддерживаются, поскольку PEP 249 никак не регламентирует их применение.
asyncpg — быстрая клиентская библиотека Python / asyncio для базы данных PostgreSQL
Это библиотека интерфейса базы данных, разработанная специально для PostgreSQL и Python / asyncio.
asyncpg — это эффективная и чистая реализация бинарного протокола сервера баз данных PostgreSQL для использования с асинхронным фреймворком Python asyncio. Вы можете узнать больше об asyncpg вот здесь.
asyncpg требует Python версии 3.5 или новее и поддерживается для PostgreSQL начиная с версии 9.2 и заканчивая версией 12.
psycopg2 — самый популярный адаптер PostgreSQL для Python
Psycopg — самый популярный адаптер базы данных PostgreSQL для языка программирования Python. Его основными особенностями являются полная реализация спецификации Python DB API 2.0 и безопасность потоков (несколько потоков могут использовать одно и то же соединение). Он был разработан для многопоточных приложений, которые создают и уничтожают множество связей и выполняют большое количество одновременных операций INSERT или UPDATE.
mysqlclient — поддерживающий Python 3 форк библиотеки mysql-python
В этом проекте добавлена поддержка Python 3 и исправлен ряд ошибок. Мы надеемся, что этот форк будет снова объединен со своей родительской библиотекой. Это было бы так же логично, как объединение дистрибутива и программы для его установки.
cassandra-python-driver — драйвер Python для Cassandra
Современная, многофункциональная и гибконастраиваемая клиентская библиотека Python для Apache Cassandra (1.2+) и DataStax Enterprise (3.1+). Она использует исключительно бинарный протокол Cassandra и язык запросов Cassandra Query Language v3.
motor — аснхронный драйвер Python для MongoDB
pymssql — простой интерфейс для Microsoft SQL Server
Простой интерфейс баз данных на языке Python, который строится поверх FreeTDS и предоставляет интерфейс Python DB-API (PEP-249) для Microsoft SQL Server.
SuperSQLite — улучшенная библиотека SQLite
Это многофункциональная библиотека Python, предназначенная для использования SQLite в Python компанией Plasticity. Построена она на основе apsw.
Данная библиотека предназначена для замены встроенного в Python API SQLite, но без каких-либо ограничений. Она предлагает уникальные функции, такие как удаленная потоковая передача по HTTP и объединение расширений, таких как JSON, R-Trees (геопространственное индексирование), а также полнотекстовый поиск.
SuperSQLite также содержит предварительно скомпилированные собственные бинарные файлы для SQLite и всех его расширений (практически для любой платформы). Это сделано чтобы избежать возможных ошибок компилятора C / C ++ во время установки.
2.3. Primary Key
Primary Key:- It is a unique value in the table. It helps to find each row uniquely in the table.
To create a Primary Key, we use the PRIMARY KEY statement while creating the table.
The statement INT AUTO_INCREMENT PRIMARY KEY is used to identify each row uniquely with a number starting from 1.
Let’s see how to create Primary Key for a table.
To see the table run the following code.
Dropping Primary Key
We use ALTER TABLE table_name DROP column_name statement to drop the column with Primary Key.
Now, we have dropped the Primary Key column. Let’s see how we can add a column with Primary Key to the existing table.
Adding Primary Key
Adding Primary Key to the existing table. We use ALTER TABLE table_name ADD PRIMARY KEY(column_name) statement to add a Primary Key to a table.
We have added the column id to the users table.