Полное руководство по плагину advanced custom fields
Содержание:
- Плагин Advanced Custom Fields
- Naming Your Fields ??♂️
- Template usage
- ACF 5.7.11
- Compatibility
- Gutenberg Issues
- Parameters
- Compatible Plugins
- Getting started
- Типы файлов ACF
- More Ways to Tidy Up
- The cost of a one-time purchase
- Отображение значений полей
- Simplify your Fields ?
- Описание
- A Clean UI Makes for Happy Users
- Reviews
- Filters
- Pre-purchase Questions
- Что такое кастомные поля. Что с их помощью можно делать.
- Как вывести поля Advanced Custom Fields
Плагин Advanced Custom Fields
С плагином Advanced Custom Fields работать с полями гораздо проще. У плагина более понятный интерфейс с бóльшим числом функций и гораздо более простой процесс вывода полей.
Advanced Custom Fields
Author(s): Elliot Condon
Current Version: 5.9.3
Last Updated: 05.11.2020
Плагин ACF установлен на более чем 1 млн. сайтов и имеет рейтинг 98% на основе 1.100+ отзывов.
После установки плагин добавляет раздел меню Группы полей (Custom Fields) в админке Вордпресс.
Вы можете добавлять кастомные поля во все виды записей, включая собственные типы записей, таксономии, пользователям, в медифайлы, в комментарии и меню.
Вы можете выводить поля ACF с помощью кода в файлах темы ( по каждому типу полей и выводу с помощью кода), с помощью шорткодов и Elementor Pro.
Naming Your Fields ??♂️
Each field is given a name and label. The first is for internal use (DB / code) and the other is seen visually when editing content. As the developer, you can also edit these to just about anything you like. However, keep the following in mind.
Names should be PHP friendly
Similar to the WordPress standards for variables, field names should use lowercase letters (never camelCase). Separate words via underscores. Don’t abbreviate field names unnecessarily; let the code be unambiguous and self-documenting.
Describe What the Field is, Not Where it Lives
It’s easy to get really specific when naming fields. But because each field is always saved against a post object, its name should reflect purpose – but not necessarily location. Therefore, a more generic name will cause less confusion when editing content and code. This example shows how an “over complicated” field name can create convoluted code.
Don’t Repeat Names in Your Repeater
When working with sub fields, avoid repeating the parent field’s name within the sub field’s name. Doing so not only causes long-winded field names for you, but also causes ACF to generate even longer meta keys in your wp_postmeta table. This is because ACF joins together both the parent and child field name’s to create the meta key like so .
Template usage
Loading the value of a cloned field is the same as loading a normal field. If using the ‘Group’ display setting, you may also load all cloned values as an array by loading the ‘Clone field’ itself.
Some of the following examples use a clone field called ‘main_button’ which is cloning a field group called ‘Button’. The ‘Button’ field group contains 2 fields called ‘text’ and ‘url’.
Basic
This example shows how to load a clone field value with the following default settings. Note that these settings will essentially replace the clone field with the selected fields:
- Name: main_button
- Display: seamless
- Prefix Names: no
- Fields: A field group called ‘Button’ described above
Prefix Field Names
This example shows how to load a clone field value with the following ‘group’ settings. Note that these settings will render the ‘button’ fields within a group and prefix the field names. All values will be saved / loaded with the name prefix ‘main_button_’
- Name: main_button
- Display: group
- Prefix Names: yes
- Fields: A field group called ‘Button’ described above
Using the ‘Group’ display setting will allow ACF to load the clone field values as an array like so.
Sub fields
Clone fields may also be used within a repeater or flexible content field. This example shows the same ‘main_button’ clone field (from the previous example) used within a repeater field.
ACF 5.7.11
A bug was reported where consecutive calls would use the same cached value even if the site was switched via .
Status: Solved. Please re-download the ACF PRO plugin files.
A bug within the post_template location rule class caused incorrect choices to appear in the location rule dropdown. Choices were displayed as “Template Title” => “template-file-name.php” instead of “template-file-name.php” => “Template Title”.
Status: Solved. Please re-download the ACF PRO plugin files.
A bug found in the text and textarea field validation function caused an incorrect character count when validating a value containing special characters.
Status: Solved. Please re-download the ACF PRO plugin files.
A bug found in the “Local Fields” logic caused all metaboxes to appear in reverse order.
Status: Solved. Please re-download the ACF PRO plugin files.
A bug found in the function caused issues when copying meta values for revisions and previews. This bug affected serialized array values and caused the flexible content field to appear empty when previewing or restoring a revision.
Status: Solved. Please re-download the ACF PRO plugin files.
A bug found in the function prevented a field from being loaded by it’s key.
Status: Solved. Please re-download the ACF PRO plugin files.
A bug found in the function caused incorrect values to be returned for some sub fields. This issue was seen most when a sub field existed with a “name” value equal to a “field type” such as “text” or “image”.
Status: Solved. Please re-download the ACF PRO plugin files.
A bug found in the logic for syncing field groups (from Local JSON) caused the imported fields to lose their children.
Status: Solved. Please re-download the ACF PRO plugin files.
A bug found in function caused values from the Options Page to be incorrectly escaped causing multiple backslashes.
Status: Solved. Please re-download the ACF PRO plugin files.
The function was accidentally removed.
Status: Solved. Please re-download the ACF PRO plugin files.
Compatibility
The acf object extends a “compatibility layer” where we keep any deprecated or changed functions and properties. This allows our library to stay organised as well as provide compatibility with existing code. The biggest changes to our library that requires backwards compatibility are those to the “hook” functions and .
Prior to version 5.7, all callbacks for Field Actions or Field Filters would receive a jQuery element parameter. This has changed in version 5.7 as these same actions now receive a field instance.
To provide backwards compatibility, we didn’t change the hook names, but we did change the function names. This allows us to apply a “compatibility layer” to the parameters depending on which function you use. To better illustrate, please look at the following backwards compatible functions.
Gutenberg Issues
A bug exists within the Classic Editor plugin causing a WSOD (White Screen of Death) when editing a field group. This issue has been reported to the Classic Editor here.
Status: Solved. Please update Classic Editor to version 1.1.
All field groups created with the Advanced Custom Fields plugin are shown as empty visible metaboxes when editing a post irrelevant of those field group’s location rules.
This is due to a decision in Gutenberg to override the CSS that ACF adds to “placeholder” metaboxes – used to update metaboxes dynamically whilst editing the post.
Status: This is a that has been bumped to WordPress 5.0.1.
All field groups shown in the “content area” look awkward, detached and slightly broken.
More care should have gone into the styling of metaboxes to avoid such a disjointed UI and UX.
Status: This is also a known issue that has been bumped to WordPress 5.0.1.
One of our favorite, simple and intuitive features is the ability to update metaboxes dynamically whilst editing a post. For example, metaboxes will hide and show depending on location rules when changing the post template, format, parent and other post attributes.
Due to the huge and complex changes to the post edit page, our dynamic screen check no longer works.
Status: We will be working hard to get this fixed in ACF 5.8
Another highly used feature in ACF is our AJAX powered validation. This allows developers to highly customize the validation process via PHP whist providing convenient feedback to the user when a field value does not meet its requirements.
Status: Similar to above, this feature is no longer working and is scheduled to be fixed in ACF 5.8.
Parameters
$settings
(String | Array) Array of settings or ‘id’ of a registered form.
-
id
(String) A unique identifier for the form. Defaults to ‘acf-form’. -
post_id
(Integer | String) The post ID used to determine which fields to show, where data is loaded, and where data is saved. Defaults to current post ID. Can also be sent to ‘new_post’ to create a new post on submit. -
new_post
(Array) When the above attribute is set to “new_post”, this setting is used to create the post. See wp_insert_post for available parameters. -
field_groups
(Array) An array of field group IDs/keys to override the fields displayed in this form. -
fields
(Array) An array of field IDs/keys to override the fields displayed in this form. -
post_title
(Boolean) Whether or not to show the post title text field. Defaults to false. -
post_content
(Boolean) Whether or not to show the post content editor field. Defaults to false. -
form
(Boolean) Whether or not to create a element. Useful when adding to an existing form. Defaults to true. -
form_attributes
(Array) An array or HTML attributes for the form element. -
return
(String) The URL to be redirected to after the form is submitted. Defaults to the current URL with a GET parameter ‘?updated=true’.
A special placeholder ‘%post_url%’ will be converted to post’s permalink.
A special placeholder ‘%post_id%’ will be converted to post’s ID. -
html_before_fields
(String) Extra HTML to add before the fields. -
html_after_fields
(String) Extra HTML to add after the fields. -
submit_value
(String) The text displayed on the submit button. -
updated_message
(String) The message displayed above the form after being redirected. Can also be set to false for no message. -
label_placement
(String) Determines where field labels are places in relation to fields. Defaults to ‘top’.
Choices of ‘top’ (above fields) or ‘left’ (beside fields). -
instruction_placement
(String) Determines where field instructions are placed in relation to fields. Defaults to ‘label’.
Choice of ‘label’ (below labels) or ‘field’ (below fields). -
field_el
(String) Determines element used to wrap a field. Defaults to ‘div’.
Choices of ‘div’, ‘tr’, ‘td’, ‘ul’, ‘ol’, ‘dl’. -
uploader
(String) Whether to use the WP uploader or a basic input for image and file fields. Defaults to ‘wp’ .
Choices of ‘wp’ or ‘basic’. -
honeypot
(Boolean) Whether to include a hidden input field to capture non-human form submission. Defaults to true. -
html_updated_message
(String) The HTML used to render the updated message. -
html_submit_button
(String) The HTML used to render the submit button. -
html_submit_spinner
(String) The HTML used to render the submit button loading spinner. -
kses
(Boolean) Whether or not to sanitize all data with the function. Defaults to true.
Compatible Plugins
Luckily there’s an array of great translation plugins available for WordPress, and we’ve rounded up the top 4 along with their guides on translating custom fields with ACF.
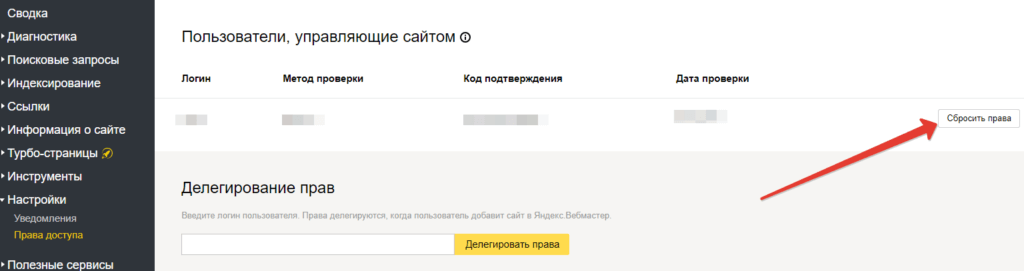
1: WPML
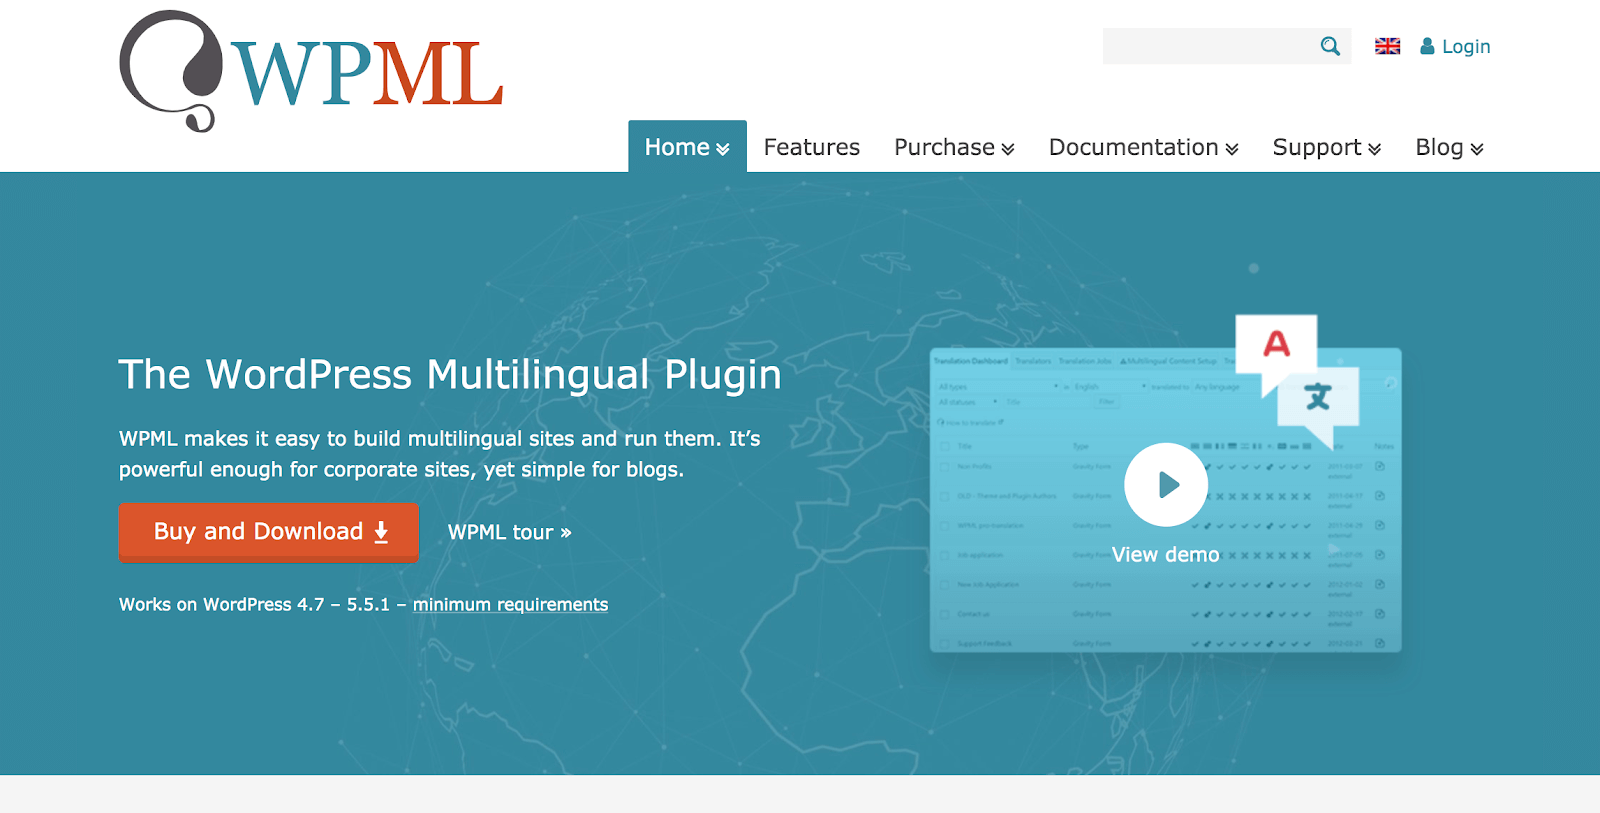
WPML is what you could call the original translation plugin. With the company founded in 2007 and with WPML now powering over 1 million websites, you’re in good hands.
Even better? Translating ACF with WPML is quick and straightforward; check out the in-depth guide here.
But how much does it cost? Starting from $29 and going up to $159 depending on the package you choose. At the time of publishing there’s no free option.
2: Polylang

Polylang is another powerhouse translation plugin that now boasts over 500,000 active users. A freemium plugin by nature — the ACF integration requires Polylang Pro.
While the translation process is straightforward, there is one caveat. Currently, their integration only works for posts and pages and does not work for options pages.
Although there is an additional plugin contributed by BeAPI that does translate the options pages using Polylang Pro.
Pricing wise? Polylang Pro comes in at €99 for a single site license, climbing to €495 for a 25 site license pack.
3: TranslatePress

TranslatePress is more unique in the plugin translation world, focusing more on an easy to use front-end interface; it’s one of the most user-friendly translation plugins on the market.
Making good use of the WordPress customizer to manage and edit front-end translations, and content it also comes with both automatic and manual translations.
Meaning if you don’t know the language you can let the plugin run with it and translate for you. Should you? Most probably not if you don’t have anyone to look over it. However, it’s still a nifty feature.
Translating ACF with TranslatePress is a painless process, and they have an easy to follow guide you can check out here.
Pricing? Coming in at €79 for a single site license without all the add-ons and climbing to €179 for the most expensive license.
4: WeGlot
WeGlot is one of the newest translation plugins to market. Unlike every other tool we mention here, it’s a SaaS-based application that offers a WordPress plugin for translation along with support for other platforms such as Shopify.
The main unique selling point is its automated translation ability and the ability to translate any content (if it’s on your website WeGlot can translate it). Automated translations can be updated manually if you don’t feel they are word for word perfect.
Translating with WeGlot is a breeze and everything is done from the WeGlot website making management simple.
You can find a quick guide on translating Advanced Custom Fields with WeGlot here.
Pricing wise? WeGlot charges on a word count and language count. 1 language and 10,000 words will cost you €99/yr climbing to €1,990/yr for a million words and 10 languages.
Getting started
If you are already familiar with the above function, object and filter you may skip this section.
The WP_Query object is used to query posts and will return an object containing an array of $post objects and many useful methods.
The get_posts function makes use of the above WP_Query object, however, it only returns an array of $post objects making it a simpler way to find and loop over posts.
The pre_get_post filter is called after the query object is created, but before the actual query is run.
Example
This example demonstrates how to query all posts and display them in a list. Please note the functions and are used to allow functions such as and to work as expected.
Типы файлов ACF
Ассоциация основного файла ACF
.ACF
| Формат файла: | .acf |
| Тип файла: | Steam Application Cache File |
Cache file generated for the purpose of a game downloading using Valve Steam, a software package used for downloading games.
| Создатель: | Valve |
| Категория файла: | Файлы игр |
| Ключ реестра: | HKEY_CLASSES_ROOT\.acf |
Программные обеспечения, открывающие Steam Application Cache File:
Valve Steam, разработчик — Valve
Совместимый с:
| Windows | |
| Windows Phone |
| iOS |
| Android |
| Linux |
Ассоциации других файлов ACF
.ACF
| Формат файла: | .acf |
| Тип файла: | X-Plane Aircraft File |
Файл данных, связанный с X-Plane, реалистичным симулятором полета для пилотов и тренажерных любителей.
| Создатель: | Interscape |
| Категория файла: | Файлы данных |
Программы, открывающие файлы X-Plane Aircraft File :
X-Plane, разработчик — Interscape
Совместимый с:
| Windows |
| Mac |
| Linux |
.ACF
| Формат файла: | .acf |
| Тип файла: | Agent Character Data File |
ACF файлы содержат символьные данные, которые могут быть загружены по протоколу HTTP (или Web). Он aved вместе с соответствующим ACA-файл, который содержит данные анимации для персонажа.
| Создатель: | Microsoft Corporation |
| Категория файла: | Файлы данных |
Программы, открывающие файлы Agent Character Data File :
Microsoft Agent, разработчик — Microsoft Corporation
Совместимый с:
| Windows |
.ACF
| Формат файла: | .acf |
| Тип файла: | Adobe Photoshop Custom Filter File |
ACF файл хранит пользовательский фильтр, связанный с Adobe Photoshop для редактирования фотографий и программное обеспечение для управления фотографиями.
| Создатель: | Adobe Systems Incorporated |
| Категория файла: | Файлы настроек |
Программы, открывающие файлы Adobe Photoshop Custom Filter File :
Adobe Photoshop CC, разработчик — Adobe Systems Incorporated
Совместимый с:
| Windows |
| Mac |
More Ways to Tidy Up
Beyond using specific fields to keep things looking neat, ACF has some other built-in features that can help:
Conditional Logic
ACF fields can use conditional logic to determine which fields should (or shouldn’t) be displayed at a given time. The most common example of this is providing a user with fields that let them make choices (radio, checkbox, select, true/false). Affected fields are displayed or hidden based on that data.
What’s great about using conditional logic is that it keeps fields hidden until they are needed. It’s an easy way to reduce clutter.
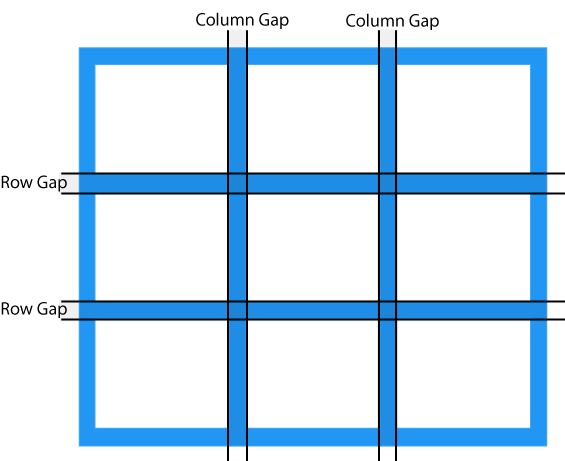
Width
Each field also contains a width setting (introduced in version 5) allowing to to place multiple fields next to each other. This is a great way to optimize the size of your form by reducing it’s overall height. Just remember that when customizing your field’s width, each row should add up to 100% (2 x fields @ 50% = 100%).
The cost of a one-time purchase
Selling a WordPress plugin under the “one-time” purchase model has its pros and cons. For the most part, this model offers a lot of positives, especially for new and emerging software trying to stand out in a busy marketplace.
Our customers often say that “ACF is a bargain” which in turn generates great publicity and helps to drive new sales. Considering that “word of mouth” is our primary marketing strategy, this model has helped grow ACF to where it is today! However, growth comes with a cost.
Over the past 4 years, license sales for ACF PRO have steadily and consistently increased at a rate of around 10% per year. This is both a cause for celebration and also a cause for concern .
See, although our sales are going up a bit, the number of customers relying on our service are going up a lot! Take a look at the following graph to illustrate this point.

With growing users comes growing costs. Things like support, documentation, website hosting, license management, education and community participation are all part of a bigger picture that we value – aka, the whole service.
Switching to a subscription-based model will allow us to better invest in these areas and provide a quality service that grows with its users. And without further ado, our upcoming pricing model!
Отображение значений полей
Чтобы вывести значения полей, нужно отредактировать код шаблона вывода архивной страницы таксономии, к примеру для Рубрик это category.php, для меток — tag.php или же общий шаблон taxonomy.php/archive.php. В зависимости от вашей темы, вы также можете использовать фильтры или части шаблона для кастомизации.
Чтобы легко определить, какой файл редактировать, прочитайте статью Иерархия файлов темы (шаблона).
Настройка HTML-кода для таксономии WordPress может быть легко выполнена путем редактирования файла category.php, tag.php или taxonomy.php в вашей теме. В зависимости от вашей темы вы также можете использовать шаблонные части или фильтры для настройки HTML.
В нашем случае мы произвольные поля добавили к Рубрикам, поэтому мы будем редактировать файл , используя тему Twenty Seventeen. В этом шаблоне мы выведем картинку для рубрики сразу после шапки сайта виде бэкграунда и зададим цвет заголовков у постов.
<?php
/**
 * Шаблон вывода архивной страницы Рубрики
 *
 * @link https://wp-kama.ru/id_7654/ierarhiya-fajlov-temy-shablona.html
 *
 * @package WordPress
 * @subpackage Twenty_Seventeen
 * @since 1.0
 * @version 1.0
 */

get_header();

// Получаем данные текущего термина (рубрики)
$term = get_queried_object();

// Получаем значения произвольных полей
$image = get_field('image', $term);
$color = get_field('color', $term);

?>
<style type="text/css">

	.entry-title a {
		color: <?php echo $color; ?>;
	}

	<?php if( $image ): ?>
	.site-header {
		background-image: url(<?php echo $image; ?>);
	}
	<?php endif; ?>

</style>
<div class="wrap">

	<?php // Далее идёт оставшийся код шаблона ?>
В итоге получим следующий результат:

Simplify your Fields ?
When it comes to choosing which fields to use, a little creative thinking can result in a more efficient use of space and resources. Because, while our first instinct may be to implement lots of separate fields, we can often find ways to accomplish the same goal by using less.
This less is more approach can be shown in our Home Slider example. Let’s imagine the client requires text over each image (title, sub title and excerpt). On first glance, we could set this up by creating three fields – 2 text and 1 text area. While it would certainly work in terms of functionality, it might not be the best solution. This arrangement could be a bit visually awkward, restricts the customization of content and doesn’t necessarily provide the most intuitive interface for users.

Taking that into consideration, we might choose instead to combine these fields into a single WYSIWYG field. ACF allows us to hide the Visual/Text tabs and turn off media uploads – so we won’t have to worry about our client going too far with things . Using the Default Value field setting, we can also place sample content into the field so that all our client has to do is replace it. The result is something that makes more visual sense for users while still providing the functionality we need.

Описание
The Table Field Plugin enhances the functionality of the «Advanced Custom Fields» plugin with easy-to-edit tables.
This plugin requires the «Advanced Custom Fields» plugin or the Pro version!
The table field works also with the repeater and flexible field types and supports the ACF Blocks for Gutenberg
Features
- Table Header (Option)
- Table Caption (Option)
- Support for ACF Gutenberg blocks
- Add and remove table columns and rows
- Change order of columns and rows by dragging
- To move to the next cells editor press key: tab
- To move to the previous cells editor press key: shift + tab
- English — default, always included
- German: Deutsch — immer dabei!
- Danish: Dansk — altid der!
- Polish: Polski — zawsze tam jest!
A Clean UI Makes for Happy Users
When we talk about creating a clean UI, we often think about front end design. But it’s just as important on the back end. Part of the reason we use custom fields is to make the process of adding and editing content easier. So the better we can organize our fields, the more efficiency we add to the process.
Just as visitors to your website will appreciate clearly-labeled visual cues, those in charge of maintaining content will feel just as giddy about a clean set of fields inside of WordPress.
ACF’s layout fields make it incredibly easy to organize fields in a way that makes sense for your site. It only takes a few short moments to set up and is time well spent.
Reviews
http-equiv=»Content-Type» content=»text/html;charset=UTF-8″>lass=»plugin-reviews»>
We needed a custom table with dynamic content that had an easy-to-use interface for our client. What better way than with an actual table on the backend with user-editable rows. This also made pulling in data a breeze, even for the complexity we had with the tables.
Works great with Twig and other ACF content within the table rows itself.
This plugin handles a classic, seemingly simple, but surprisingly (or possibly annoyingly) complex development task of entering a table of data, very smoothly (in my experience).
Additionally, I encountered a bug in one of the most recent version, while implementing ACF Blocks using the ACF Table Field Plugin, and the Developer not only replied, but had a fix within 24hrs. While, I’m sure other bugs might take a longer time to resolve, I’m grateful for the quick response and turn around in my experience.
Thank you!
This plugin is a fantastic solution for tables using ACF. I used this and I was shocked with how it works brilliantly. A huge thank you for the authors of this masterpiece.
Thank you Johann. This is awesome, exactly what we needed!
Just wonderful, want to say thank you!
Works straight out of the box. Configuration sits very well with ACF natively. Very impressive with an input type not native to HTML. Great job!
Filters
Filters are called at specific times to allow for customisation. Below is a list of available JS filters that you can hook into using the function.
validation_complete
This filter allows the validation JSON response to be customized. Called after AJAX validation is complete but before errors are shown or the form is submitted.
wysiwyg_tinymce_settings
This filter allows the tinyMCE settings to be customized for each WYSIWYG field. Called before the tinyMCE instance is created.
This filter allows the quicktags settings to be customized for each WYSIWYG field. Called before the text instance is created.
date_picker_args
This filter allows the date picker settings to be customized for each date picker field. Called before the date picker instance is created. A full list of settings can be found here: https://api.jqueryui.com/datepicker/
date_time_picker_args
This filter allows the date time picker settings to be customized for each date time picker field. Called before the date time picker instance is created. A full list of settings can be found here: http://trentrichardson.com/examples/timepicker/
time_picker_args
This filter allows the time picker settings to be customized for each time picker field. Called before the time picker instance is created. A full list of settings can be found here: http://trentrichardson.com/examples/timepicker/
google_map_args
This filter allows the google maps settings to be customized for each google maps field. Called before the map instance is created.
google_map_marker_args
This filter allows the google maps marker settings to be customized for each google maps field. Called before the map instance is created.
google_map_result
This filter allows the google maps field value to be modified after an API request has been made and a result has been returned.
select2_args
This filter allows the select2 settings to be customized for each select field before the select2 instance is created.
color_picker_args
This filter allows the color picker (wpColorPicker) settings to be customized for each color picker field. This filter is called before the wpColorPicker instance is created. Added in v 5.3.6
Pre-purchase Questions
ACF comes in two versions: free and PRO. The free version is fully featured, and contains most of the types of fields you’re likely to need while building an average website.
If you’d really like to level up, and gain access to more complex and feature rich field types such as Blocks, Galleries, Repeaters, Flexible Content Layouts, and Clones, you’ll need to purchase the PRO version.
ACF PRO licenses are available for purchase as yearly subscriptions. Prices shown are in USD excluding any taxes which may be added during checkout depending on your billing location. For available pricing, please see our PRO page.
Yes. Licenses are renewed automatically each year to give you continued access to updates. You may also opt-out from auto renewals in favour of manual control from you online account.
You can safely purchase ACF PRO with your credit card through Stripe’s secure payment gateway.
ACF is registered for GST in Australia and VAT in Europe. Your tax will be calculated at checkout.
If you require a ‘Tax residency certificate’ we have one available, please contact support.
Your purchase provides you access to your own store account page on our site. From here you can:
- Download the latest version of ACF PRO (and access previous versions too).
- View and upgrade your license keys.
- View and manage your license activations.
- View and print invoices for all your orders.
- Manage your contact and billing details.
- View and create support tickets.
Your ACF PRO download is always available at your store account page on our site.
ACF PRO has been built with WordPress best practices in mind. We have designed the plugin to be as efficient and unobtrusive as possible, to allow you to build great websites without getting in your way.
But, with over 50,000 plugins available in the WordPress directory, and probably at least as many themes available, some conflicts may arise. In the unusual circumstance that such an issue occurs, we will always do our utmost to try and resolve those conflicts through our friendly support folks.
We are fanatical about support, and want you to get the best out of your website with ACF. If you run into any difficulties, there are several places you can find help:
- Our extensive documentation contains references and guides for most situations you may encounter
- We have an active and friendly community on our Community Forums who may be able to help you figure out the ‘how-tos’ of the ACF world.
- The support professionals on our Help Desk will assist with your more in depth, technical challenges
- The WordPress professionals at Codeable can provide coding support if you’re starting to feel out of your depth.
Find out more about our support .
We really want you to be happy with your purchase, and we’ll try really hard to make that happen. But, if for any reason you’re not completely happy, we do offer a 30 day money back guarantee. Please get in touch.
Что такое кастомные поля. Что с их помощью можно делать.
Кастомные (Произвольные) поля позволяют добавлять, хранить и выводить дополнительную информацию о вашем контенте.
Например, WooCommerce использует свои собственные кастомные поля для хранения дополнительной информации о Товарах:
- Цена
- Вес
- Цвет
- Размер
Если вы пользуетесь плагином событий, эти плагины используют кастомные поля для вывода информации:
- Место события
- Дата / Время начала
- Цена
Для сайта с недвижимостью вы можете выводить поля с типом недвижимости, аренда или продажа, количеством комнат, метраж, и так далее.
Для сайта о фильмах вы можете выводить информацию о режиссёре, студии, продолжительности, жанре фильма, и так далее.
Еще одна область применения плагина Advanced Custom Fields — на сайтах клиентов.
Например, вы сделали сайт, где на главной странице находится слайдер с несколькими строками текста.
Через некоторое время клиент хочет изменить текст в слайдере на какой-то другой. Чтобы он мог это сделать без вашей помощи, вы можете использовать кастомные поля.
 Пример Банера / Слайдера на Главной
Добавьте кастомные текстовые поля в админку Главной страницы, а вывод полей — на слайдере. Тогда клиент может изменить текст на слайдере в бэк-энде сайта без использования пейдж-билдера. И нажать на кнопку Обновить.
Или, например, изменить цвет шрифта или фон секции.
В бесплатной версии ACF вы можете использовать такие типы кастомных полей:
Основное
- Текст
- Область текста
- Число
- Диапазон
- Ссылка
- Пароль
Выбор
- Выбор (select)
- Флажок (checkbox)
- Переключатель (radio)
- Группа кнопок
- Да / Нет
Отношение
- Ссылка
- Объект записи
- Ссылка на страницу
- Записи
- Таксономия
- Пользователь
jQuery
- Расположение на карте
- Дата
- Дата и время
- Время
- Цвет
Блок
- Сообщение
- Аккордеон
- Вкладка
- Группа
Как вывести поля Advanced Custom Fields
Вы узнали, как добавлять информацию в Произвольные поля, как связывать поля с типом контента на сайте и сохранять информацию в базу данных.
Если сейчас вы заполните поля в бэк-энде, сохраните страницу и перейдете во фронт-энд, то поля не будут отображаться.
Существует 3 способа вывести поля в ACF:
- . Этот способ требует технических знаний, но считается лучшим.
- . Очень простой способ и используется, когда вы хотите поместить кастомные поля только в нескольких местах.
- . Аналог первого способа, но без необходимости работать с PHP.
Как добавить Кастомные поля в файлы темы
Первый способ выводить поля ACF — добавить PHP функции Advanced Custom Fields в файлы шаблонов дочерней темы.
Этот способ предполагает работу с файлами темы, но гарантирует, что поля ACF будут всегда выводиться в одном и том же месте.
Например, если вы хотите добавить вывод полей ACF на всех страницах блога, вам нужно редактировать файл single.php.
В вашей теме это может быть другой файл, например, в теме TwentyNineteen этот файл называется content-single.php.
После того, как вы нашли файл шаблона страницы, добавьте в нужное место файла функцию ACF the_field() для вывода нужного поля. Подробнее о функции the_field().
В общем виде функция выглядит так:
Имена полей можно посмотреть здесь:
 Имена полей ACF
по функциям Advanced Custom Fields.
Как выводить Кастомные поля с помощью шорткода
Выводить поля ACF с помощью шорткода проще. Если у вас всего несколько мест / страниц, где вы хотите выводить кастомные поля, это простой и удобный способ.
Если вам нужно выводить поля на многих страницах, то придется везде добавлять шорткоды вручную. В этом минус этого способа.
Шорткод для вывода полей ACF:
Например, такой шорткод выводит поле Название Курса:
Если вы используете Родительские и Дочерние поля, вам нужно указать оба шорткода:
То есть, если вы использовали поле Вкладка, а в нем дочернее поле Название Курса, то шорткод должен быть такой:
Как выводить Кастомные поля с помощью Elementor Pro
Elementor — один из самых популярных конструкторов страниц. Он позволяет создавать страницы просто перетаскивая виджеты.
С помощью Elementor Pro вы можете создавать шаблоны страниц, включая добавление в них кастомных полей Advanced Custom Fields.
По сути это визуальный редактор первого способа, который позволяет вам редактировать файлы шаблонов без работы с кодом.
В этом примере вы добавляете поля на странице Advanced Custom Fields. Откройте страницу в Элементоре и добавьте виджеты для вывода кастомных полей.
Чтобы выводить Изображение, сделайте так:
 Вывод изображения ACF в Elementor Pro
Остальные поля выводятся аналогично.
Если вы хотите выводить поля, например, на всех страницах Блога, вам нужно редактировать шаблон страницы.
 Elementor — Конструктор темы — Одиночная
Создайте или загрузите нужный шаблон страницы и добавьте в него вывод ACF полей в нужном месте.